
Context
Ensuring data quality in Jira is essential to both smooth ticket resolution and reporting. Select lists allow you to guide users in their choices, yet manually updating the list options in Jira can turn into an admin nightmare if changes occur too frequently.
If you don’t have an easily accessible external datasource where you store and update lists values, but still want to benefit from dynamic select lists, you can use Elements Connect to fetch data from Jira. You can use a dedicated project with the Jira issues serving as your list of options. This list of options can then be managed by carefully chosen power users, who will create tickets in this dedicated project.
There are a number of use-cases for which one would benefit from delegating select list options management to business users. It can be useful in classic ITSM use cases from Incident management to Service Catalog management where these services are usually taken in charge by specific business users who could also managed the catalog on Jira on their own, and thus free time for the Jira admin.
Also by giving access to a precise list of options, wherever it's a list of services or products, Jira users can easily select the one they need for notifying an incident or requesting a new service.
In this tutorial, we'll examine how to create a dynamic select list in Jira without the hassle of maintaining an external datasource in the ITSM context of managing incidents on CMDB assets.
The need: Delegating select list options configuration to business users
Let's imagine your company uses Jira to manage all IT services, including IT Support and assets (such as the products available).
This catalog of products should be accessible in Jira issues as a select list of options for final users in order to help them choose a product easily and get direct information on it.
However, you don't have an easily accessible external datasource where to store and update product data and, as Jira admin, you would like to delegate the select list options management to chosen users.
The final goal would be:
-
for Jira admins, to delegate some configuration to chosen business users, in this case the management of the product catalog.
-
for those power users, to manage directly inside Jira the list of product options as well as all information about each product, and be able to update it.
-
for final users, to be guided through the creation of Jira issues linked to specific products by being able to choose directly in the issue the associated product from a drop-down select list. Also, once the product is selected, additional information on it should be displayed in the issue.
Solution: Setting up your list of options in a dedicated project as Jira issues’ fields
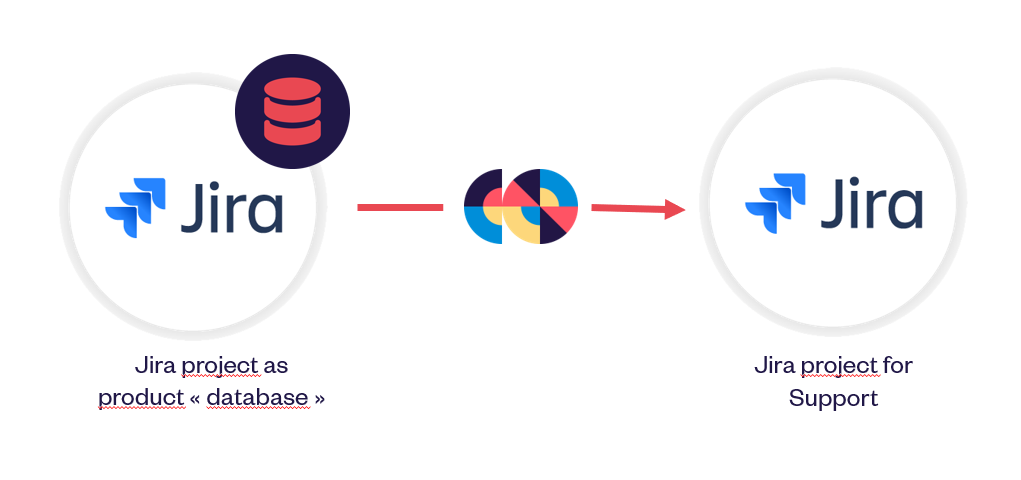
As you don't have access to an external datasource, you can store your product data in a dedicated Jira project and use it as your "database" or product catalog.
This project will gather products as issues with their technical details inside custom fields.
This way, you can use Elements Connect to fetch product data from Jira and display a list of all products in a drop down select list available at the support request creation. An additional read-only field will be populated with technical details on the selected product.
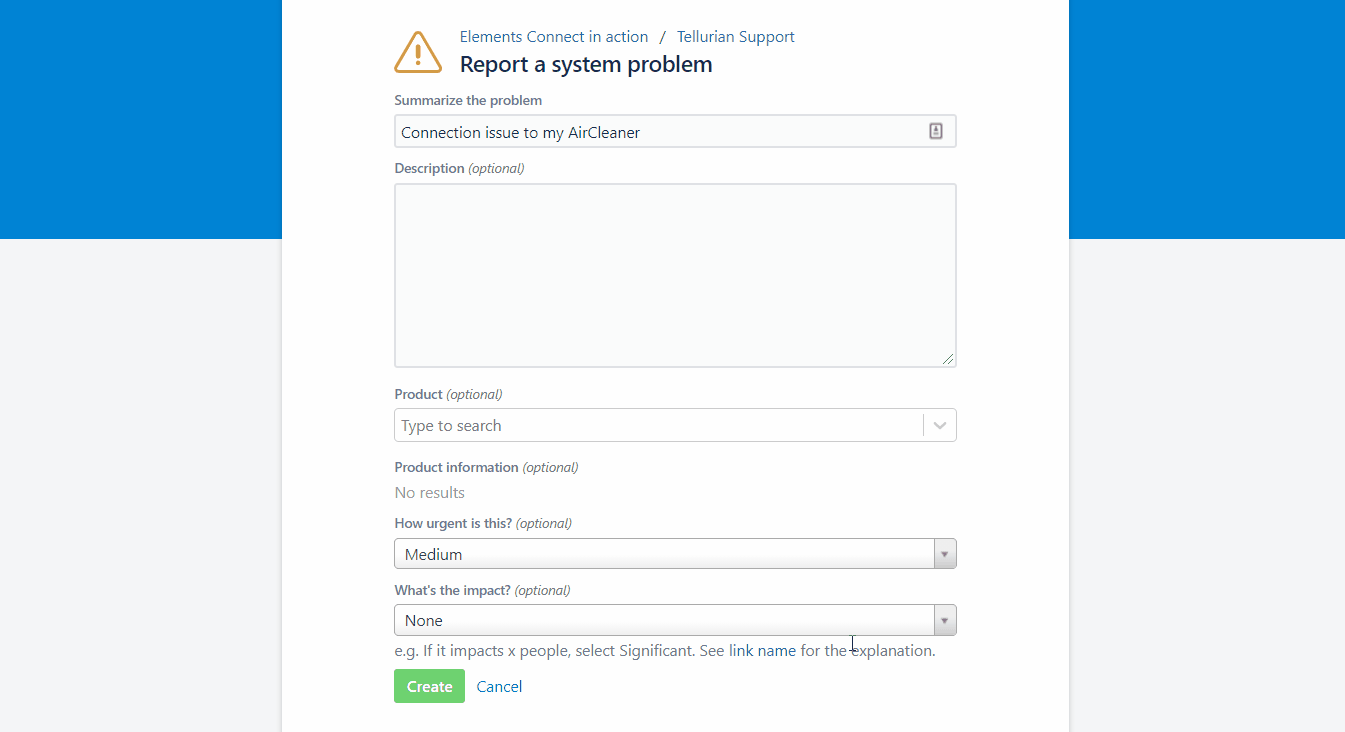
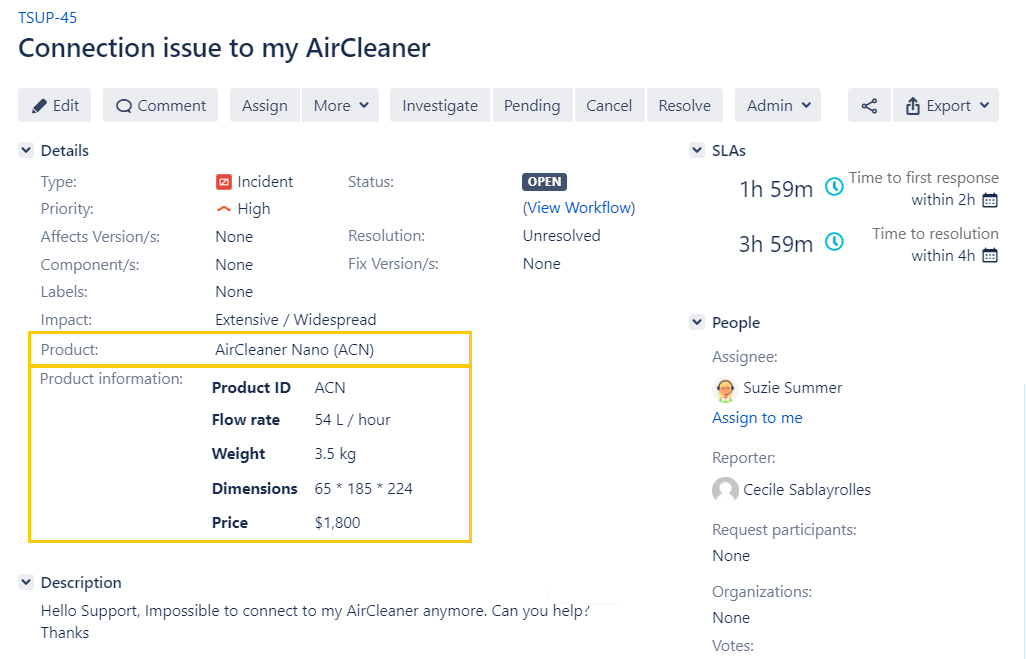
On the user side, once a incident is noticed on a product, they open a new ticket on Jira: in this ticket, they can select easily the product impacted from the select list populated by Elements Connect with all Product names. The dependent read-only field will display all technical details on the selected product.
Configuration guide: How to pull data from a Jira project into a select list
-
Pre-requisite: Create the "database" Jira project + the custom fields to store the "assets" attributes
-
Step 1: Connect to the Jira JQL datasource (available by default in Elements Connect) to retrieve your product data from this project
-
Step 2: Create the Elements Connect fields to display on your bug issues
-
Step 3: Add these fields to your issue screens
Pre-requisite: create the "database" Jira project
In this tutorial, we created a dedicated Jira project as our "Product database" gathering all information on our products.
In this project, one issue per product is created and filled with data on this product in custom fields (weight, dimensions, price, etc):

Drawing a parallel with a database
|
Database |
Jira project |
Current Example |
|---|---|---|
|
Database |
1 Jira project |
"Product DB" |
|
Table |
1 Issue type |
"Product" issue type |
|
Row |
1 Issue |
Products as issues: "AirCleaner Nano", "WaterCleaner Nano", etc |
|
Column |
1 custom field |
Custom fields "Flow rate", "Weight", "Price", etc |
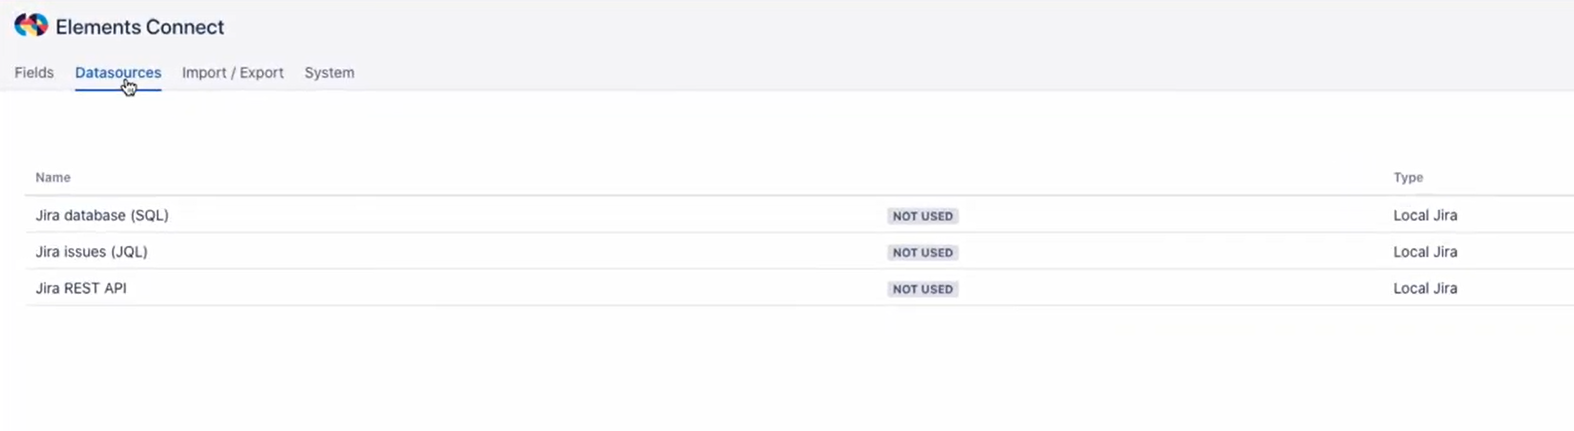
Step 1: connect to the Jira JQL datasource
This tutorial uses the Jira Issues (JQL) datasource. As this datasource is already preconfigured in the Elements Connect administration, there is no configuration required and you can use it right away.
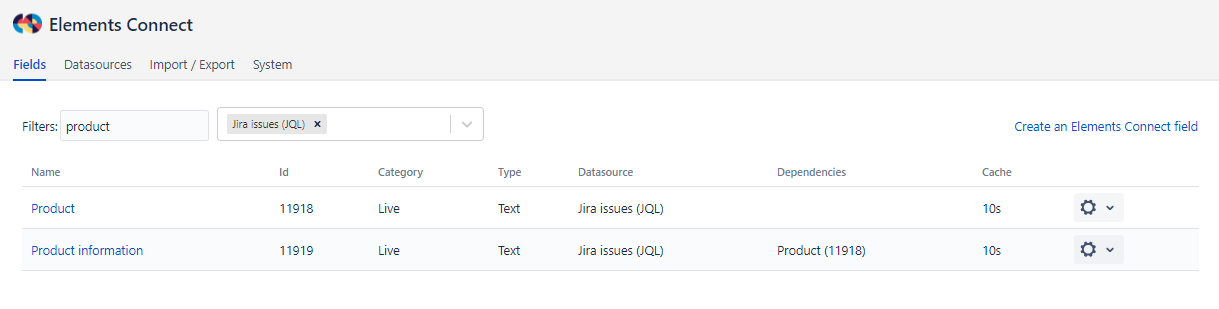
Step 2: create Elements Connect fields
The field configuration files from this tutorial example are available for download below. You can reuse them by importing them in your Elements Connect administration and adapting the configuration to your needs and your instance specificities (project names, custom fields, etc).
Download the fields configuration:
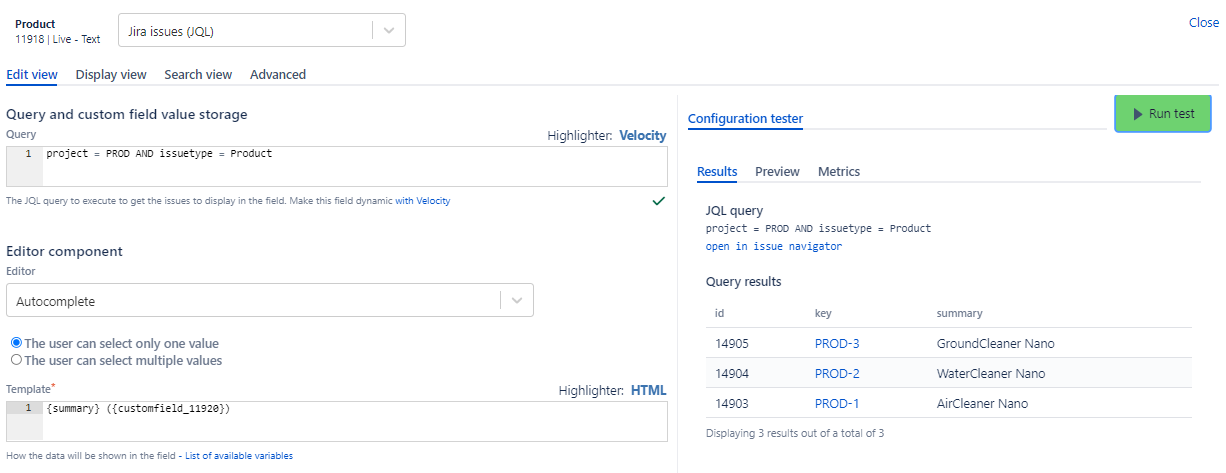
First field: Product picker
-
Download the field configuration: Product_export.json
-
From Elements Connect administration, create an Elements Connect field of type Live Text
-
Click on the field name to configure it and select the third option: "Import an external configuration"
-
On the next screen, select the "Jira issues (JQL)" datasource and upload the JSON file
-
Click on "Import"and that's it! The field is now configured. You can adapt the query and template to your needs.
-
Click the "Save" button, the field can now be used from an issue.
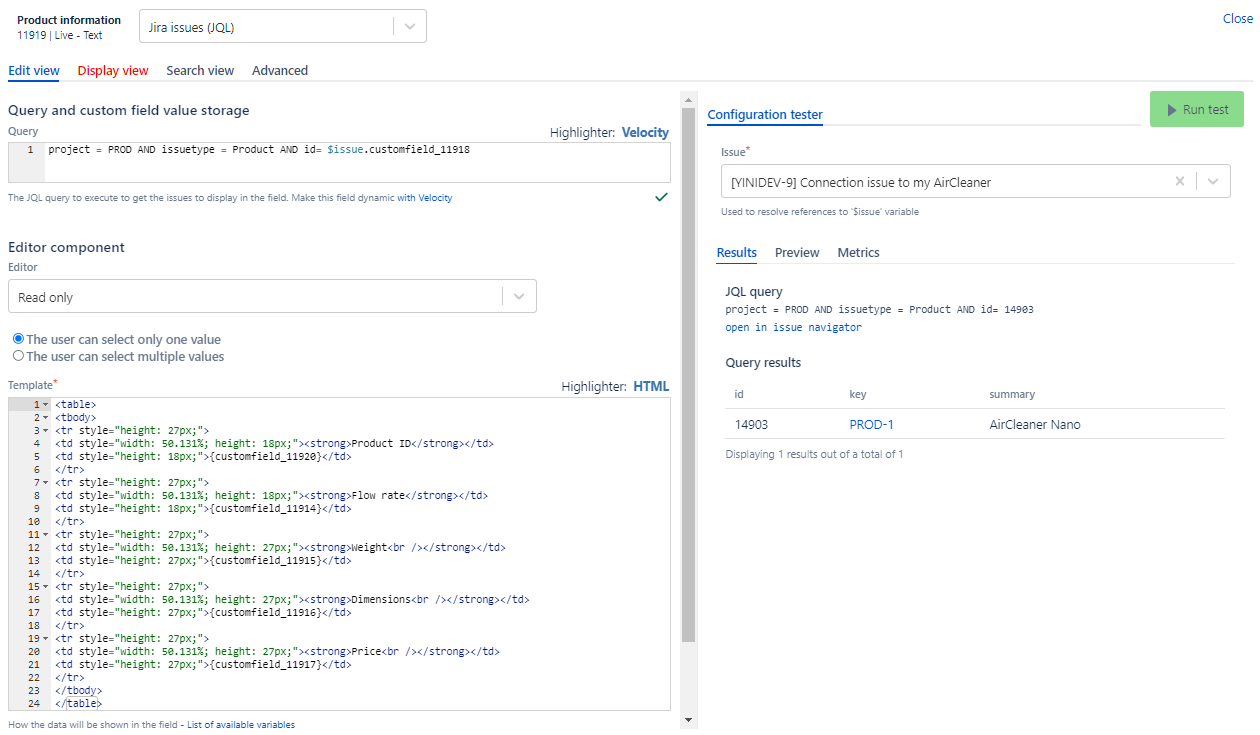
Dependent field: Product information
-
Download the field configuration: Product_information_export.json
-
Following the same process as for the first field, import this configuration into a new Elements Connect field of type Live Text.
-
Update the query by replacing '11918' with the ID of the Elements Connect field you've created in the previous step. It will keep the dependency between these 2 fields.
-
Save.
Step 3: add these fields to your issue screens
Last step is to add these fields to the aimed issue screens. In this tutorial we add them to the issues of type "incident" in our Support project.
>> Learn how to add Elements Connect fields to Jira issue screens
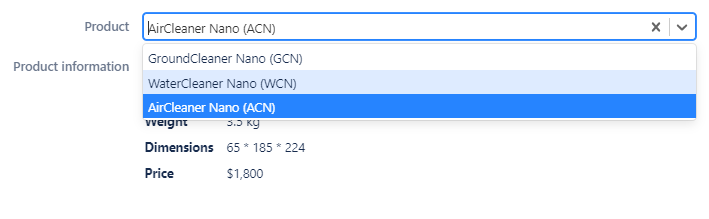
Now at the creation of a new incident in the Support Project, the product can be selected in the "Product" field and the dependent field "Product information" is automatically populated with data on the selected product.
Using Jira as a custom CMDB allows Jira admins to delegate select list options management to business users. This is a easy-to-implement solution when you don’t have an easily accessible external datasource: by setting up your list of options in a dedicated project as Jira issues' fields and using Elements Connect to fetch this list, you can guide users in their choices and provide the right up-to-date information at the right place.
Next step?
Want to go further and automatically set the value of an Elements Connect field? Check out this tutorial.