Get user information from Azure AD into Jira issues
Table of contents
The need: provide support teams with additional information about users coming from Azure Active Directory (Azure AD)
When customers raise requests through a Jira Service Management portal, support agents need to have additional information about the reporter in order to be able to process them, such as:
First name and last name
Job title
E-mail address
Phone number
Staff ID
Organization
Department
Manager
This information should be readily available to support agents in Jira, avoiding them the pain to keep looking up missing information in external systems and maximizing process efficiency.
Customers should not have to manually provide this information as this is time-consuming and prone to error. Such information should be dynamically retrieved from an external user directory and displayed to support agents only to ease up ticket processing.
Looking to do this on Jira Cloud? Check out the Elements Connect Cloud tutorial.
Solution: Display Azure AD user details in a read-only Jira custom field
We use Elements Connect to populate Jira custom fields with information coming from Azure AD
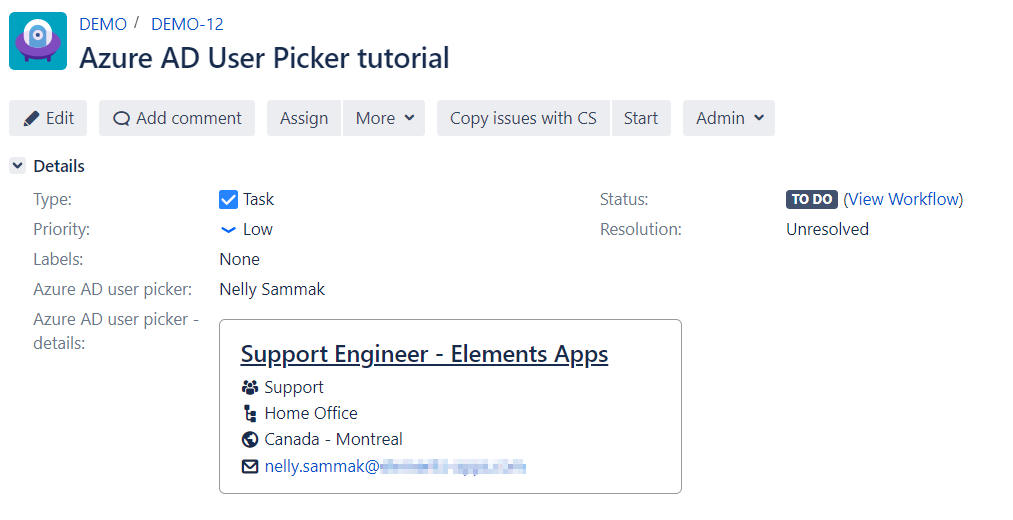
Here, as example, we want to get more information on a user stored in Azure AD. Once the user selected, a custom field is automatically populated with additional details like title, email, phone, etc.
Configuration guide: how to populate Jira custom fields with Azure AD user data
Step 1: connect to the Azure AD datasource
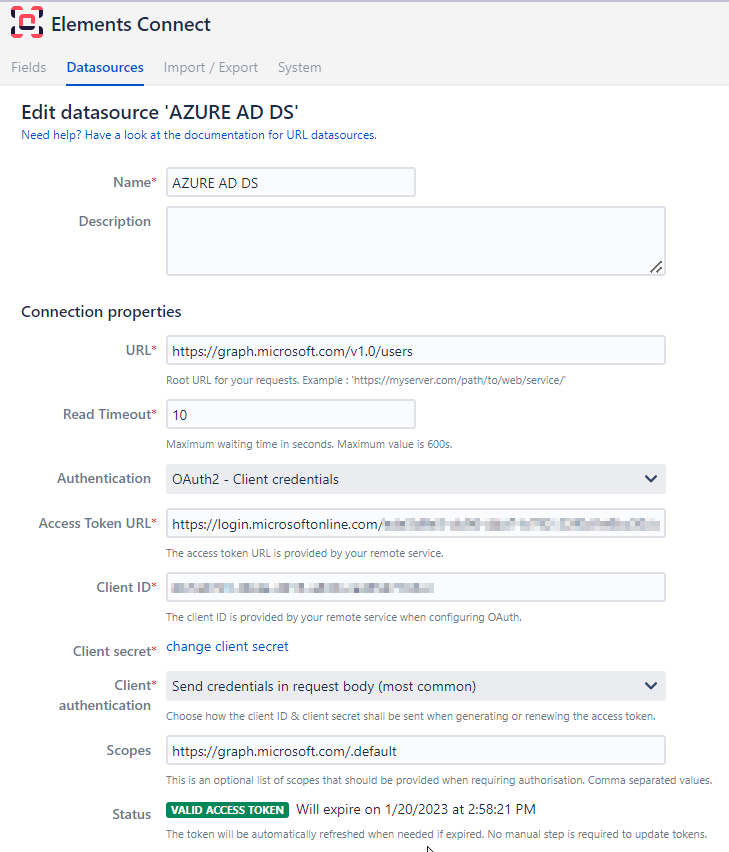
In this demo, fields are connected to an Azure AD datasource. Learn how to configure the connection to an Azure AD datasource using OAuth2.
Once the datasource is configured, you should get something like the below in your datasource configuration:
Step 2: create Elements Connect fields
The fields configuration files for this example are available for download below. You can reuse them by importing them in your Elements Connect administration and adapting the configuration to your needs.
You will need to create 2 fields:
- Field 1: lists all users stored in Azure AD and select a user.
- Field 2: displays detailed information about the user selected in Field 1.
Download the fields configurations:
| Name | Version | Published |
|---|---|---|
| Azure_AD_user_picker_-_details_export.json | 1 | 2023-02-06 15:23 |
| Azure_AD_user_picker_export.json | 1 | 2023-02-06 15:23 |
Import them in your Elements Connect administration following the step-by-step guide: How to import Elements Connect field configuration files and don't forget to update fields ID to keep the dependency between these fields.
![]() You can configure the first field that will list all users from Azure AD as a Live User field (created as Live Text in this tutorial) but in that case make sure that the field Key corresponds to the username of an active Jira user (in other words, the selected user should be an active Jira user in your instance)
You can configure the first field that will list all users from Azure AD as a Live User field (created as Live Text in this tutorial) but in that case make sure that the field Key corresponds to the username of an active Jira user (in other words, the selected user should be an active Jira user in your instance)
When using the User endpoint of Microsoft Graph API, only a limited set of user profile attributes will be returned: businessPhones, displayName, givenName, id, jobTitle, mail, mobilePhone, officeLocation, preferredLanguage, surname, userPrincipalName.
To return other attributes, you must specify them using the OData $select query parameter.
In this example, the user has other attributes such as office location, country, city, department, and others that were used in the field configuration.
This needs to be adapted based on your Azure AD user's attributes.
Step 3: add fields to your issue screens
Last step is to add these field to the aimed issue screens.
>> Learn how to add Elements Connect fields to Jira issue screens