
Context
Automation for Jira is a great tool that allows project admins to create many rules and trigger many actions.
Thanks to Elements Publish public REST API, it is possible to benefit from the whole list of Automation rule conditions to trigger recipes. Creating Confluence pages has never been easier, be it when a comment is posted, or a field updated, or any other of the many triggers available in Automation.
Tutorial
In this example, we want to create a Confluence page from a Jira issue automatically when a comment is posted in it.
This guide explains how a recipe titled can be triggered by Automation to create a Conlfuence page from any issue where a comment is posted.
Prerequisites
A recipe called "Add to Knowledge Base" has been created and activated.
This recipe is configured to create pages in a specific Confluence space, with a specific parent page.
Configuration steps
1 - As a Jira administrator, go to the "Elements Publish" administration and click on Settings in the navigation bar.
2 - In the "Authentication" section, click on the Create API token button.
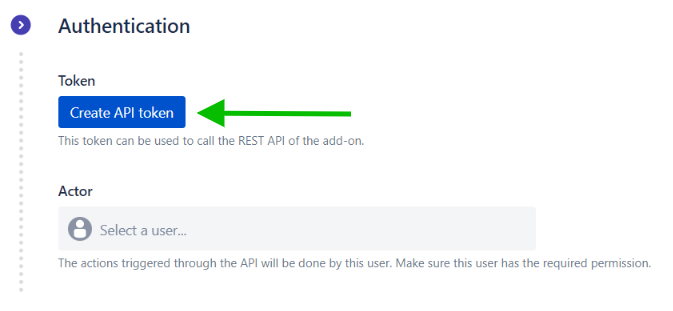
By doing so, an authentification token is generated that will allow you to call the Elements Publish API.
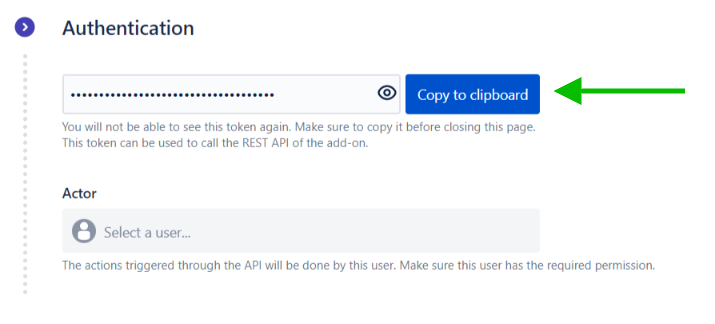
3 - Click on the Copy to clipboard button to save the token, and copy it somewhere safe.
4 - In the Actor select list, choose the Jira user that will be used to trigger the recipes via the API.
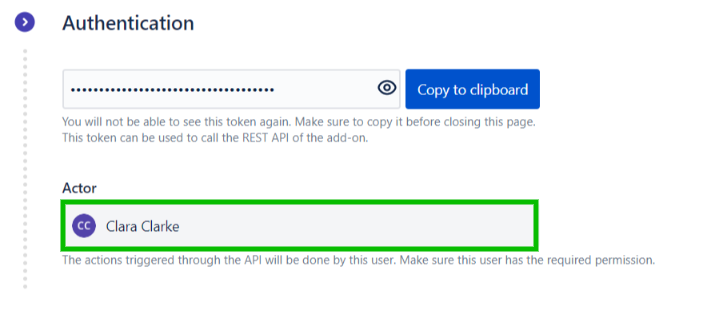
This actor is mandatory, as their permissions will be used by Jira to decide whether actions done through the API calls are authorized or not.
5 - Click on Recipes in the navigation bar
6 - In the Recipes listing page, select "Add to Knowledge Base" in the Active Recipes list.
7 - In the Recipe configuration page, click on the Triggers tab.
8 - In the Public API section, click on the Copy to clipboard option to copy the Request URL that will be used in the API call.
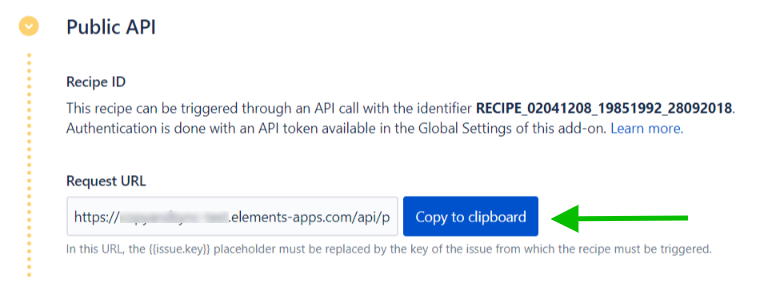
Please note that this request URL changes if you migrate your instance from one Data Residency realm to another. In this case, you need to copy it again from this step and update your Automation rule after your data have been migrated.
At this point, you have all the information you require to make calls to the Elements Publish API and to start creating Confluence pages with this recipe.
In the following steps, we will show you how to configure Automation for Jira to trigger this recipe.
9 - Open Automation on your Jira instance.
10 - Click on the Create a rule button.
11 - In the New trigger page, select the Issue commented trigger.
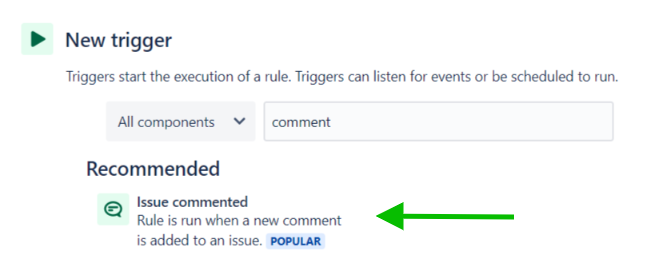
Note : This is just for this example, you can use any trigger you want.
12 - In the next screen, click on the Save button to save the trigger.
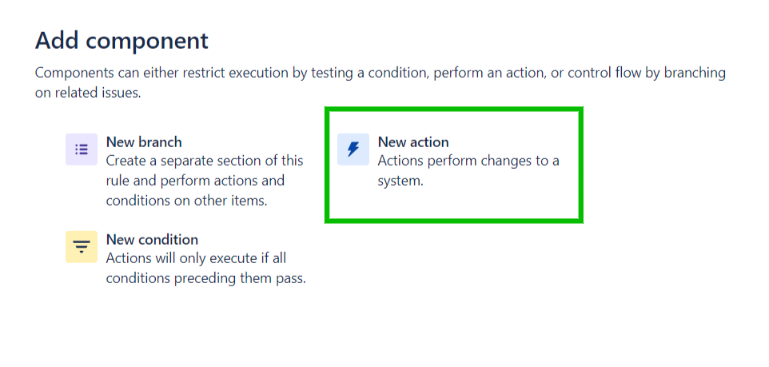
13 - In the Add component page, select New action.
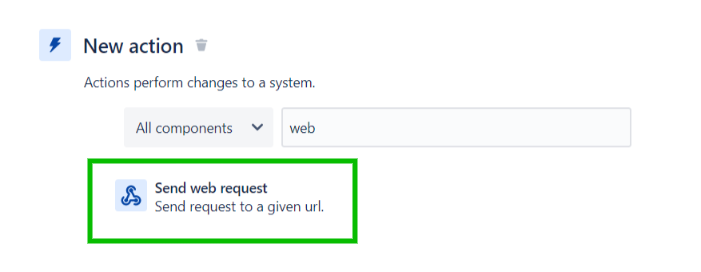
14 - In the New action page, select Send web request.
15 - In the Send web request page, two fields need to be configured:
-
First, put the Request URL copied at step 8 in the Web request URL field
-
Then, in the Headers option, add the parameter "token" and put the token created at step 3 as its value.
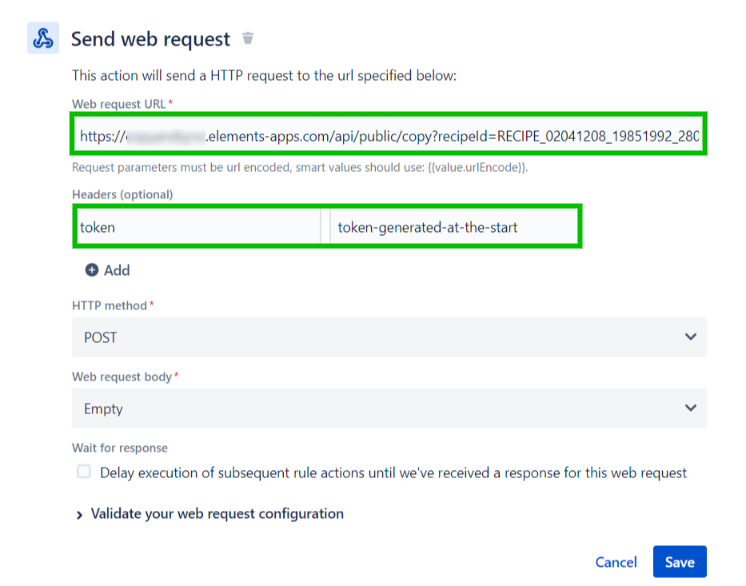
Note: at the end of the Request URL, the placeholder {{issue.key}} means that the current issue will be copied by the recipe. This placeholder can be replaced by any issue key if you wish to copy a specific issue.
16 - Click on the Save button.
17 - In the following screen, add a name to your Automation rule and click on the Turn it on button.
And you're done!
Result
With this configuration, each time a comment is posted in an issue, a Confluence page will be automatically created by the "Escalate ticket" recipe.
As you may have guess, this is not a very realistic use case, so don't hesitate to make it your own by selecting the Automation trigger you find the most valuable to your use cases.
Troubleshooting
Error 400 when option "If the page already exists: Don't publish a new page" selected in Recipe "Target" tab

If this option has been selected, the Automation rule has to process the error 400 returned by the Publish app in order to continue its execution.
Follow the steps below to ensure a coherent behavior of your Automation rule:
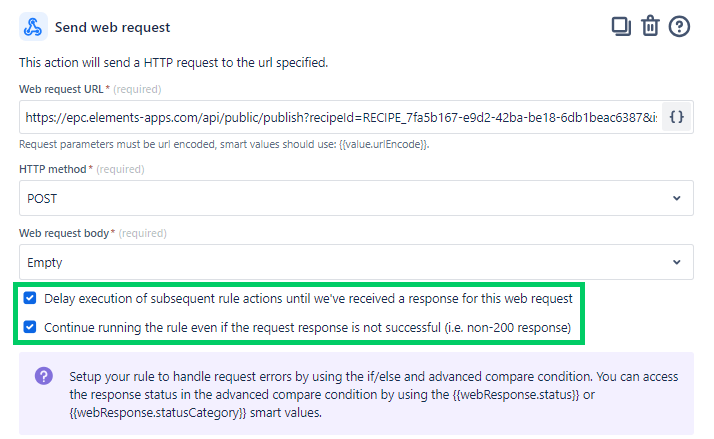
1 - In the “Send web request” action, select “Delay execution of subsequent rule actions until we've received a response for this web request”, this will also allow you to select “Continue running the rule even if the request response is not successful (i.e. non-200 response)”.
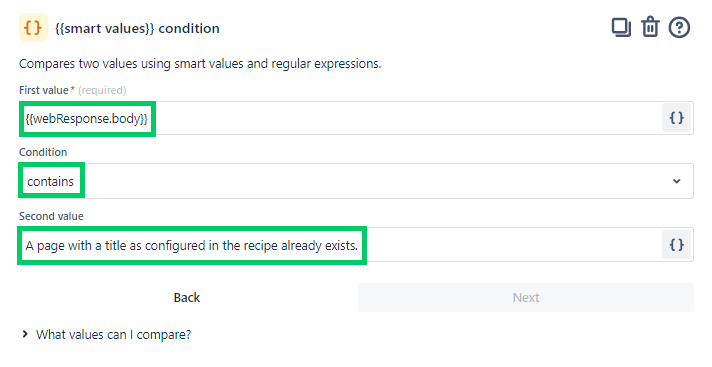
2 - After that, as explained in the purple insert above, add an IF {{smart values}} compare condition, with the following configuration:
Your Automation rule will now successfully execute until the end, and you will be able to see the WebRequest status in the audit log.
••
New to Elements Publish?
If this tutorial has stirred your imagination, why not give it a try?
• Try Elements Publish for free •