
In the Triggers configuration tab, you can find settings that let you define where, and how, your recipe can be triggered.
Trigger options
This section lets you configure where the recipe will be available in your Jira instance, as well as other options.
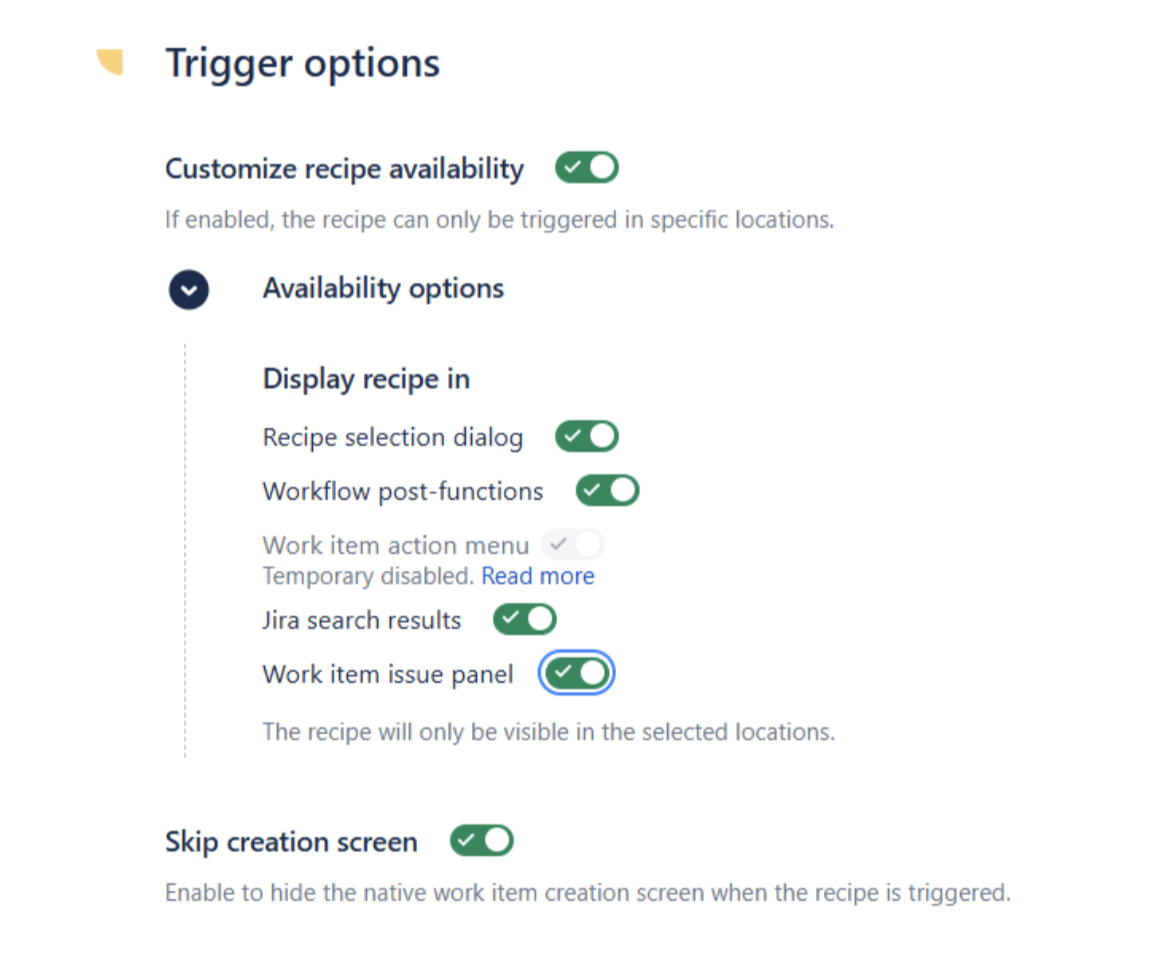
Customize recipe availability
Use this option to define precisely where a recipe will be visible on your instance.
By default, recipes can be activated manually through the action menu of a work item, or added as a post-function in a workflow transition. If this option is enabled, the "Availability options" can be set to change this default behavior to a custom one.
Availability options
-
Enable the "Recipe selection dialog" option to display the recipe in the recipe selection dialog of a work item.
-
Enable the "Workflow post-functions" option to display the recipe in the recipe select box in post-functions configuration.
-
Enable the "Jira search results" option to display the recipe in the Advanced search page and copy work items in bulk.
-
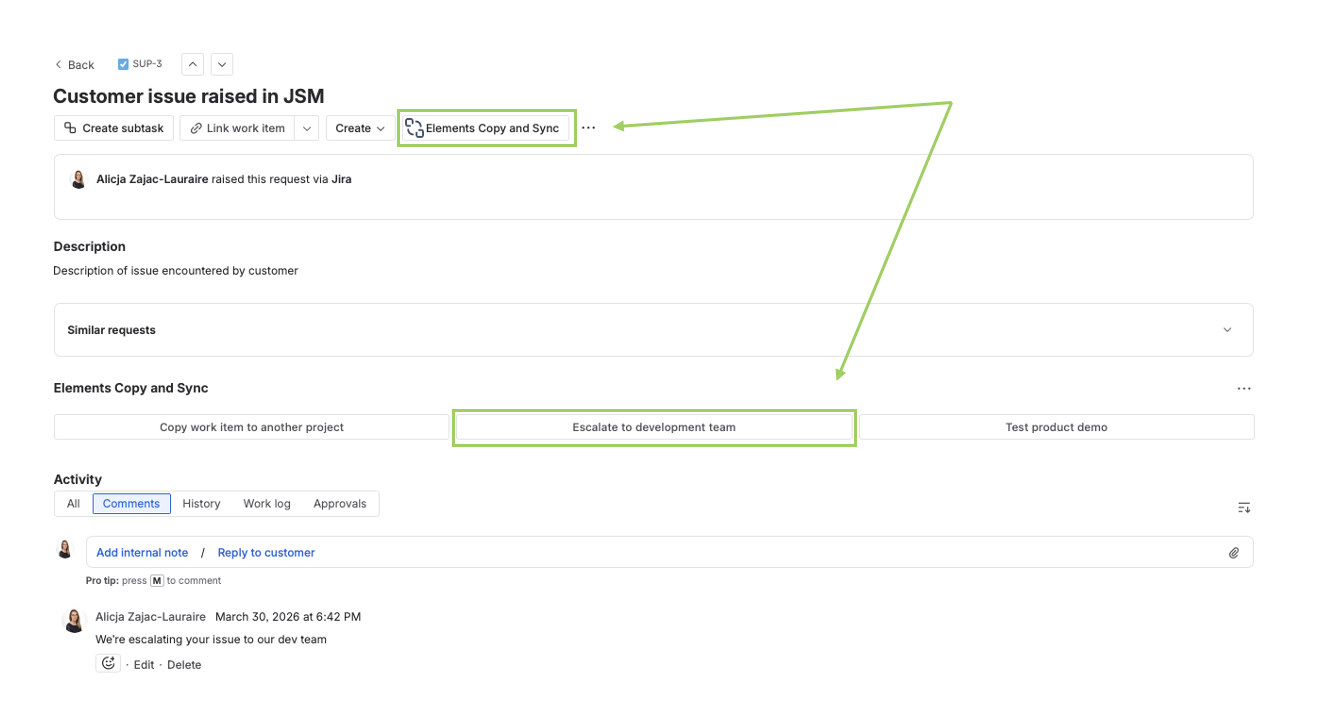
Enable the “Work item view” option to display the recipe in the work item. Click on Elements Copy & Sync to make appear available recipes in the work item, see below:
The option “Work item action menu” is temporarily unavailable due to current limitation of Atlassian Forge platform, which is expected to be resolved soon (follow Atlassian Roadmap here).
In the meantime, we recommend using the “Work item view” option, which allows you to display available Copy & Sync actions directly to users and trigger a recipe in a single click.
Skip creation screen
Use this option to prevent end-users from changing the values of a copied work ites before its creation.
By default, when a recipe is triggered manually, the native Jira work item creation screen is displayed to allow users to change some values in the new work item before it is actually created by the recipe. With this option, the native creation screen is never displayed.
Activating of this option is required is case of granting users the ability to create work items regardless of their project permissions with the option Allow work item creation in all target spaces.
User restrictions
This section lets you configure who can trigger your recipe.
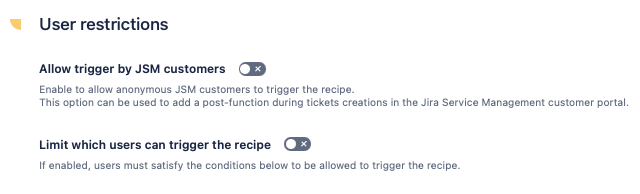
Allow trigger by JSM customers
Use this option to let anonymous Jira Service Management customers to trigger the recipe.
By default, recipes in workflow post-functions cannot be triggered by anonymous users. This can be troublesome in some use cases when tickets are escalated to another project as soon as they are created in the JSM portal. This option will let all users trigger the recipe through a post-function, even if they are anonymous.
Limit which users can trigger the recipe
Use this option to define which users will be able to see the recipe in the recipe selection dialog of a Jira work item, and able to trigger the recipe with a post-function.
By default, all users are able to trigger a recipe. When this option is enabled, some additional conditions can be added on the user's identity and group.
Conditions on users
Here you can select more precisely which users can see the recipe in an work item or trigger it in a post-function.
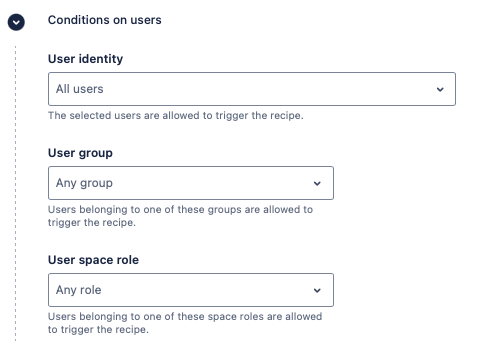
User identity
Here you can restrict the recipe to the Assignee or Reporter of the source issue.
If both "Issue assignee" and "Issue reporter" are selected here, it means that both will be able to see the recipe.
User group
Here you can restrict the recipe to users belonging to one or more user groups in the Jira instance. For example, only to "site-admins" or "jira-servicemanagement" users.
If several groups are selected here, it means that users from at least one of these groups will be able to see the recipe.
User space role
Here you can restrict the recipe to users belonging to one or several space roles. The space role is checked for the space of the source work item. If several groups are selected, it means that users from at least one of these groups will be able to see the recipe. This option is currently available only in remote recipes.
The "User identity", "User group" and “User space role” options can be used concurrently. If specified, a user must satisfy all options in order to be able to trigger the recipe. This can be useful if, for example, you want the Reporter to trigger the recipe only if they belong to the JSM agent group.
Allow work item creation in all target spaces
This option provides an alternative for administrators who want recipes to run regardless of the user’s individual space permissions. When this option is enabled, Copy & Sync will create work items in the target space(s) even if the user triggering the recipe does not have the Create work item permission. This option is useful when recipes must run consistently across spaces with different permission schemes.
Activating this option automatically enables the “Skip creation screen” option as well, which is required.
Public API
This section gives you information on how to trigger the recipe from our public REST API.
Recipe ID
This identifier is specific to the current recipe. This unique ID must be used to call this specific recipe.
Request URL
This URL can be used to call the API to trigger this recipe.
In this URL, the {{issue.key}} placeholder must be replaced by the issue key of the work item you need to copy.
The following tutorial shows how the API can be used to trigger recipes : How to copy issues with Copy & Sync and Automation.
Please note that this request URL changes if you migrate your instance from one Data Residency realm to another. If that’s the case, you need to copy it again from this step and update your Automation rule after your data have been migrated.