
Unlike the API key authentication (see here), this approach does not require the spreadsheet to be public and is therefore better for data privacy.
Prerequisites
-
Have a Jira Cloud instance
-
Have Elements Connect installed on your instance
-
Have a Google Sheet
Configuration steps
-
Google API configuration
-
Elements Connect configuration
1. Google API configuration
Set up a Google Cloud Platform (GCP) project
-
Go to the Google Cloud Console: https://console.cloud.google.com/
-
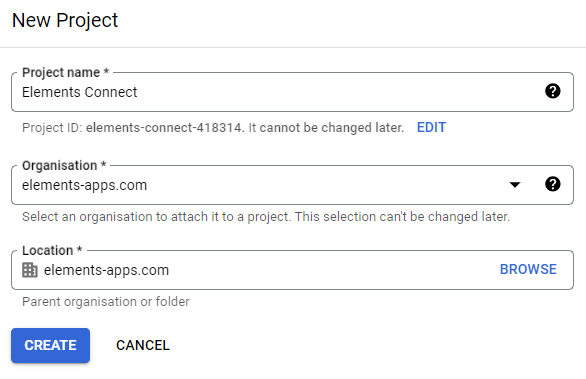
Create a new project or select an existing one:
Enable the Google Sheets API
-
Go to your new project
-
Go to "APIs and services"
-
Go to "Library"
-
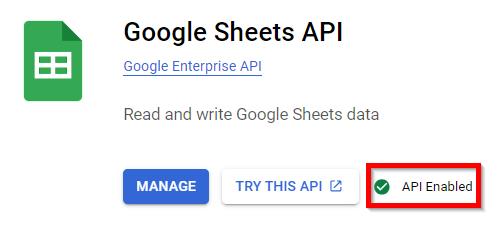
Search for "Google Sheets API" and enable it:
Create the Web application
-
Still in your project, go back to "APIs and services"
-
Go to "Credentials"
-
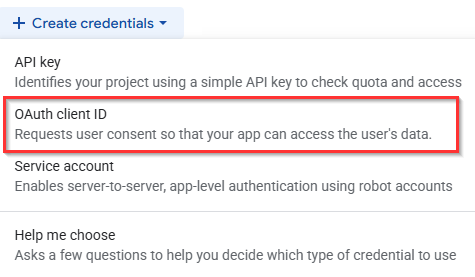
Click on "Create credentials" and select "OAuth client ID":
-
Set the Application type to “Web application”
-
In the “Authorised redirect URIs” section, add the following callback URL:
https://ecc.elements-apps.com/token/authorization-code/access-token -
Click “Create”
-
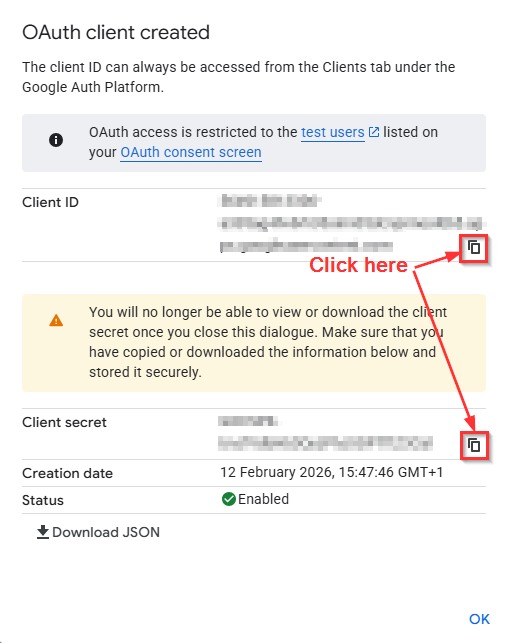
Copy the Client ID and Client secret, as they will be required to configure the datasource in Elements Connect.
2. Elements Connect configuration
Datasource configuration
-
Go to the Elements Connect administration menu
-
Go to the Datasources tab
-
Create a new REST API datasource and configure it as follows:
-
API Base URL:
https://sheets.googleapis.com/v4/spreadsheets/{SPREADSHEET_ID}Please refer to the bottom of this page for instructions on how to retrieve
{SPREADSHEET_ID} -
Authentication:
-
Mode: OAuth 2
-
Grant type: Authorization code
-
Auth URL:
https://accounts.google.com/o/oauth2/v2/auth -
Token URL:
https://oauth2.googleapis.com/token -
Client ID and Client secret: copy the information generated during the web application creation process.
-
Credentials: Send in request body
-
Scopes:
https://www.googleapis.com/auth/spreadsheets.readonly
-
-
Click “Get access token” and complete the uthentication process:

-
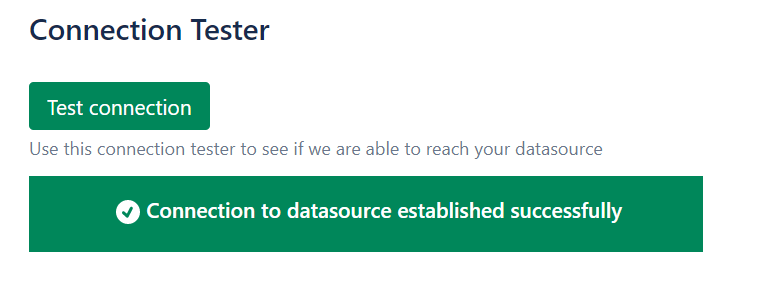
Then, click "Save" and "Test Connection":
-
Endpoint for the Connected field configuration
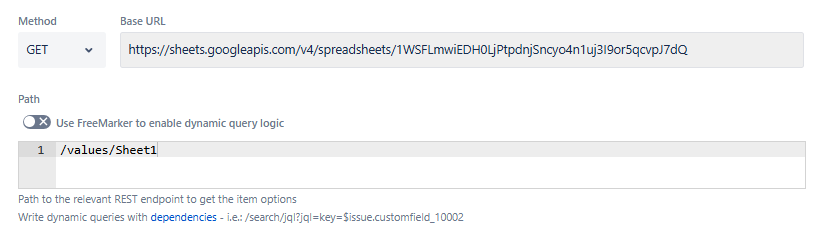
When setting up your Connected field, you need to complete the Base URL by adding the following in the Path section:
/values/{SHEET_NAME}
Replace
{SHEET_NAME} with the name of the sheet you want to access. Instructions on how to retrieve it are available at the bottom of this page.
For example:
How to retrieve {SPREADSHEET_ID} and {SHEET_NAME}
-
{SPREADSHEET_ID}corresponds to the long string of characters in your Spreadsheet’s URL:
-
{SHEET_NAME}is the name of the sheet you want to reach in your Spreadsheet: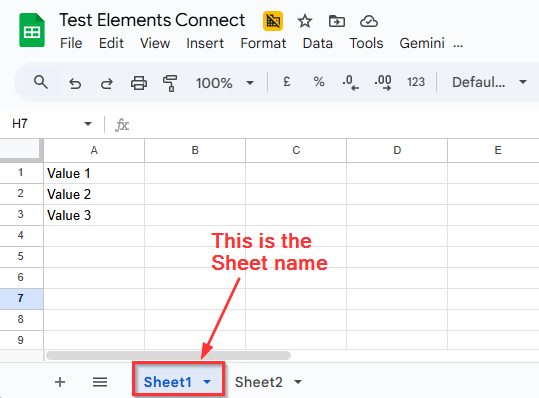
For example, in this case, the URL to use in Elements Connect would be: https://sheets.googleapis.com/v4/spreadsheets/1WSFLmwiEDH0LjPtpdnjSncyo4n1uj3I9or5qcvpJ7dQ/values/Sheet1