
Let’s take a look at how templates can be used on data from a REST API data source in order to customize and improve how it is displayed in Jira.
Applying a template on a select list
Context
In this first example, we will take the case of a “Select list” connected field which data source is a REST API.
Let’s say the JSON response to your API request returns two options "offset" and "companies", where "companies" is an object comprised of two instances.
{
    "offset": 5593477585,
    "companies": [
        {
            "companyId": 001,
            "properties": {
                "website": {
                    "timestamp": 1457513066540
                },
                "name": {
                    "value": "Elements Apps"
                }
            }
        },
        {
            "companyId": 002,
            "properties": {
                "website": {
                    "timestamp": 1457513066540
                },
                "name": {
                    "value": "Google"
                }
            }
        }
    ]
}
Our requirement is to display the list of company names and identifiers in the select list with the following formatting:
-
Elements Apps (001)
-
Google (002)
Step by step
For connected fields with type "Select list", the template is called on each option of the JSON document returned by the REST endpoint which are nested under the root element specified in the "Location of the Connected item/field options in the response" option in your configuration.
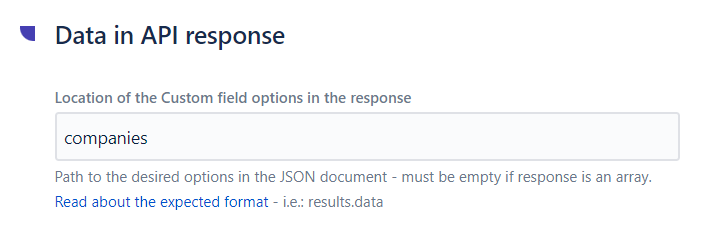
In this example, the root element is "companies", so setting “companies” in this option will result to the following object being retrieved by the API call:
"Companies" JSON object
"companies": [
        {
            "companyId": 001,
            "properties": {
                "website": {
                    "timestamp": 1457513066540
                },
                "name": {
                    "value": "Elements Apps"
                }
            }
        },
        {
            "companyId": 002,
            "properties": {
                "website": {
                    "timestamp": 1457513066540
                },
                "name": {
                    "value": "Google"
                }
            }
        }
    ]
Here, we want to retrieve the name and identifier of each company.
The identifier is at the root of the object, so it can be retrieved easily as ${row.companyId}.
In order to display the name of the company, we need to reference the access path all the way to the attribute "value" that is located under the "name" attribute of "properties". This can be done by using ${row.properties.name.value}.
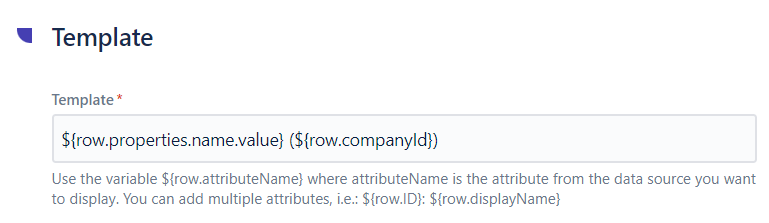
Using these two variables, we can create the template that will let us display the data as needed in the connected field:
Template
${row.properties.name.value} (${row.companyId})
This needs to be configured in the “Customize look & feel” section of the connected field configuration:
Using this template on the data in our example will result in the following options being displayed in the connected select list:
-
Elements Apps (001)
-
Google (002)
Applying a template on a read-only field
Context
For connected fields with the type "Read-only", the template is called on the JSON document returned by the REST endpoint. Depending on the use case, the JSON response of read-only connected items will return either:
-
an array of objects, or
-
a single object with attributes in the form of key-value pairs.
Depending on the JSON response, the template configuration will differ, let's see how.
Single object
Let's take an example where the JSON response of the REST endpoint is a single object. In this case, the REST endpoint queries a specific application identified by its ID.
The JSON response outputs a list of key-value pairs for this specific application:
JSON response - Single object
{
    "id": "1234",
    "name": "saasure",
    "label": "Okta Admin Console",
    "status": "ACTIVE",
    "lastUpdated": "2022-02-18T10:52:11.000Z"
}
Our requirement here is to display the ID, the label and the status of this specific application:
-
1234 - Okta Admin Console (ACTIVE)
Template
The JSON response is a single object with attributes in the form of key-value pairs. These attributes can be accessed in the template through the data variable.
Here is the template that can be used to fullfil our requirement:
${data.id} - ${data.label} (${data.status})
If your connected field is a connected item, it is possible to use FreeMarker to improve the way the data is displayed, for example by displaying the label in bold. To do this, the following template can be used:
${data.id} - <b>${data.label}</b> (${data.status})
Array of objects
The following example is only available for connected items, where templating with FreeMarker is available.
Now let's take an example where the JSON response of the REST endpoint is an array of objects. In this case, the REST endpoint queries a list of applications and the JSON response outputs a list of two deals (objects):
JSON response - Array of objects
{
    "deals": [
        {
            "portalId": 25843600,
            "properties": {
                "dealname": {
                    "value": "Manufacture marketing goodies"
                },
                "amount": {
                    "value": "57000"
                },
                "dealstage": {
                    "value": "contractsent"
                }
            }
        },
        {
            "portalId": 25843600,
            "properties": {
                "dealname": {
                    "value": "Revamp website",
                },
                "amount": {
                    "value": "10000"
                },
                "dealstage": {
                    "value": "presentationscheduled"
                }
            },

        }
    ]
}
Our requirement here is to display the name, the amount and the stage of each deal in the form of a table:
|
Deal Name |
Amount |
Stage |
|---|---|---|
|
Manufacture marketing goodies |
$57,000 |
contractsent |
|
Revamp website |
$10,000 |
presentationscheduled |
Template
The JSON response is an array of two objects, where each of these objects is a row.
In the template, we want to display the deal name, its amount and its stage in the form of a table:
Template - Array of objects
<table class="aui">
  <thead>
    <tr>
      <th>Name</th>
      <th>Amount</th>
      <th>Status</th>
    </tr>
  </thead>
  <tbody>
<#list data.deals as deals>
<tr>
      <td>${deals.properties.dealname.value}</td>
      <td>$${deals.properties.amount.value?number?string(",##0.00")}</td>
      <td>${deals.properties.dealstage.value}</td>
</tr>
</#list>
</tbody>
</table>
The <#list> method is used to iterate over each deal object (assigned to the "deals" variable).
After doing that, the access path to the attributes to display is provided, preceded by the data variable.
Applying a template on a read-only date field
Context
In this example, we will take the case of a “Read-only Date” connected field which data source is a REST API. Let’s say we’d like to display in this type of field the creation date fo the current issue, using the Jira REST API.
Step by step
JSON response
Let’s assume the JSON response is the following:
{
  "expand": "renderedFields,names,schema,operations,editmeta,changelog,versionedRepresentations,customfield_10010.requestTypePractice",
  "id": "10019",
  "self": "https://my-instance.atlassian.net/rest/api/latest/issue/10019",
  "key": "CC-1",
  "fields": {
   "statuscategorychangedate": "2024-09-17T14:11:02.238+0200",
   "priority": {
      "self": "https://my-instance.atlassian.net/rest/api/2/priority/3",
      "iconUrl": "https://my-instance.atlassian.net/images/icons/priorities/medium.svg",
      "name": "Medium",
      "id": "3"
    },
    "created": "2024-09-17T14:11:01.755+0200",
    "updated": "2024-12-10T16:29:43.230+0100",
    "comment": {
      "comments": [],
      "self": "https://my-instance.atlassian.net/rest/api/2/issue/10019/comment",
      "maxResults": 0,
      "total": 0,
      "startAt": 0
    }
  }
}
We’d like to retrieve and display the creation date, meaning the “created” attribute.
👉 Data source date should be ISO formatted. Here, “2024-12-10T16:29:43.230+0100" is a standard datetime formatting, thus Elements Connect will be able to translate it into a date field.
Template
For this creation date to be displayed as a read-only date field, we need to specify where to find it in the JSON response, your following format: ${data.your_attribute}:

Value will be converted into a Jira date field, formatted "DD Month AAAA"
This field will now be displayed as follow:
Applying a template on a user picker field
When configuring a user field, there is no proper template to configure.
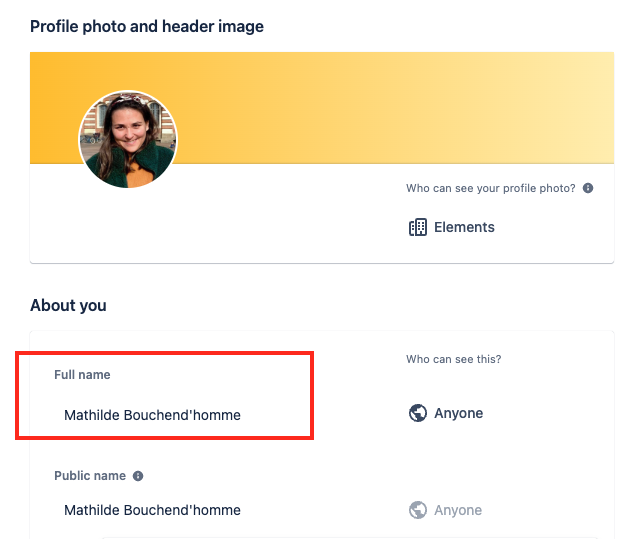
Options displayed will always retrieve user ‘displayName’ attribute, which means the user full name:
Will appear in the option list only users that have been matched between your datasource and Jira’s user list. You can decide between 2 keys for this matching:
-
email address
-
account ID
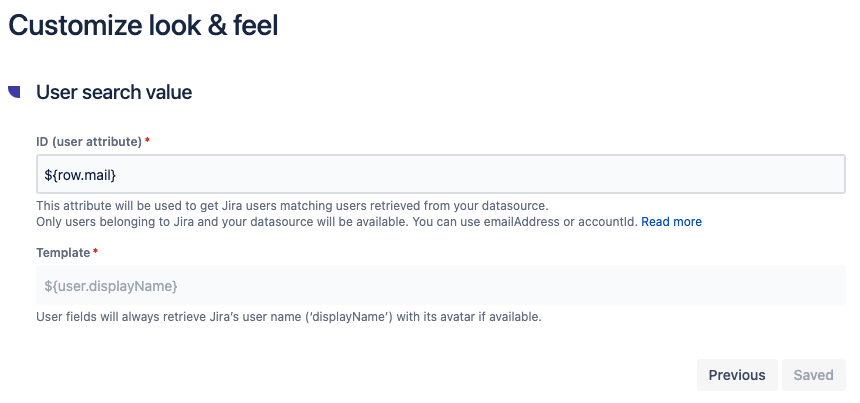
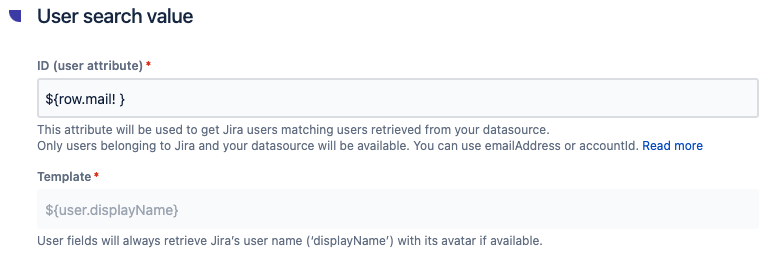
⚠️ On Jira users list, the email attribute is sometimes missing, which will trigger an error on the runtime. However, this might be your only way to generate the matching between Jira and your datasource! What we recommend, is to use FreeMarker syntax to generate default value and retrieve your users. In the ID (user attribute) field, add “! “ in your matching attribute:
${row.mail! }
Learn more about this error
Let’s say this is your list of users on Jira:
{
"self": "https://your-instance.atlassian.net/rest/api/2/user?accountId=XXX",
"accountId": "XXX",
"accountType": "atlassian",
"emailAddress": "mathilde.bouchendhomme@elements-apps.com",
"avatarUrls": {
"48x48": "https://avatar-management--avatars.us-west-2.prod.public.atl-paas.net",
"24x24": "https://avatar-management--avatars.us-west-2.prod.public.atl-paas.net",
"16x16": "https://avatar-management--avatars.us-west-2.prod.public.atl-paas.net",
"32x32": "https://avatar-management--avatars.us-west-2.prod.public.atl-paas.net"
},
"displayName": "Mathilde Bouchend'homme",
"active": true,
"locale": "en_GB"
},
{
"self": "https://your-instance.atlassian.net/rest/api/2/user?accountId=YYY",
"accountId": "YYY",
"accountType": "app",
"avatarUrls": {
"48x48": "https://secure.gravatar.com/",
"24x24": "https://secure.gravatar.com",
"16x16": "https://secure.gravatar.com",
"32x32": "https://secure.gravatar.com"
},
"displayName": "Microsoft Teams for Jira Cloud",
"active": true
},
{
"self": "https://your-instance.net/rest/api/2/user?accountId=ZZZ",
"accountId": "ZZZ",
"accountType": "atlassian",
"emailAddress": "john.doe@elements-apps.com",
"avatarUrls": {
"48x48": "https://avatar-management--avatars.us-west-2.prod.public.atl-paas.net",
"24x24": "https://avatar-management--avatars.us-west-2.prod.public.atl-paas.net",
"16x16": "https://avatar-management--avatars.us-west-2.prod.public.atl-paas.net",
"32x32": "https://avatar-management--avatars.us-west-2.prod.public.atl-paas.net"
},
"displayName": "John Doe",
"active": true,
"locale": "en_US"
}
Two users have an email address (Mathilde and John), one is an app and thus do not have this attribute mentioned.
|
Field configuration |
Runtime result |
|---|---|
|
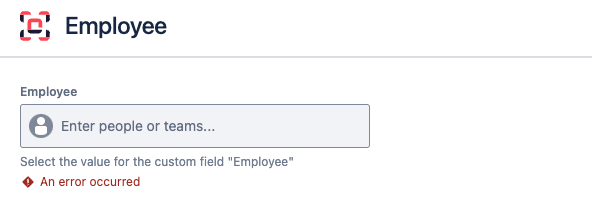
→ email attribute will be searched on each row of the result set, and thus will throw an error when attribute won’t be found |
|
|
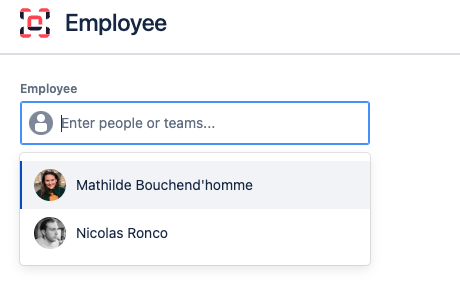
→ Use FreeMarker syntax to leverage this limitation will allow the display of users where matching attribute has been found |
To retrieve all users from your organisation, you can use https://your-instance.atlassian.net/rest/api/latest/users and access details for all users:
{
"self": "https://your-instance.atlassian.net/rest/api/2/user?accountId=XXX",
"accountId": "XXX",
"accountType": "atlassian",
"emailAddress": "mathilde.bouchendhomme@elements-apps.com",
"avatarUrls": {
"48x48": "https://avatar-management--avatars.us-west-2.prod.public.atl-paas.net/XXX/d6182e6d-4daf-430f-942d-b642e372c1b6/48",
"24x24": "https://avatar-management--avatars.us-west-2.prod.public.atl-paas.net/XXX/d6182e6d-4daf-430f-942d-b642e372c1b6/24",
"16x16": "https://avatar-management--avatars.us-west-2.prod.public.atl-paas.net/XXX/d6182e6d-4daf-430f-942d-b642e372c1b6/16",
"32x32": "https://avatar-management--avatars.us-west-2.prod.public.atl-paas.net/XXX/d6182e6d-4daf-430f-942d-b642e372c1b6/32"
},
"displayName": "Mathilde Bouchend'homme",
"active": true,
"locale": "en_GB"
},