
Objective
Learn how to set the value of an Elements Connected custom field using a Jira Automation rule, based on the content of a Jira Text field.
This guide covers four scenarios: snapshot single-value fields, snapshot multi-value fields, object fields, and user fields. Useful for Jira admins automating data flows between native Jira fields and Elements Connect custom fields.
Tutorial
Prerequisites
-
Elements Connect is installed on your Jira Cloud instance
-
A Jira Text field (Single line) has been created and added to the relevant project/screen (let’s say the project is PM).
-
The ID of the created Jira Text field has been identified (follow this KB to find your custom field ID). Let’s say the ID is “customfield_yyyyy”
-
A REST API datasource has been configured in Elements Connect, connected to your local Jira instance (this is the cross-project / Jira-to-Jira lookup pattern, see Configure a local Jira instance as a data source for the setup), and successfully tested.
Steps
We need to set the value of a Connected custom field, Issue picker, plugged to local Jira REST API.
Case 1 - Set Snapshot custom field (single value)
Custom field configuration
-
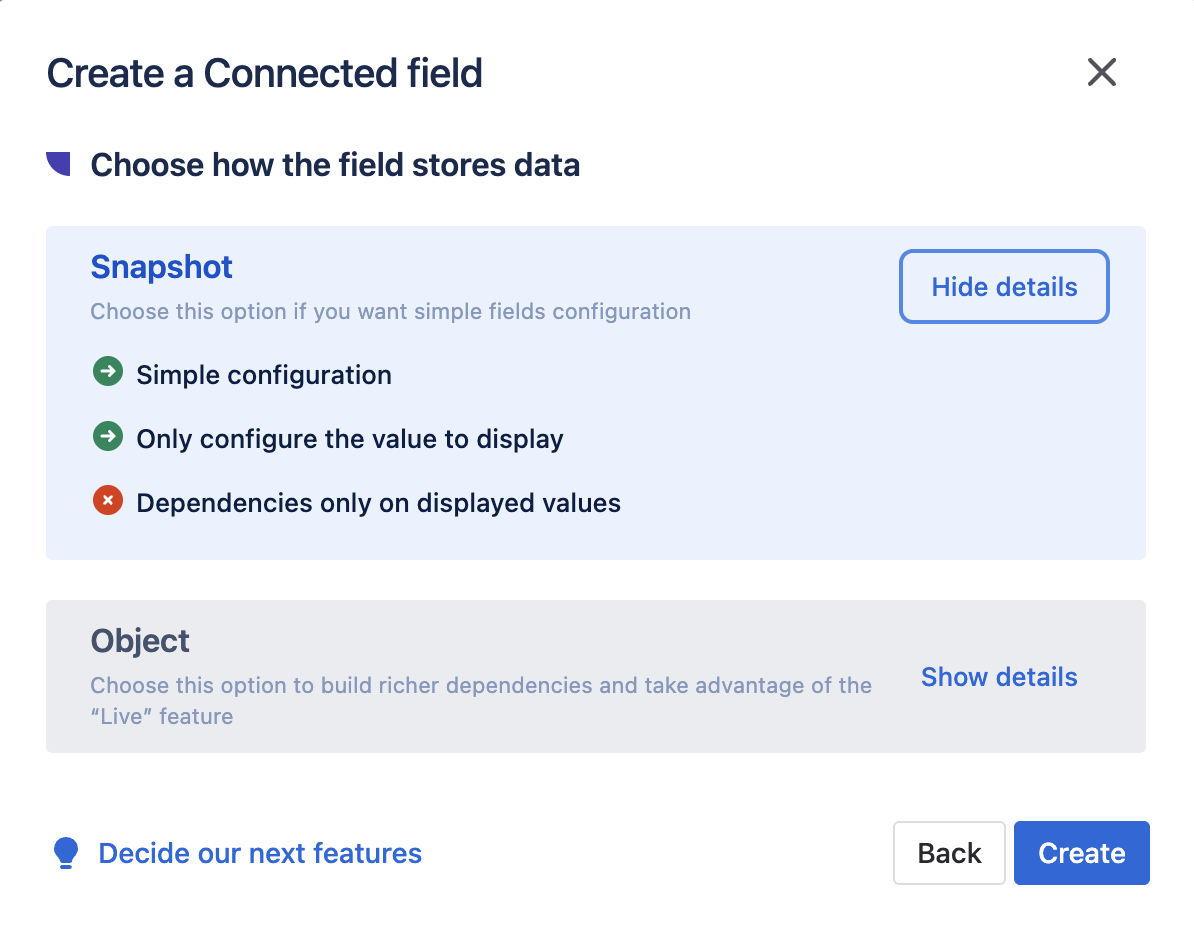
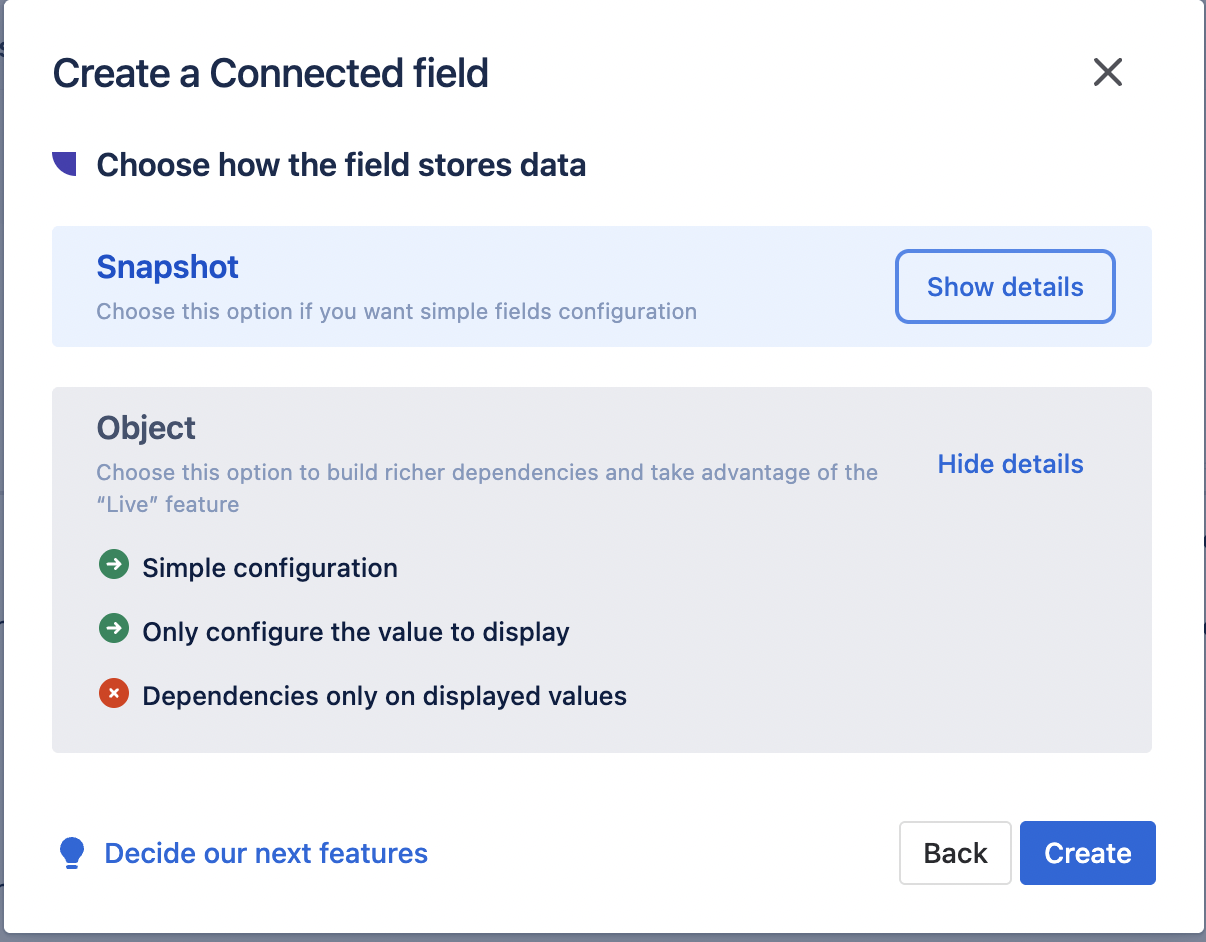
Create a Connect custom field, Single Select List, and select the custom field type as Snapshot:
-
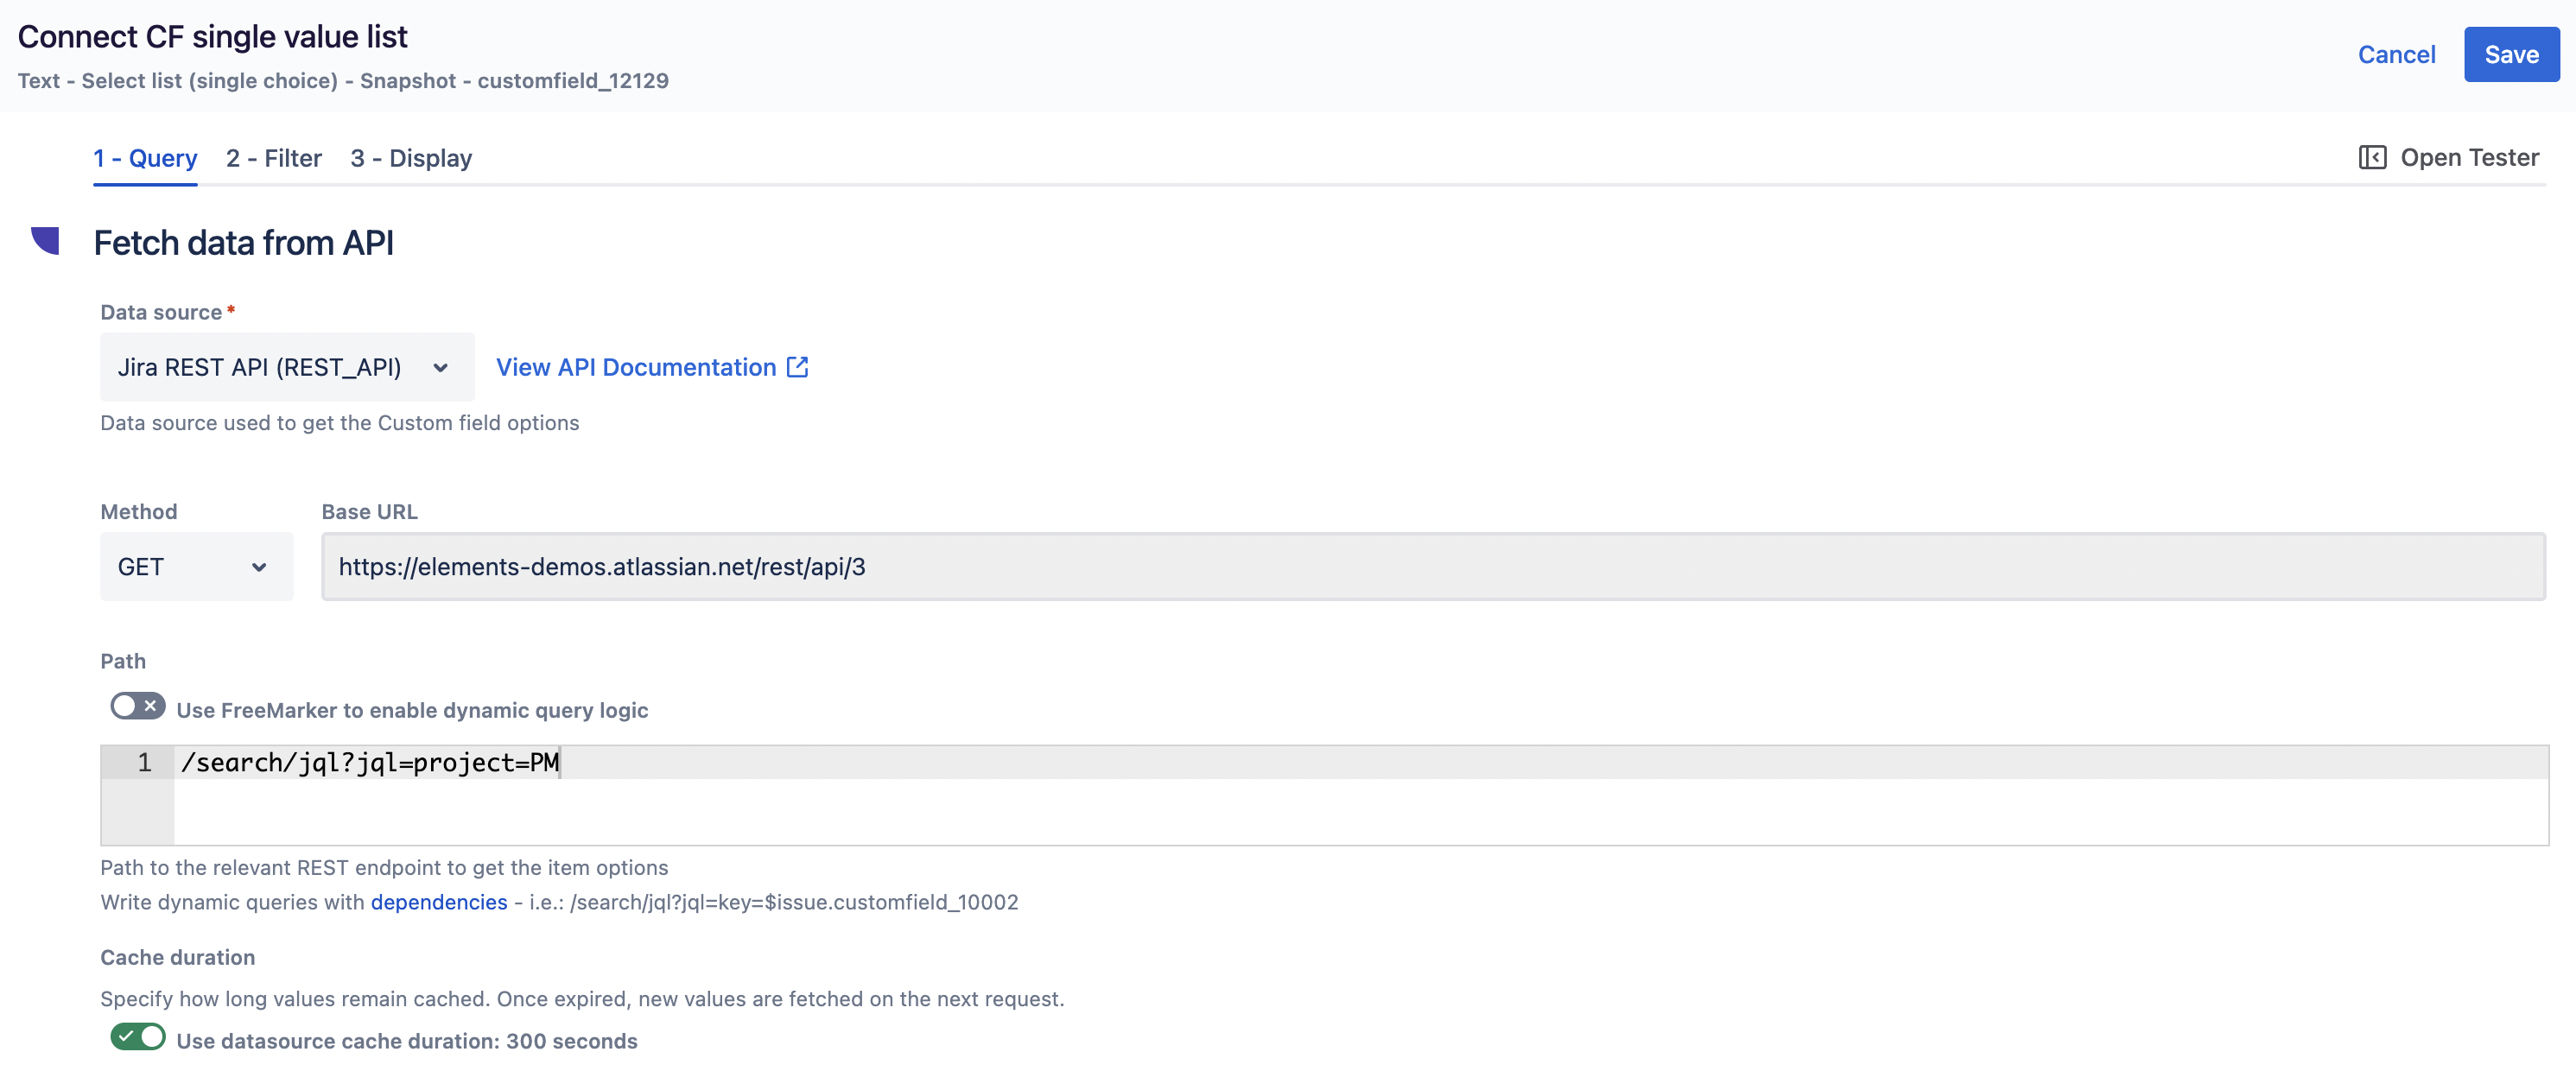
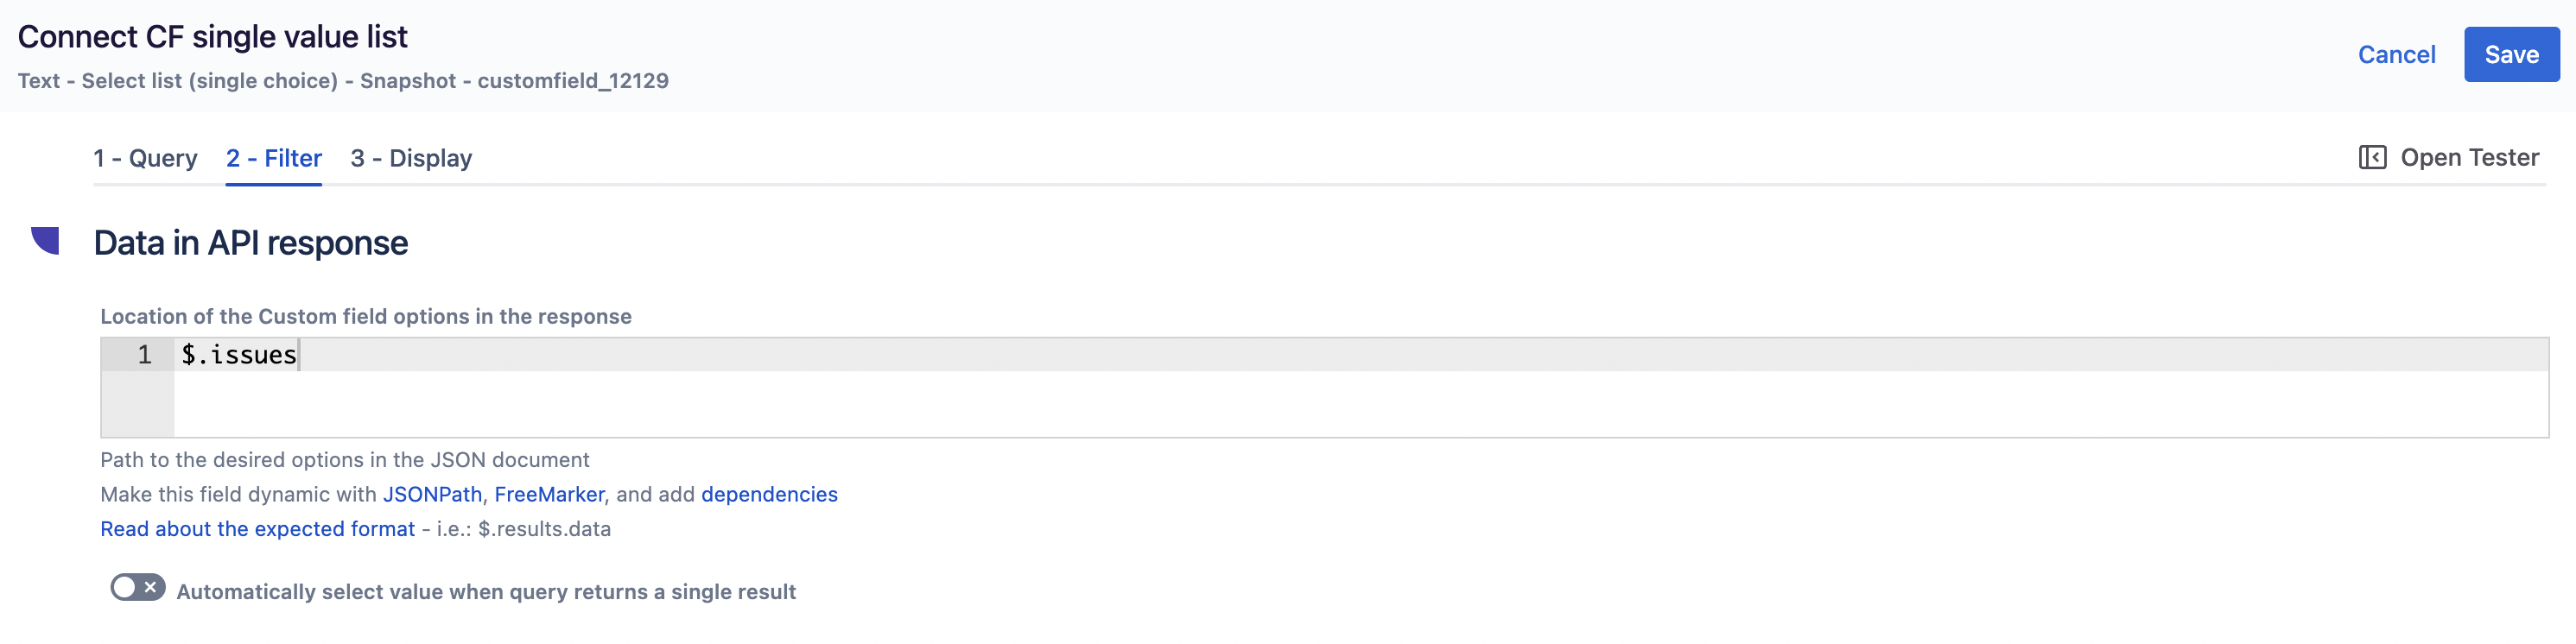
Configure your custom field:
-
-
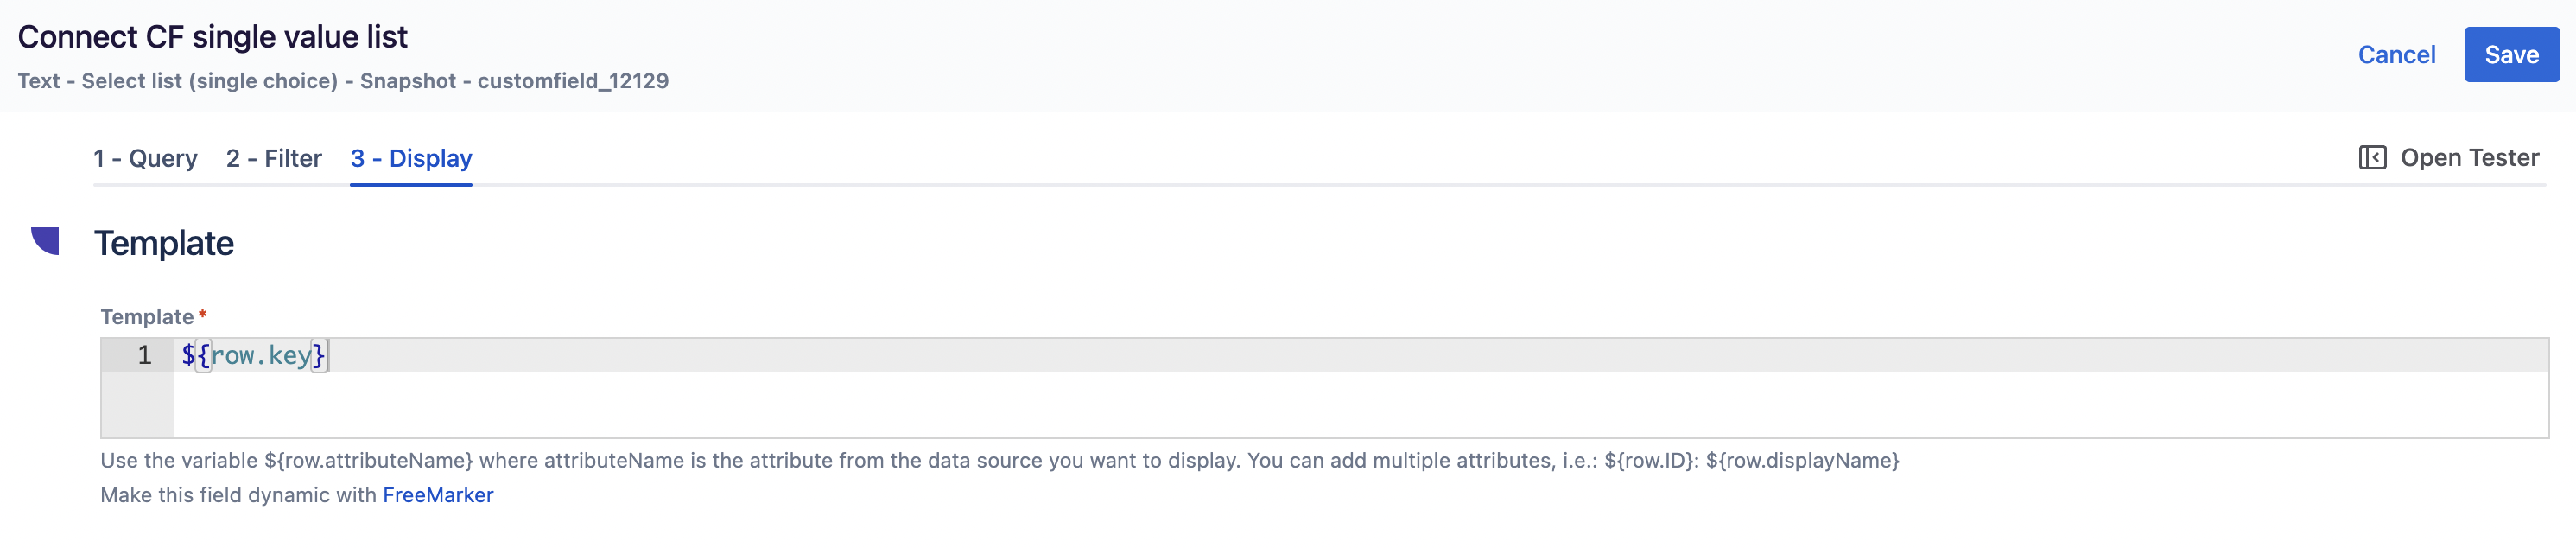
Set the template as below (the field will display and store the issue key):
-
Save your field configuration
-
Add the field to a project/screen (let’s say the project is PM)
-
From the Elements Connect administration page, note the Connect custom field ID (let’s say it's customfield_xxxxx)
%20(1).png?cb=2387ee796802d326c455c050bbf9f805)
Automation rule configuration
-
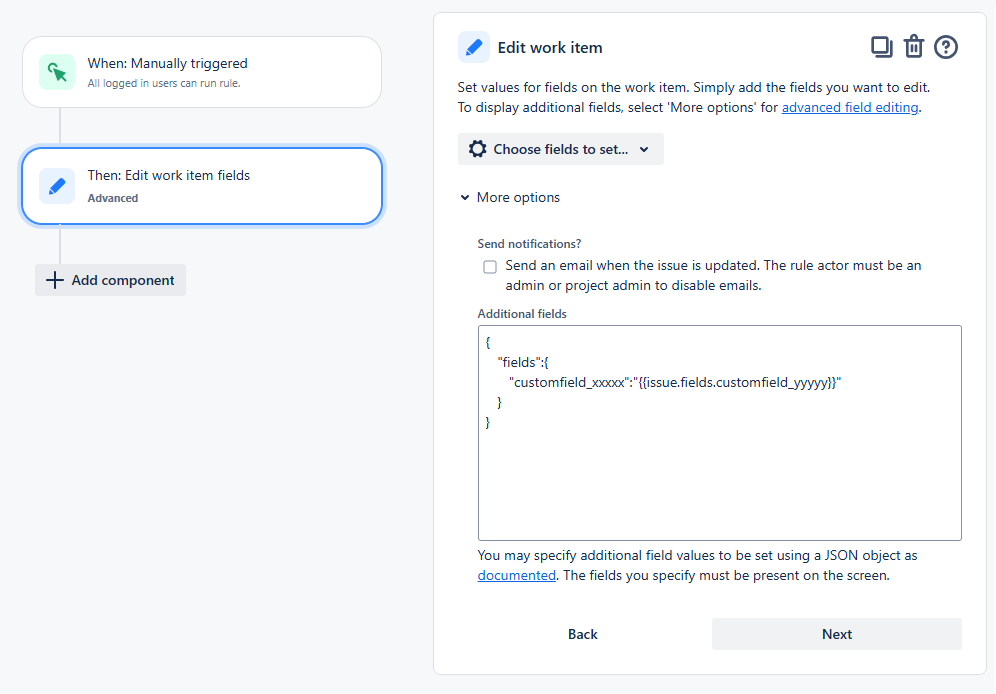
In Automation for Jira, create a rule as below:
-
Trigger: Manually triggered (or any trigger of your choice).
-
Action: Edit work item fields
-
Select “More options” and in “Additional fields” section, paste the below
{ "fields":{ "customfield_xxxxx":"{{issue.fields.customfield_yyyyy}}" } } -
Replace customfield_xxxxx by the ID of your Connect field, customfield_yyyyy by the ID of your Jira Text field:
-
-
Set rule name and publish it.
-
-
Trigger the rule manually from the project where you’ve added the Jira text field and the Connect field (let’s say the project is PM) and the value of the Text field will be copied into the Connect field.
It’s mandatory that the value in the Jira Text field matches the value defined in the field Template.
Case 2 - Set Snapshot custom field (multi values)
Custom field configuration
-
Create a Connect custom field, Multi List, and select the custom field type as Snapshot:
-
Configure your custom field:
-
Set the template as below (the field will display and store the issue key):
-
Save your field configuration
-
Add the field to a project/screen (let’s say the project is PM)
-
From the Elements Connect administration page, note the Connect custom field ID (let’s say it's customfield_xxxxx)
%20(2).png?cb=a84e016b9093871f4694f24834a018d7)
Automation rule configuration
-
In Automation for Jira, create a rule as below:
-
Trigger: Manually triggered (or any trigger of your choice).
-
Action: Edit work item fields
-
Select “More options” and in “Additional fields” section, paste the below
{ "fields":{ "customfield_xxxxx":[{{#issue.fields.customfield_yyyyy.split(",")}}"{{.}}"{{^last}}, {{/}}{{/}}] } } -
Replace customfield_xxxxx by the ID of your Connect field, customfield_yyyyy by the ID of your Jira Text field:

-
-
Set rule name and publish it.
-
-
Trigger the rule manually from the project where you’ve added the Jira text field and the Connect field (let’s say the project is PM) and the values of the Text field will be copied into the Connect field, as show below:
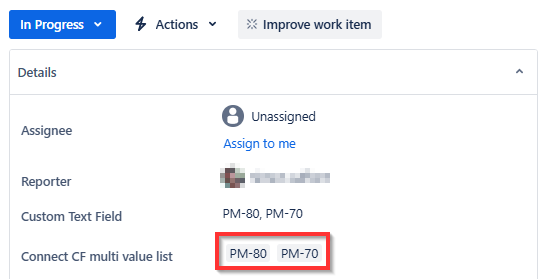
It’s mandatory that the value in the Jira Text field matches the value defined in the field Template.
Furthermore, the values must be separated by a comma. If a different delimiter is used, the Automation rule must be adjusted accordingly.
Case 3 - Set Single Select list Object custom field
Custom field configuration
-
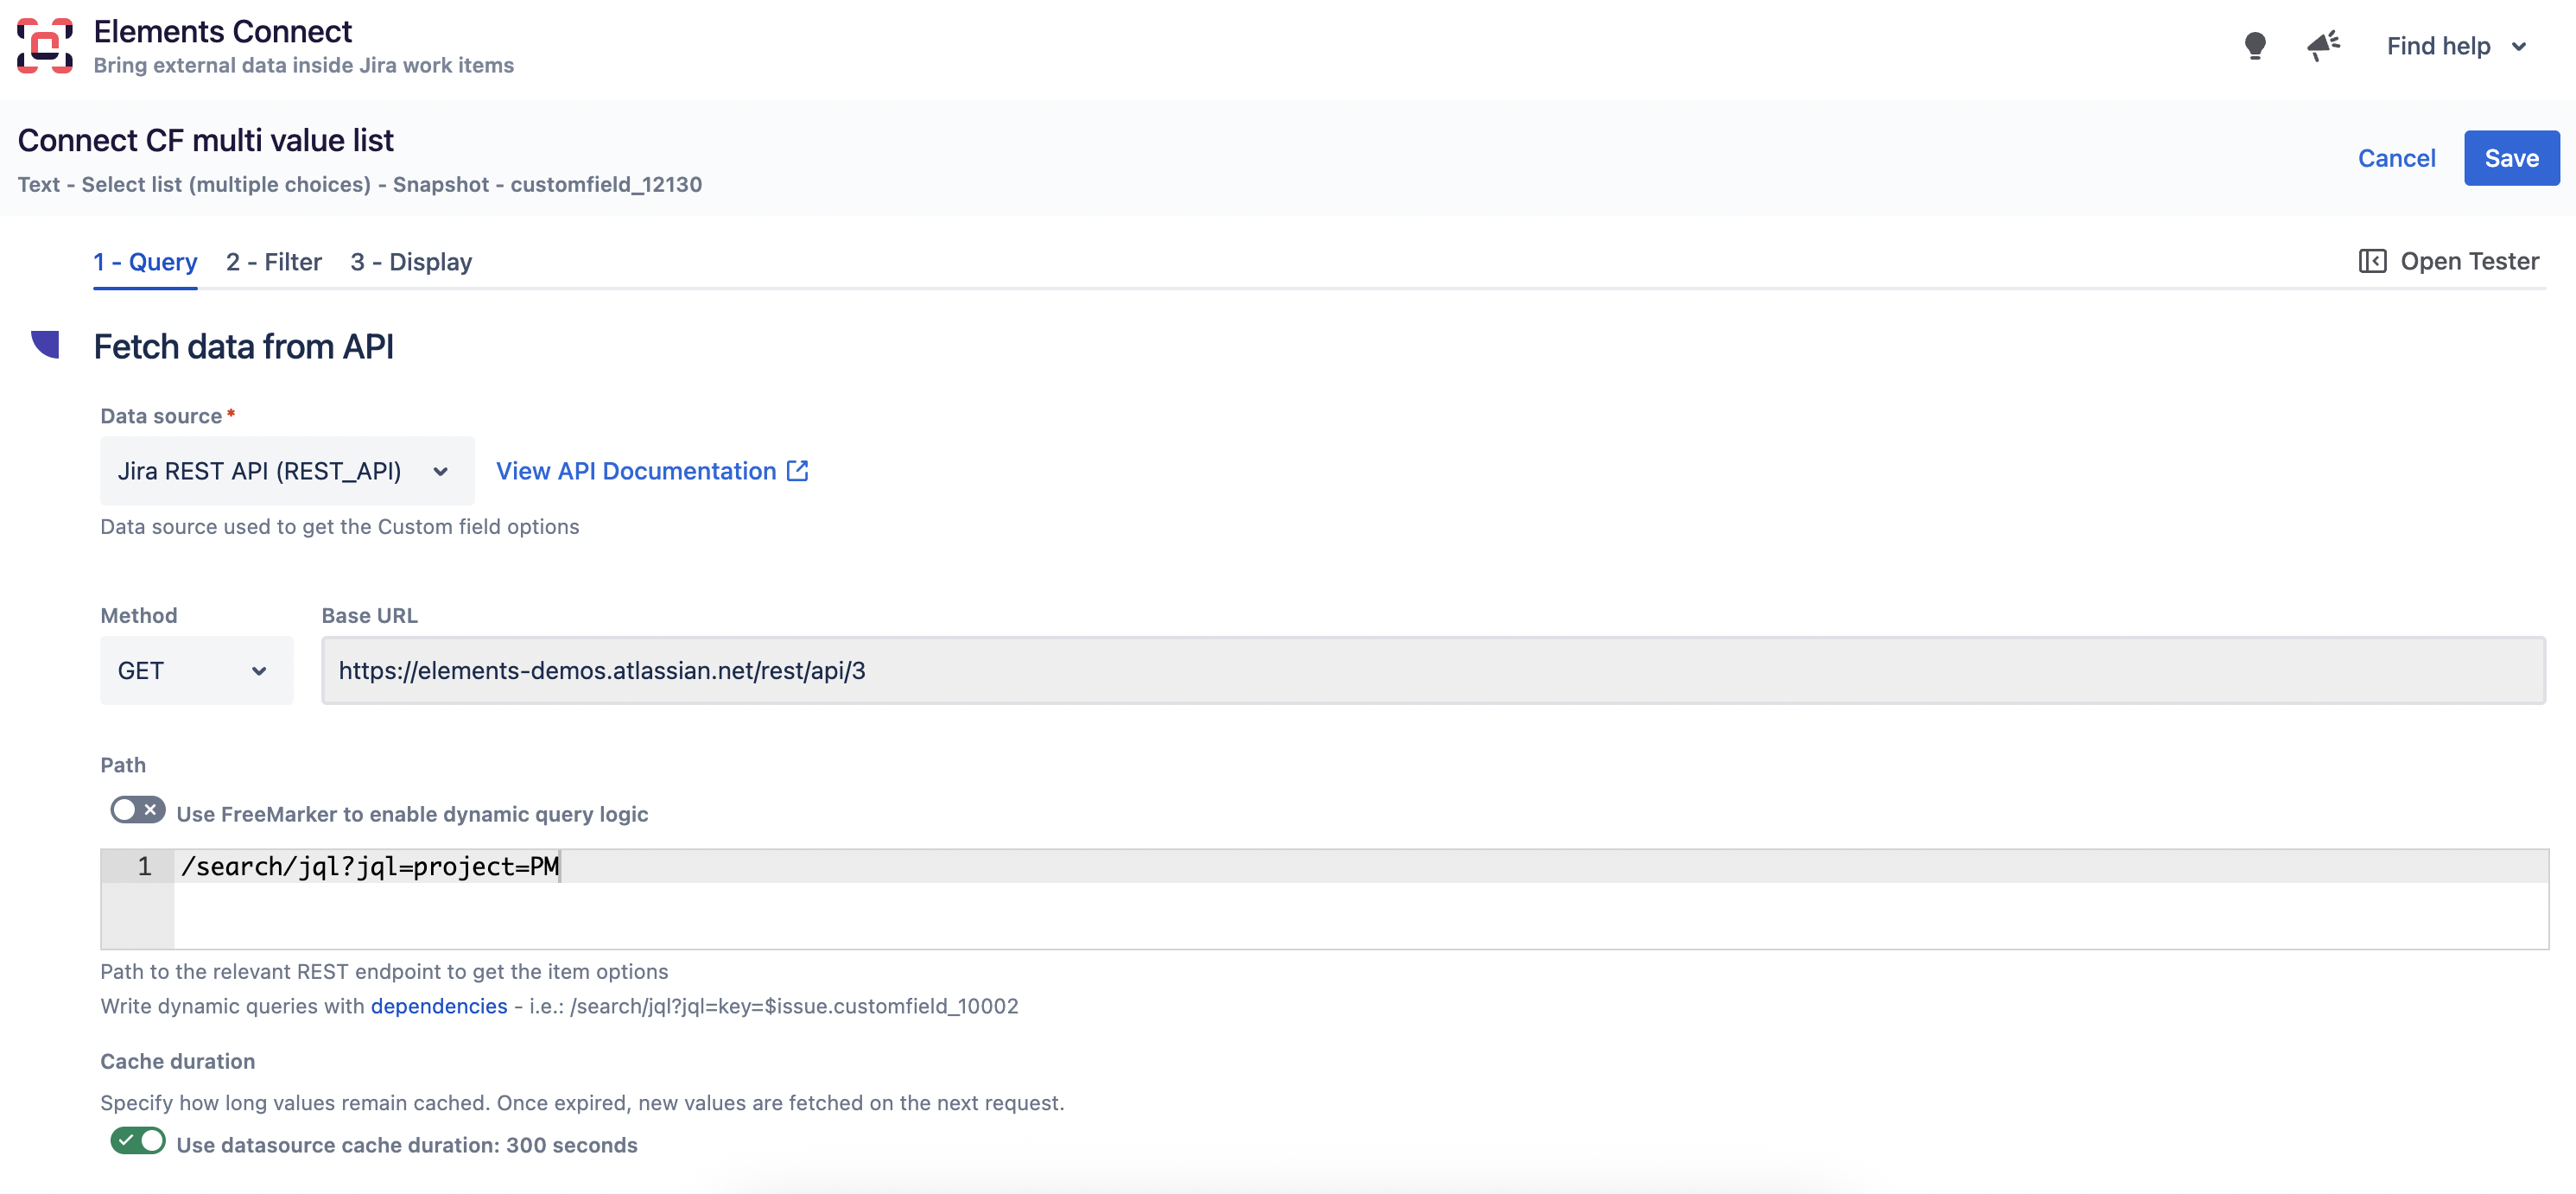
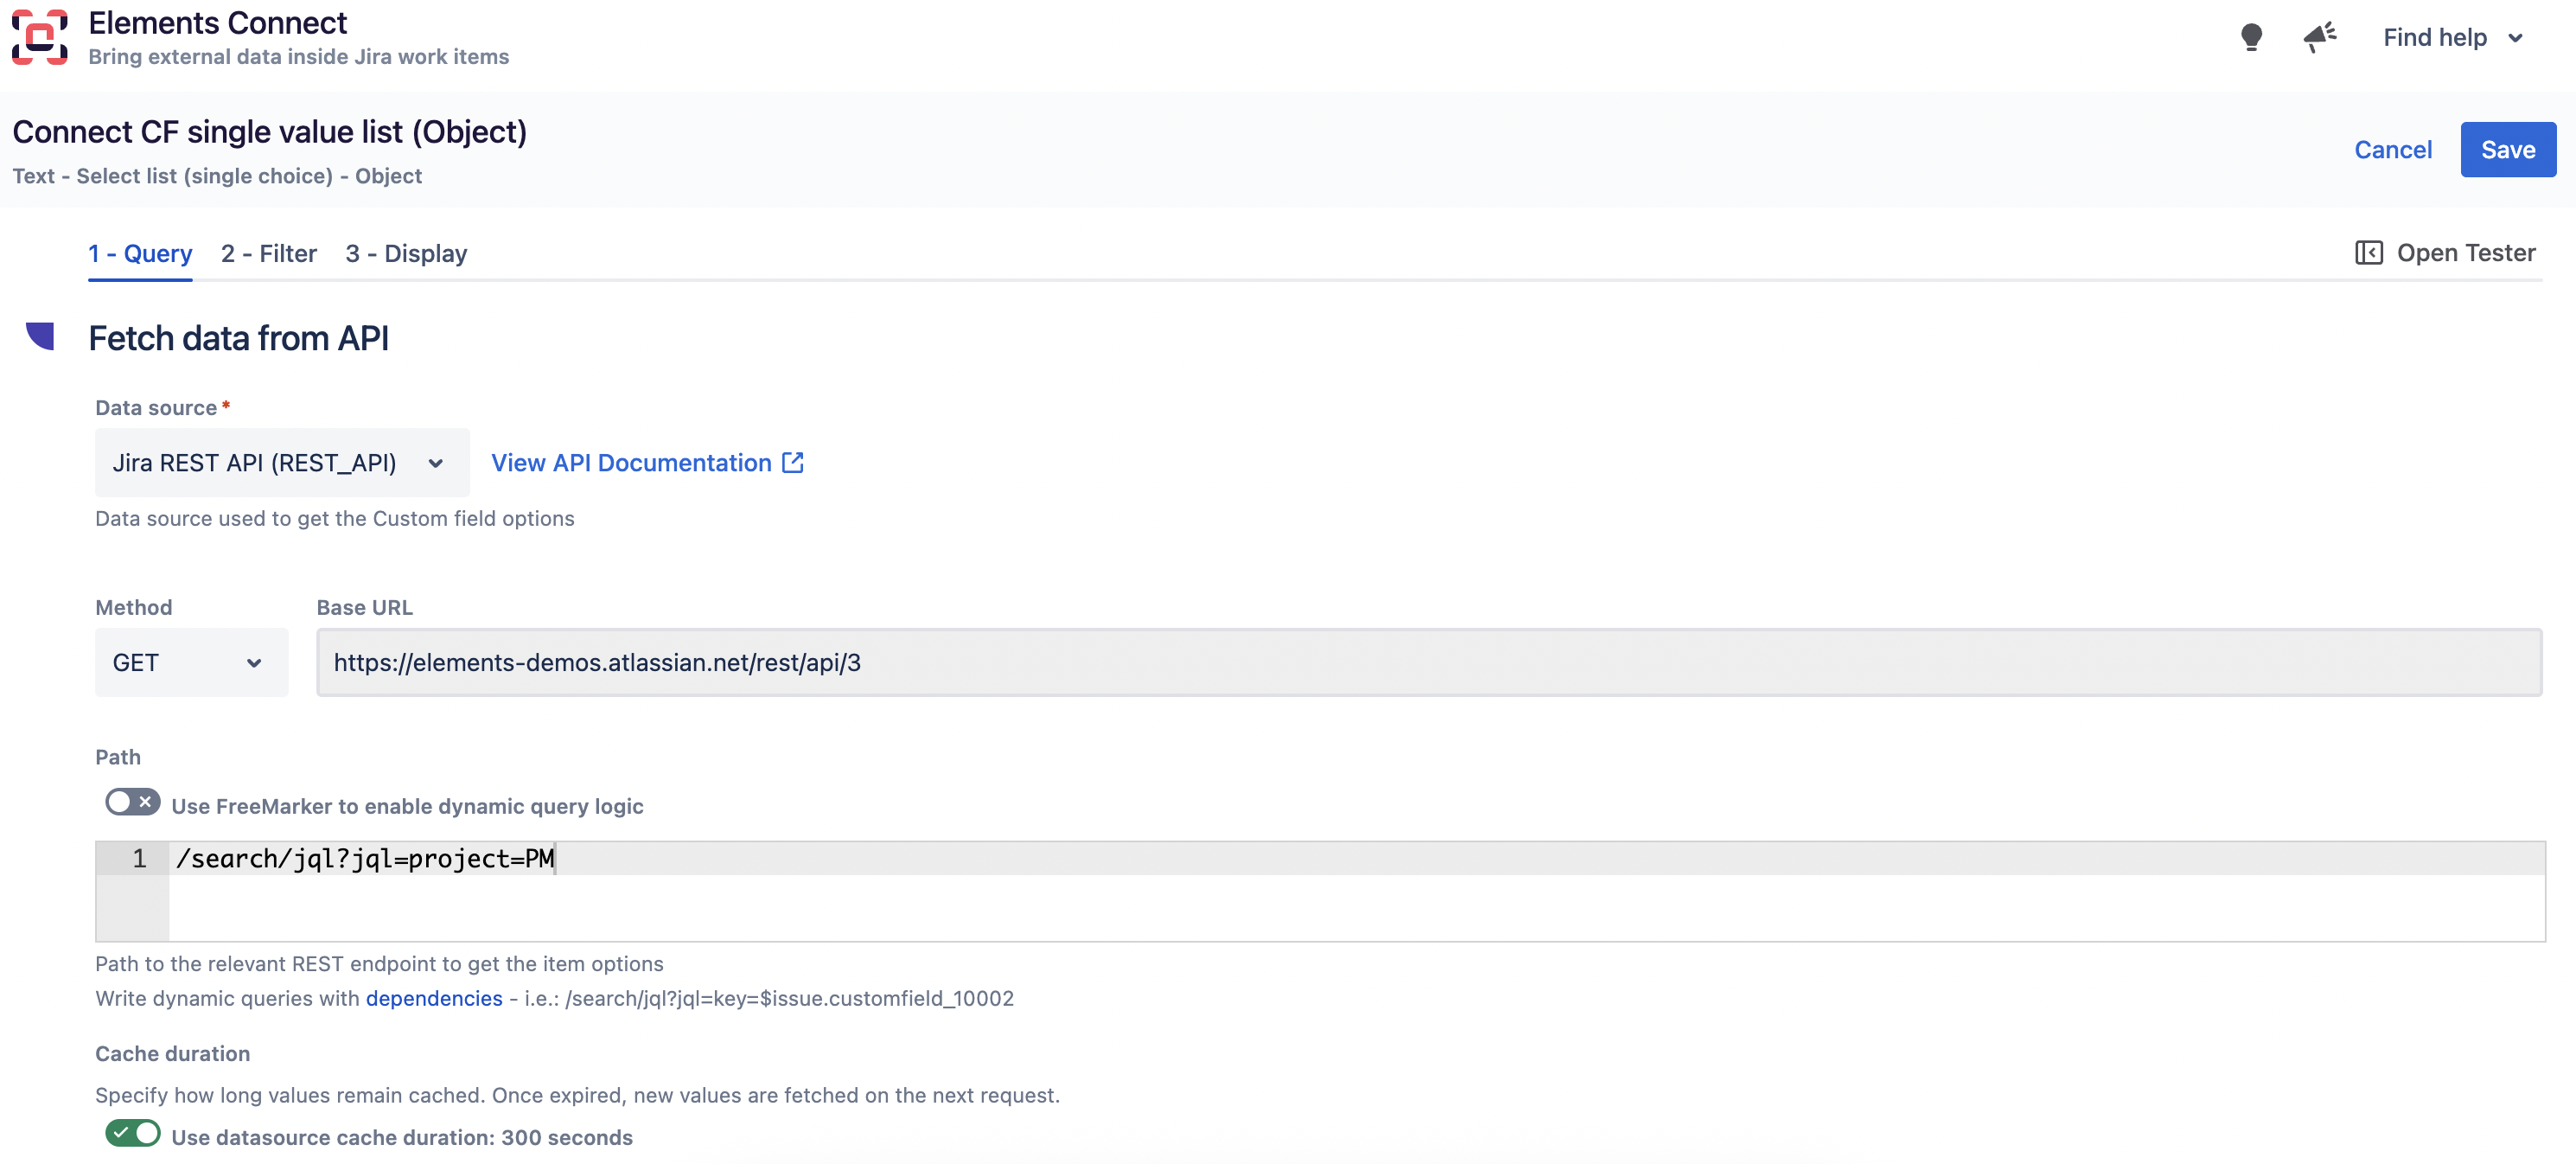
Create a Connect custom field, Select list single value, and choose the field type Object:
-
Configure your custom field:
-
Enable the option Live update in the Query section
-
In the Live path, use the below (where customfield_xxxxx is the ID of the current Connect custom field)
%20(11).png?cb=d0434f20010e0e5bcc48551b1274ea2d)
-
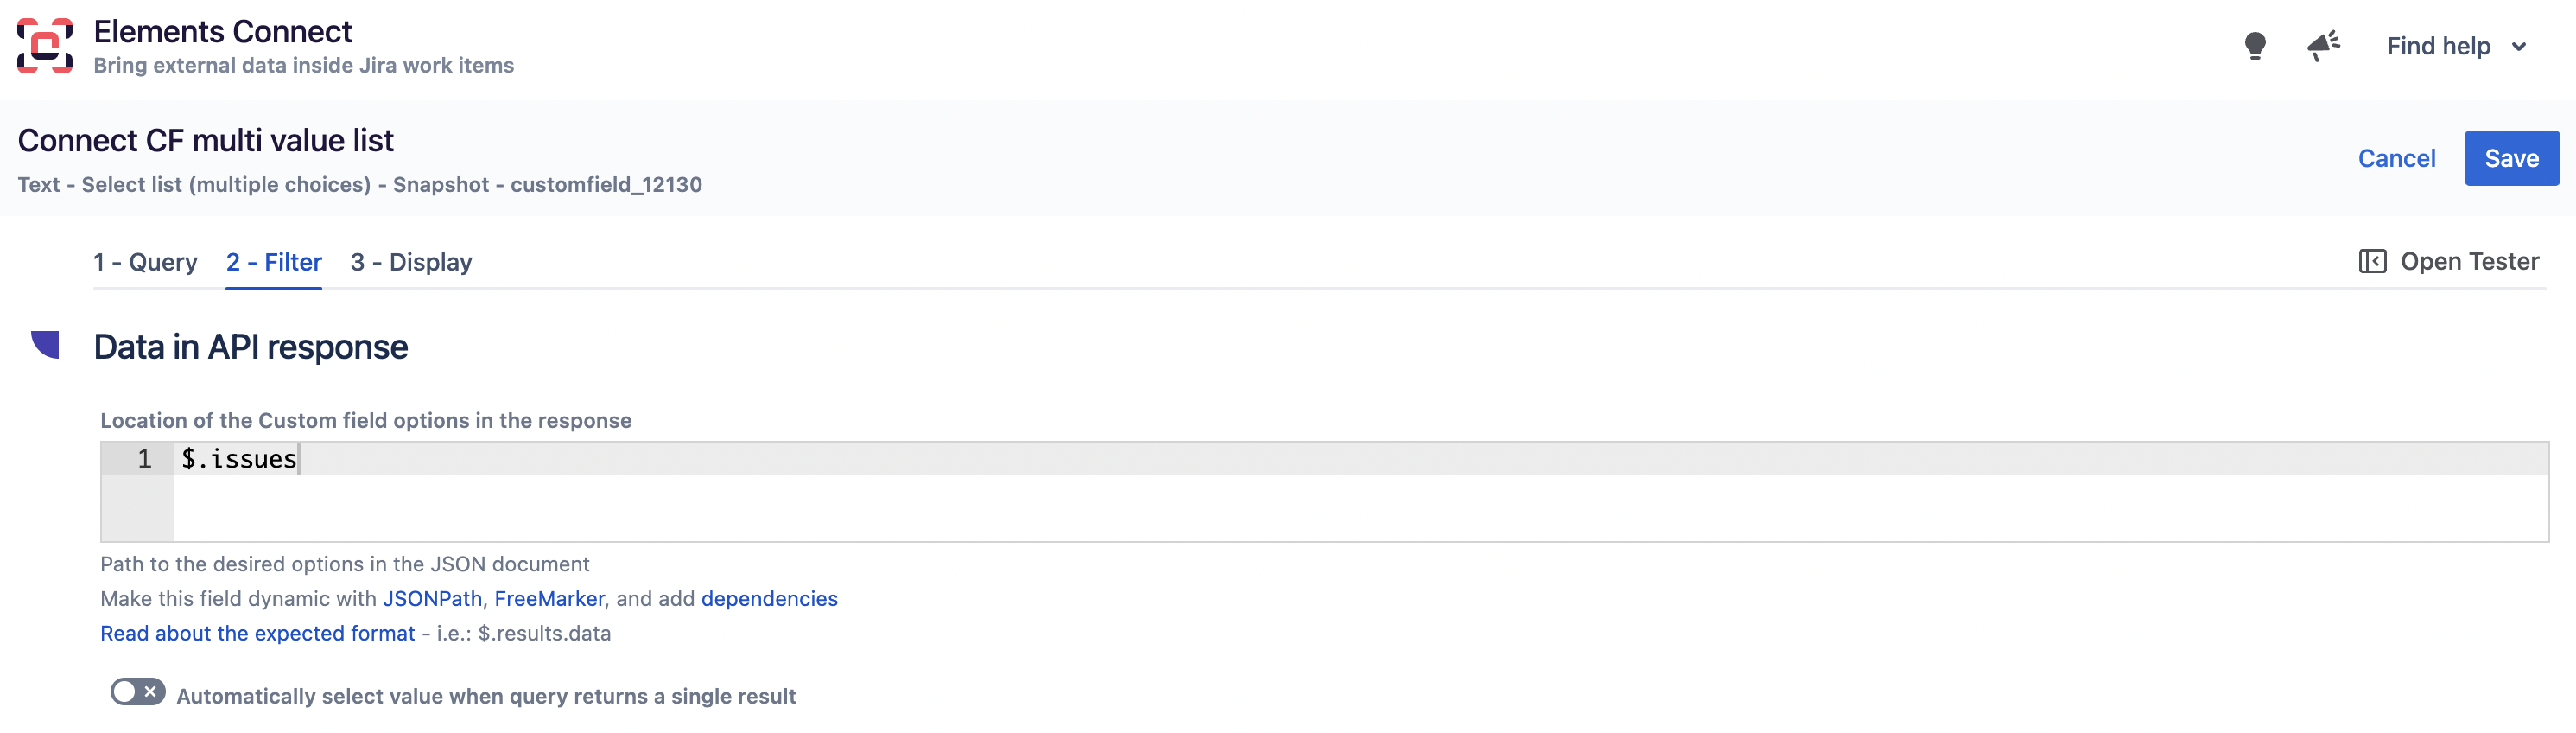
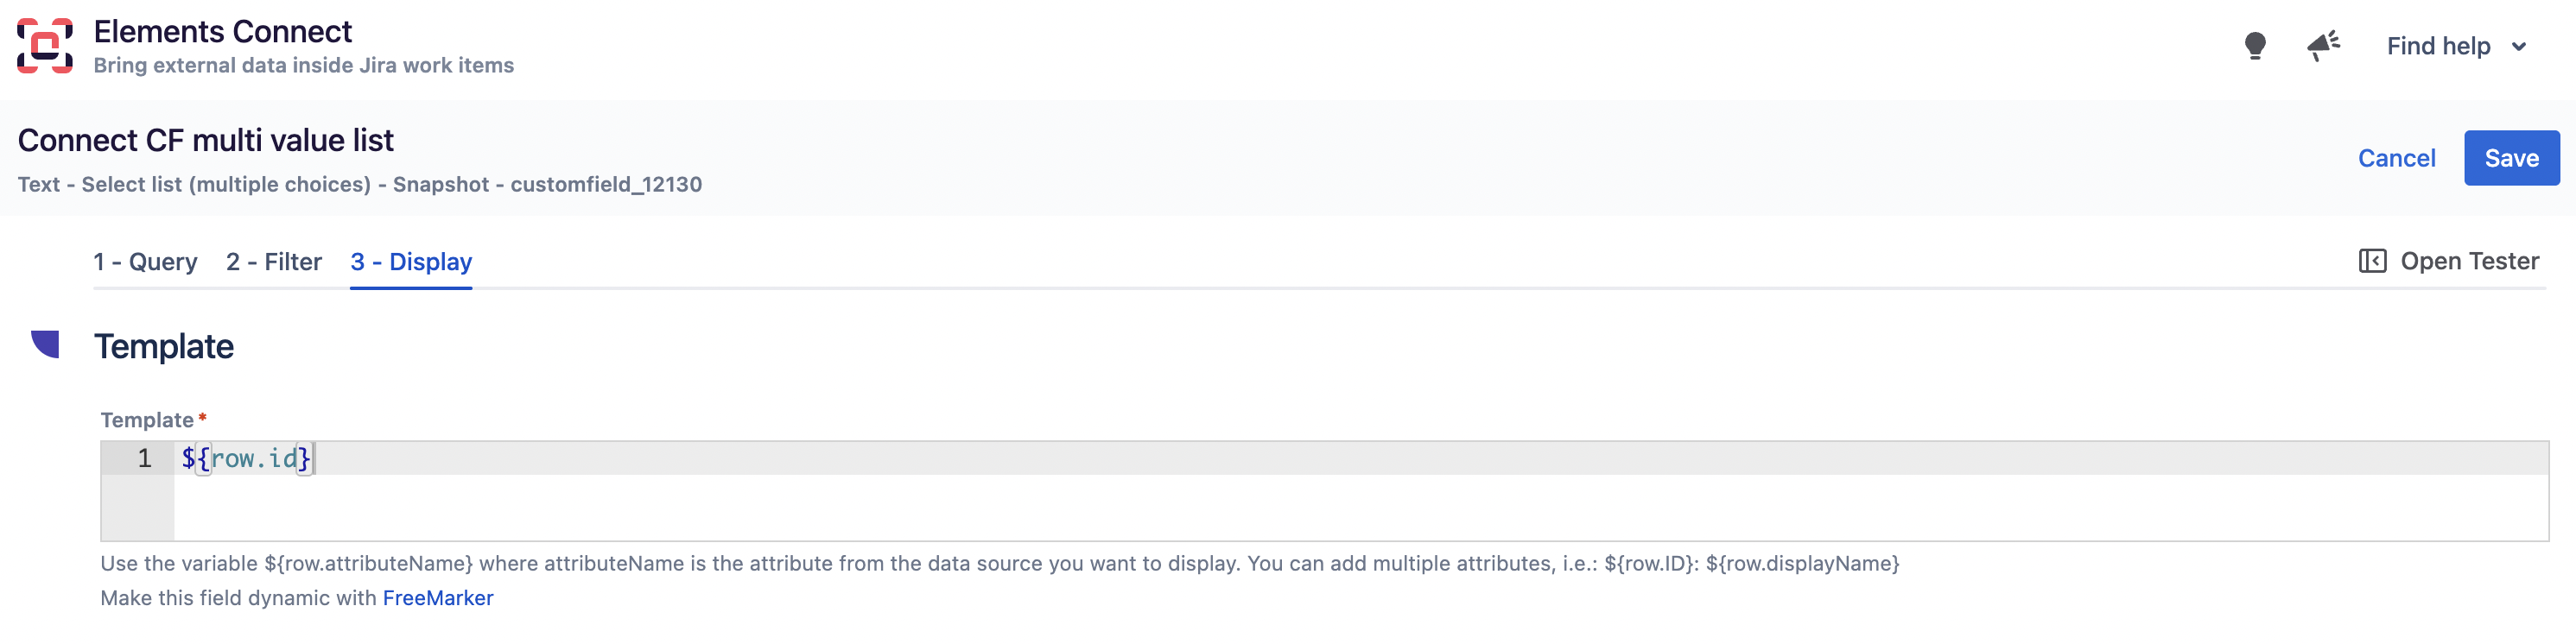
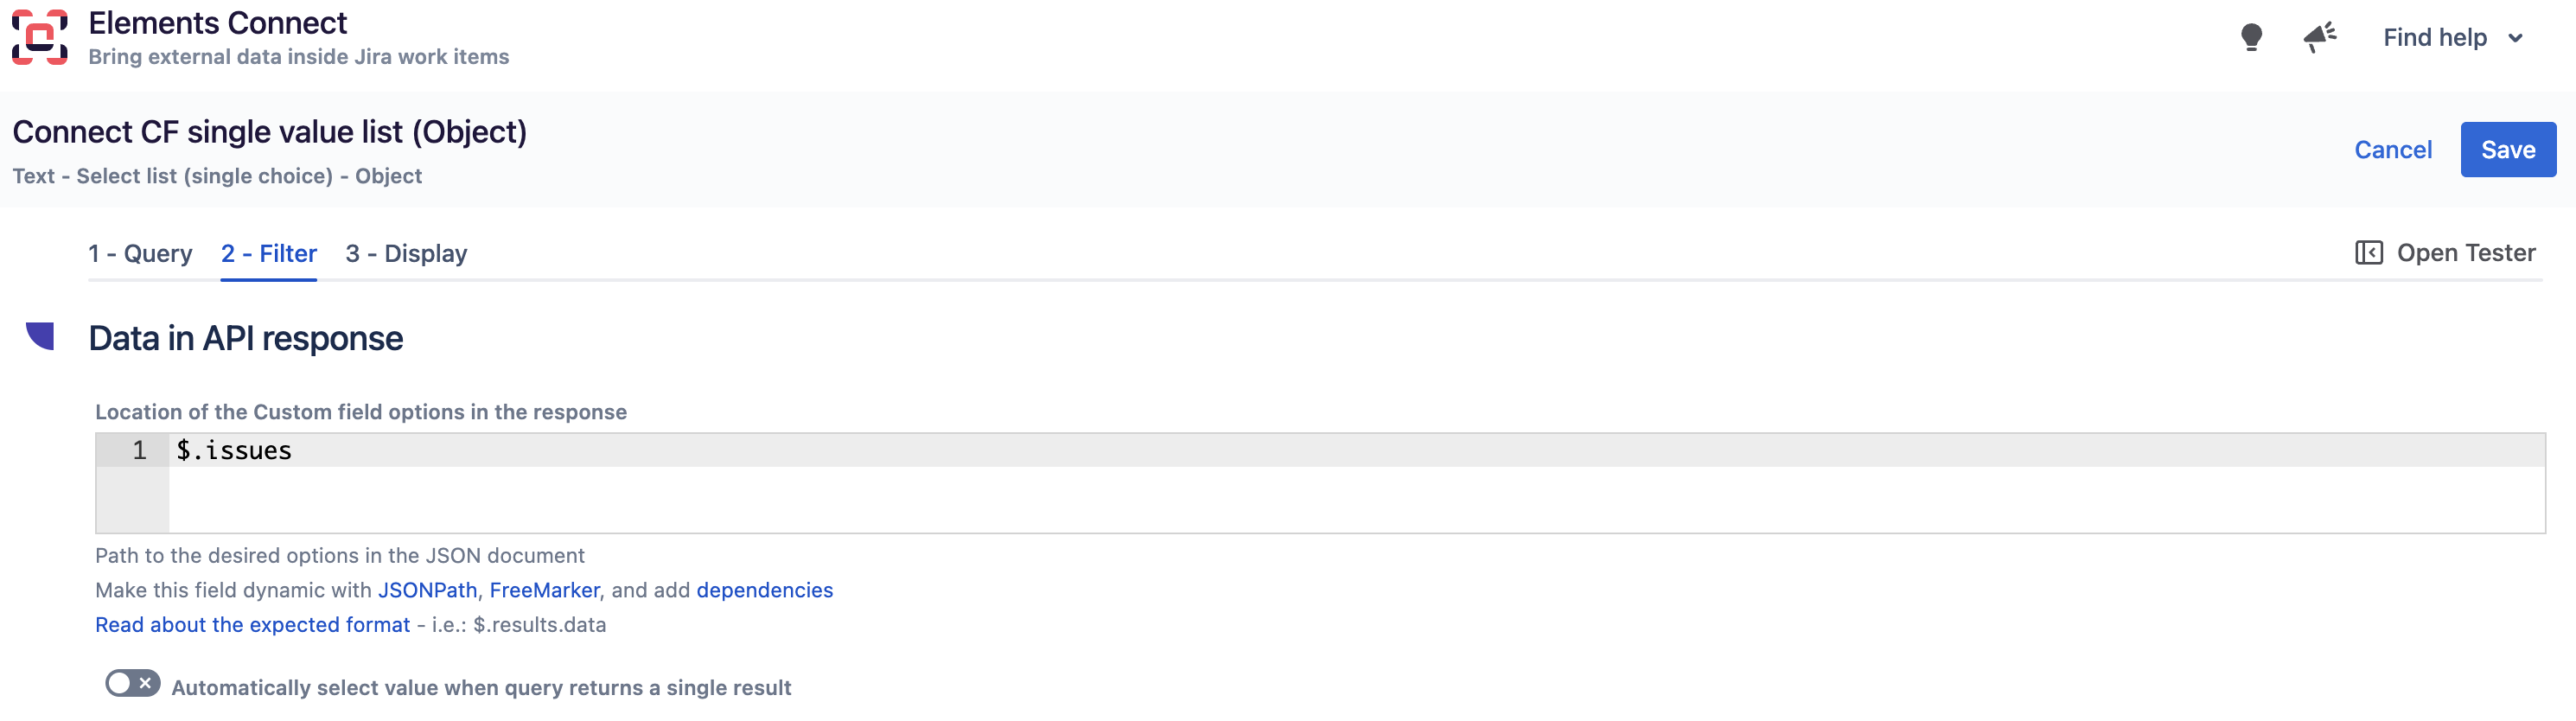
In the Template section (this means that for this object, we will store the issue id in its ID attribute, and issue key will be stored in the template attribute)
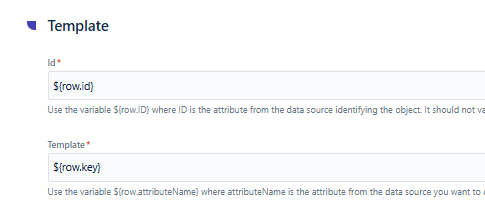
-
Save your field configuration
-
Add the field to a project/screen (let’s say the project is PM)
Automation rule configuration
-
In Automation for Jira, create a rule as below:
-
Trigger: Manually triggered (or any trigger of your choice).
-
Action: Edit work item fields
-
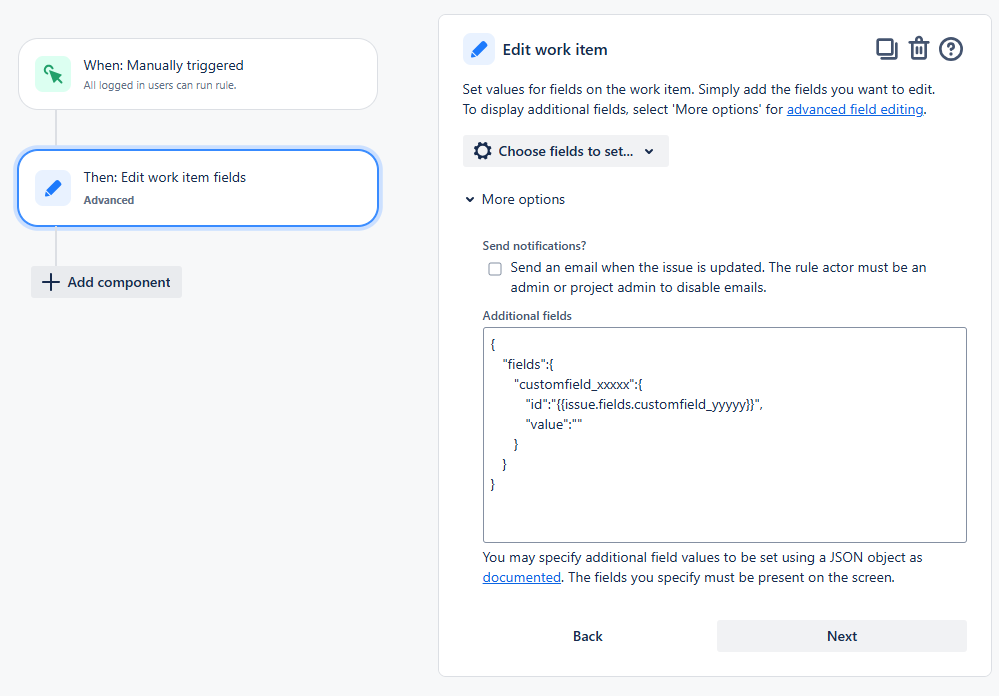
Select “More options” and in “Additional fields” section, paste the below
{
   "fields":{
      "customfield_xxxxx":{
         "id":"{{issue.fields.customfield_yyyyy}}",
         "value":""
      }
   }
}
Even if the value attribute is empty, it remains mandatory.
-
Replace customfield_xxxxx by the ID of your Connect field, customfield_yyyyy by the ID of your Jira Text field:
-
-
Set rule name and publish it.
-
-
Trigger the rule manually from the project where you’ve added the Jira text field and the Connect field (let’s say the project is PM) and the value of the Text field will be copied into the Connect field
It’s mandatory that the field is Live (the option “Recalculate displayed value on issue view” is checked) and that value in the Jira Text field matches the value defined in the Object ID attribute
Case 4 - Set User custom field
Custom field configuration
-
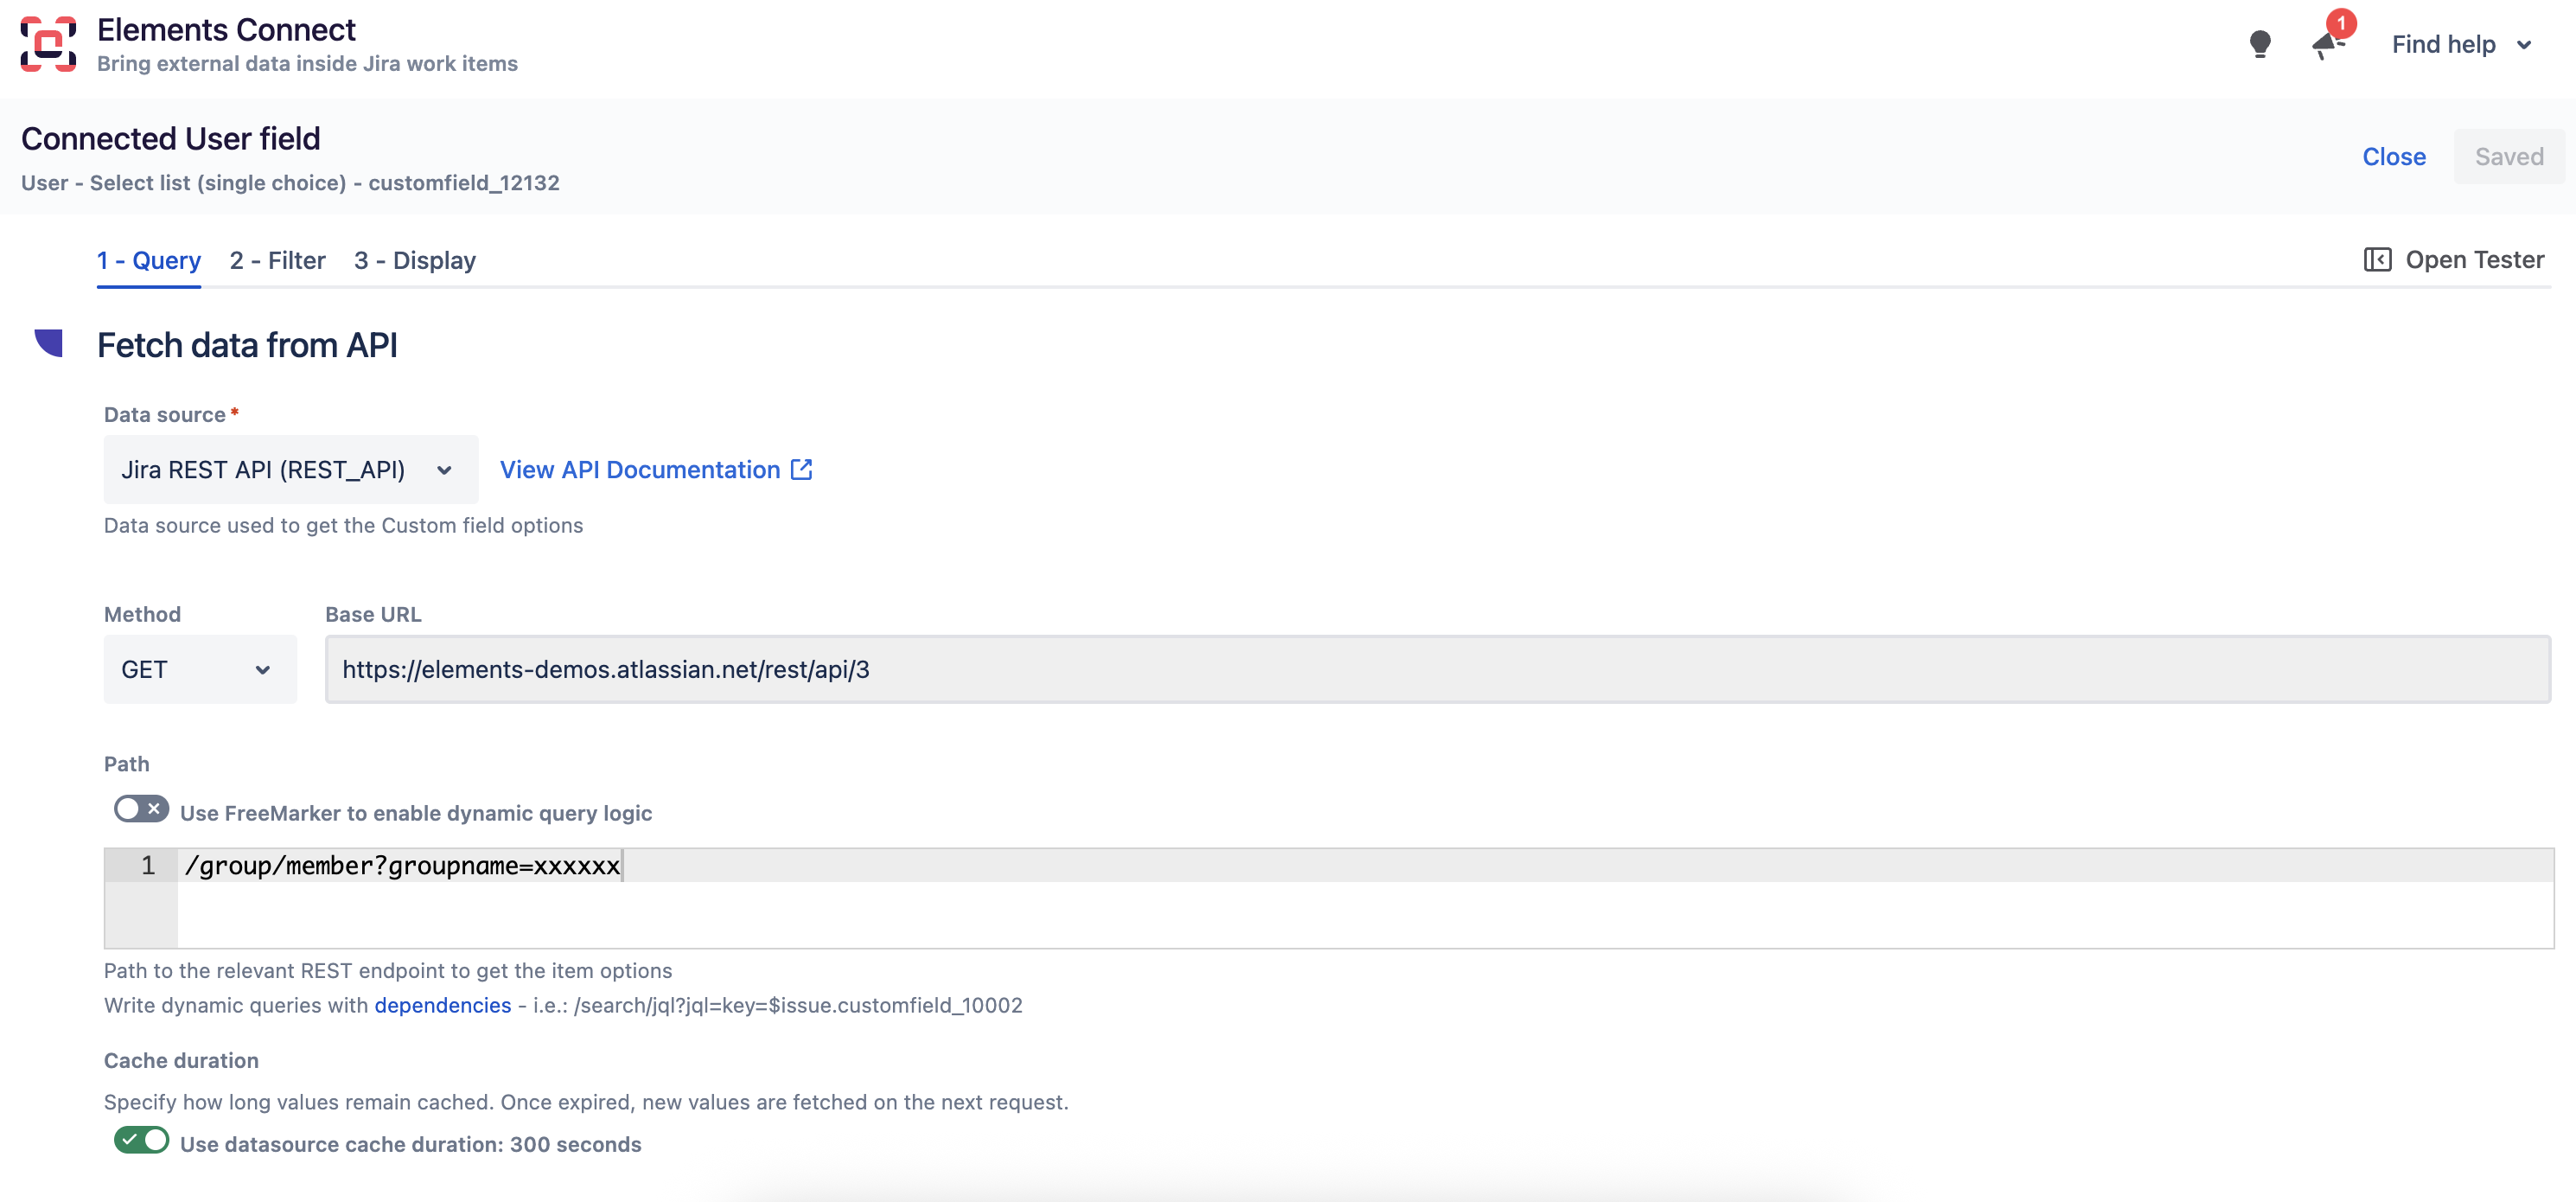
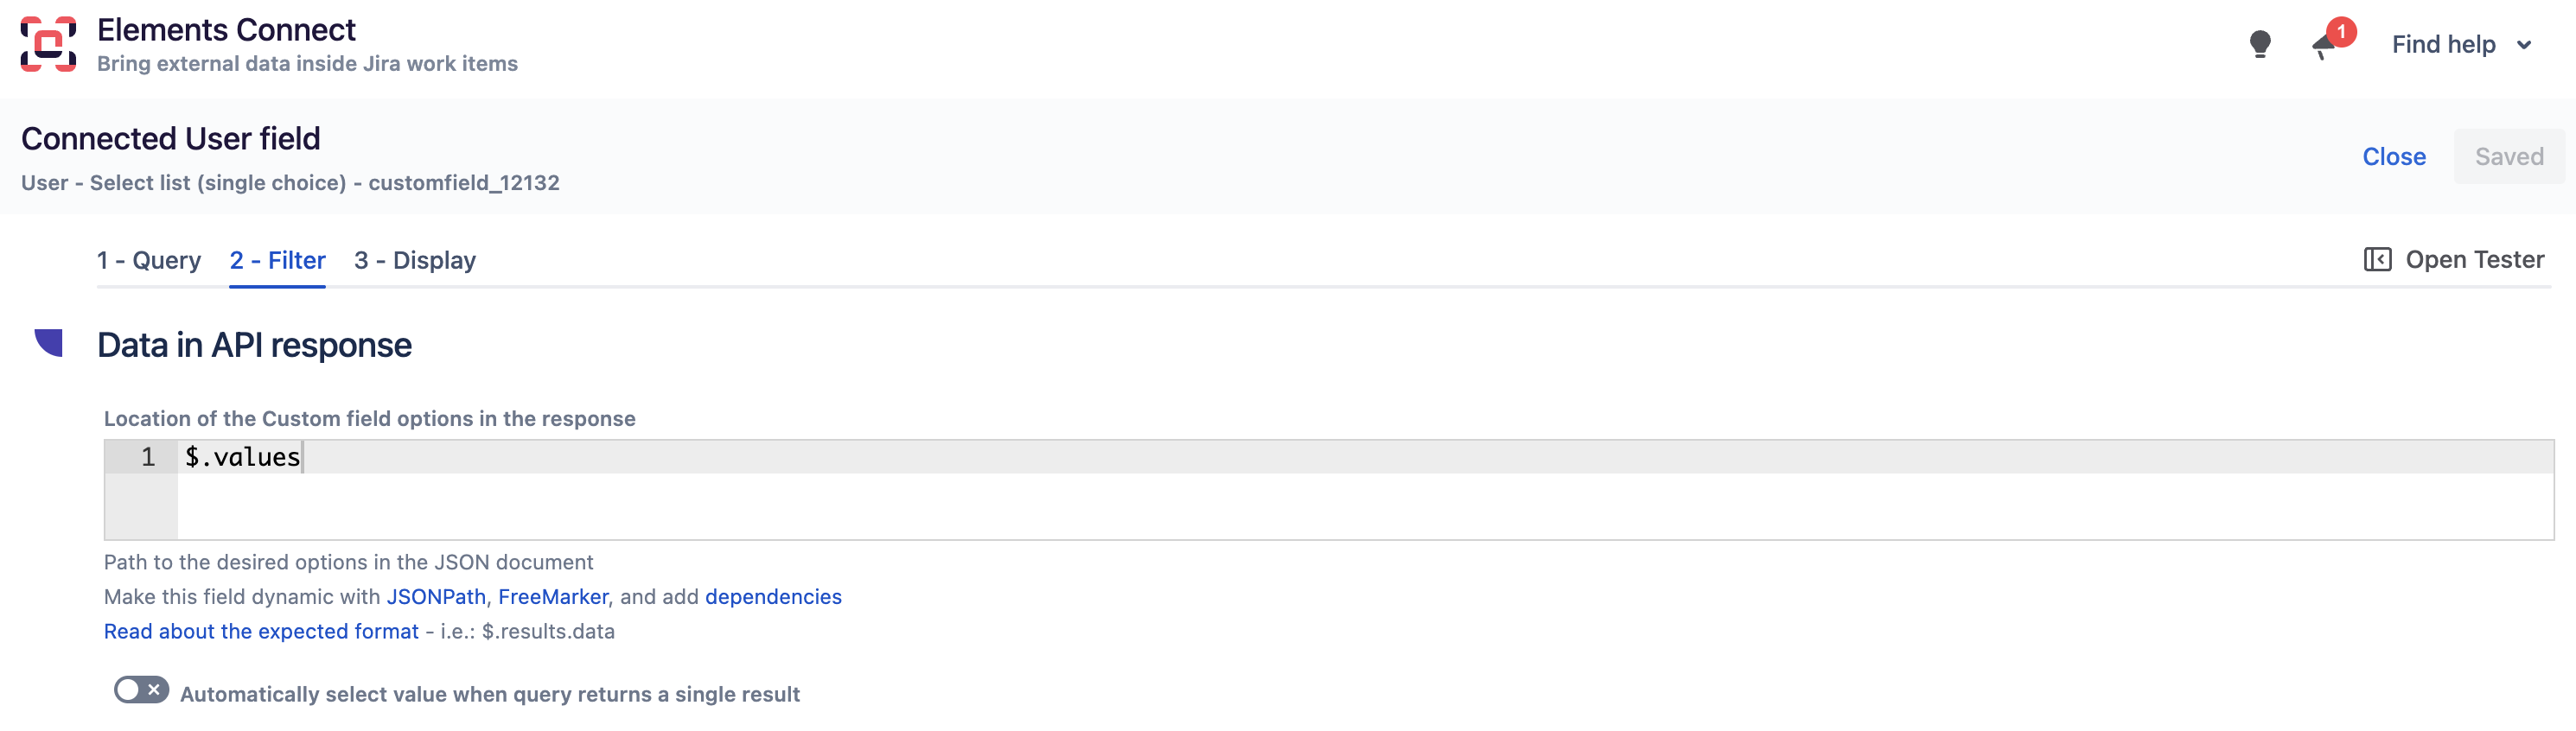
Create a Connect custom field, User - Select list (single choice):
-
In the “Display” section, set the ID you want, either
${row.accountId}or${row.emailAddress}. Please note that this will not affect the automation rule below, which can only populate a user field using theaccountIdattribute:
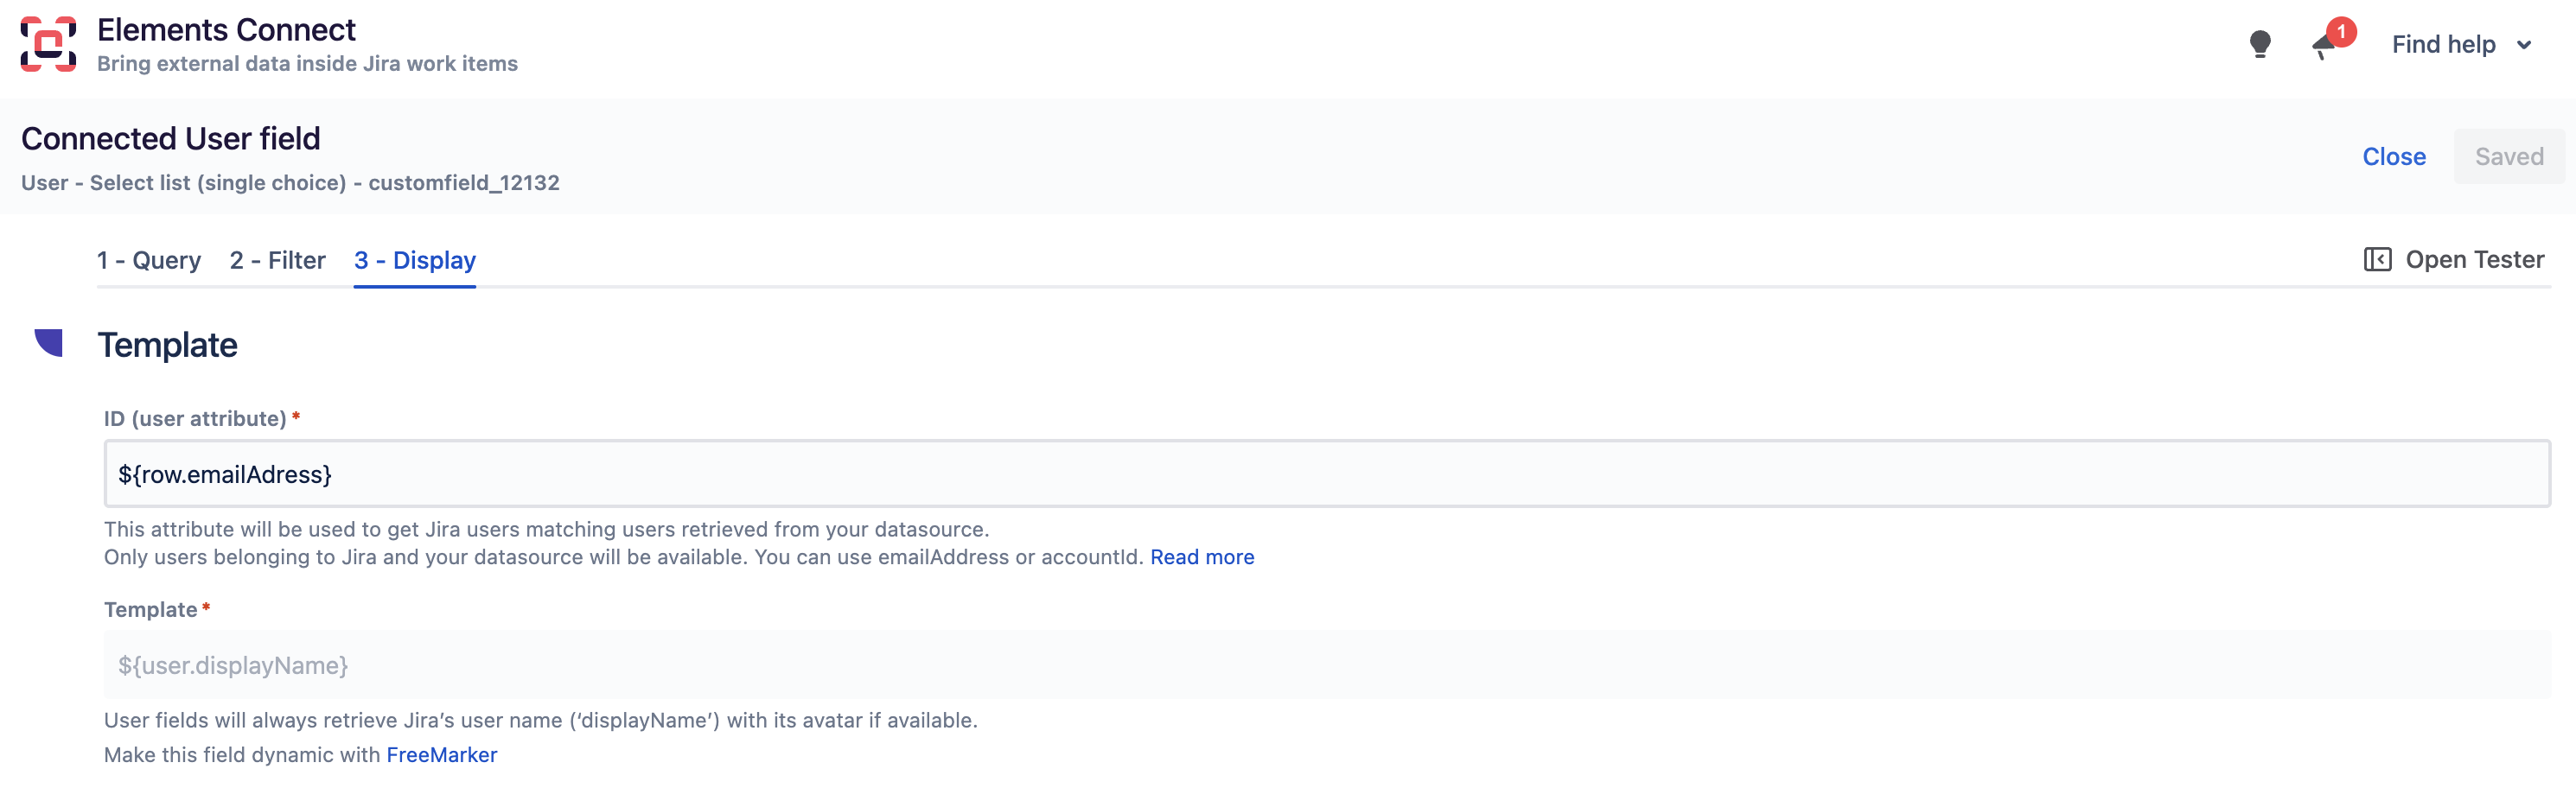
2 methods are available, depending on whether you want to use an email address or an account ID:
A. Using an Account ID
Automation rule configuration
-
In Automation for Jira, create a rule as below:
-
Trigger: Manually triggered (or any trigger of your choice).
-
Action: Edit work item fields
-
Select “More options” and in “Additional fields” section, paste the below
{ "fields":{ "customfield_XXXXX":{ "accountId":"{{issue.fields.customfield_yyyyyy}}" } } } -
Replace
customfield_XXXXXby the ID of your Connect field,customfield_yyyyyby the ID of your Jira Text field: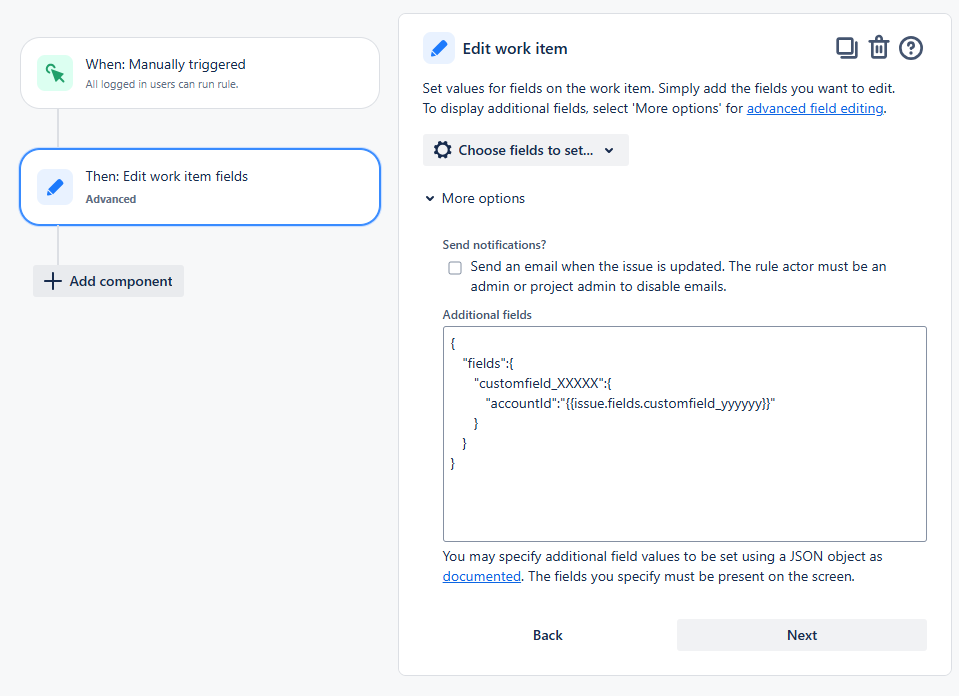
-
-
Set rule name and publish it.
-
-
Trigger the rule manually from the project where you’ve added the Jira text field and the Connect field (let’s say the project is PM) and the value of the Text field will be copied into the Connect field
To populate a user field, customfield_yyyyyyy must contain a valid user account ID.
B. Using an email address
The principle is the same as with the first method, and we will use the account ID to populate the User field, but with an additional step to retrieve the account ID from the user's email address.
Automation rule import
For your convenience, you can import the following automation rule directly into your Jira instance: automation-rule-set-connect-user-field-using-email-address.json
Once imported, you will need to update it based on your specific configuration:
-
Edit the Send Web Request action:
-
In the Web Request URL, replace
customfield_yyyyywith the ID of your Jira Text field. -
In the Authorization header, replace
ENCODED_BASE_64_TOKENwith the token you generated by following the procedure described here: How to encode a token to base 64
-
-
Edit the Edit work item fields action:
-
Replace
customfield_XXXXXwith the ID of your Connect field.
-
Automation rule configuration
-
In Automation for Jira, create a rule as below:
-
Trigger: Manually triggered (or any trigger of your choice).
-
1st Action: Send Web Request
-
Web request URL:
https://YOUR_JIRA_BASE_URL.atlassian.net/rest/api/3/user/search?query={{issue.customfield_YYYYY}}YOUR_JIRA_BASE_URLaccording to your own Jira instance, andcustomfield_yyyyyby the ID of your Jira Text field -
HTTP method: GET
-
Web request body: EMPTY
-
Activate the option “Delay execution of subsequent rule actions until we've received a response for this web request“
-
Headers:
Authorization: ENCODED_BASE_64_TOKEN Content-Type: application/jsonENCODED_BASE_64_TOKENby following the procedure described here: How to encode a token to base 64
-
-
2nd Action: Edit work item fields
-
Select “More options” and in “Additional fields” section, paste the below
{ "fields":{ "customfield_XXXXX":{ "accountId":"{{webResponse.body.accountId}}" } } } -
Replace
customfield_XXXXXby the ID of your Connect field: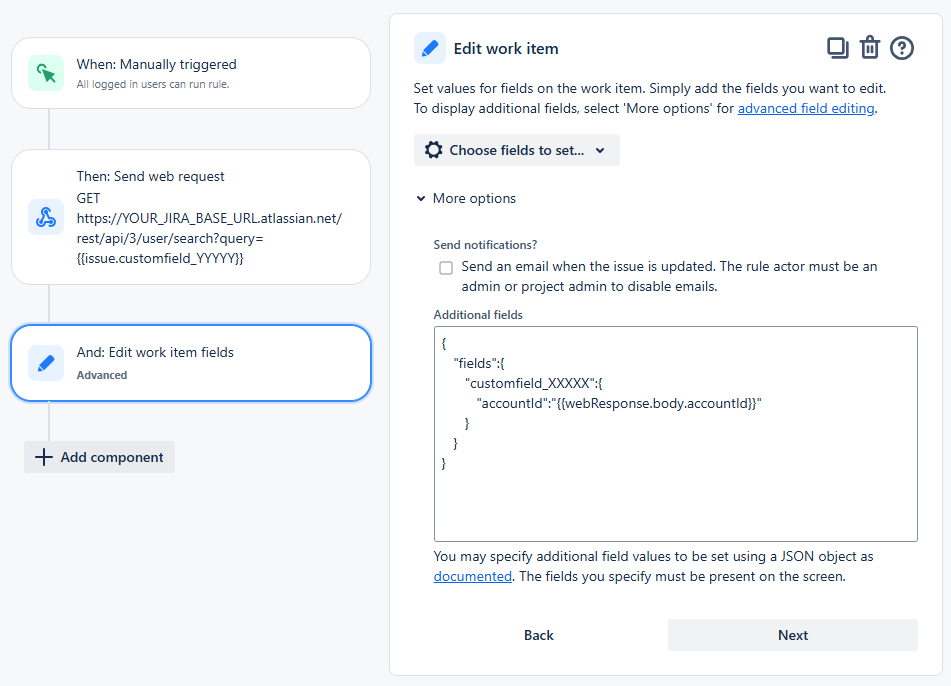
-
-
Frequently asked questions
Can I set an Elements Connect custom field value with Jira Automation?
Yes. Use the "Edit work item fields" action in Jira Automation, and provide a JSON payload that matches the Elements Connect field type (snapshot, object, or user).
What's the JSON syntax for a Snapshot single-value field?
{ "fields": { "customfield_xxxxx": "{{issue.fields.customfield_yyyyy}}" } }
What's the JSON syntax for an Elements Connect Object field?
{ "fields": { "customfield_xxxxx": { "id": "{{issue.fields.customfield_yyyyy}}", "value": "" } } }. The value attribute can be empty but must be present.
Does the Edit work item fields action support Elements Connect User fields?
Yes. Populate using accountId only, not email. To use email as input, add a Send Web Request action that calls the Jira user search API first.
My Object field automation isn't updating the displayed value. Why?
Make sure the "Recalculate displayed value on issue view" option is checked in the custom field configuration. Without it, the Object field stores the ID but doesn't refresh the displayed Template value.
Related ressources
-
How to configure a local Jira instance as a datasource - set up the cross-project Jira data source used as the prerequisite for this tutorial
-
How to search Elements Connect custom fields with JQL in Jira - query the values set by your Automation rules
-
Atlassian's Automation for Jira documentation - full reference for the Jira Automation engine and rule actions