
Introduction
Managing a service catalog in Jira Service Management often involves time-consuming manual updates and maintaining consistency, leading to inefficiencies and outdated information.
Service catalog managers face challenges with manual updates and synchronization, resulting in errors and a disjointed user experience. This complexity frustrates users and lowers service adoption.
This tutorial simplifies service catalog management with Elements Connect and Jira Assets, automating updates, improving efficiency, and enhancing user navigation.
Solution overview
This solution offers a robust and efficient way to handle service catalogs, providing a seamless experience for both administrators and users. It has three main benefits:
Centralized service data
-
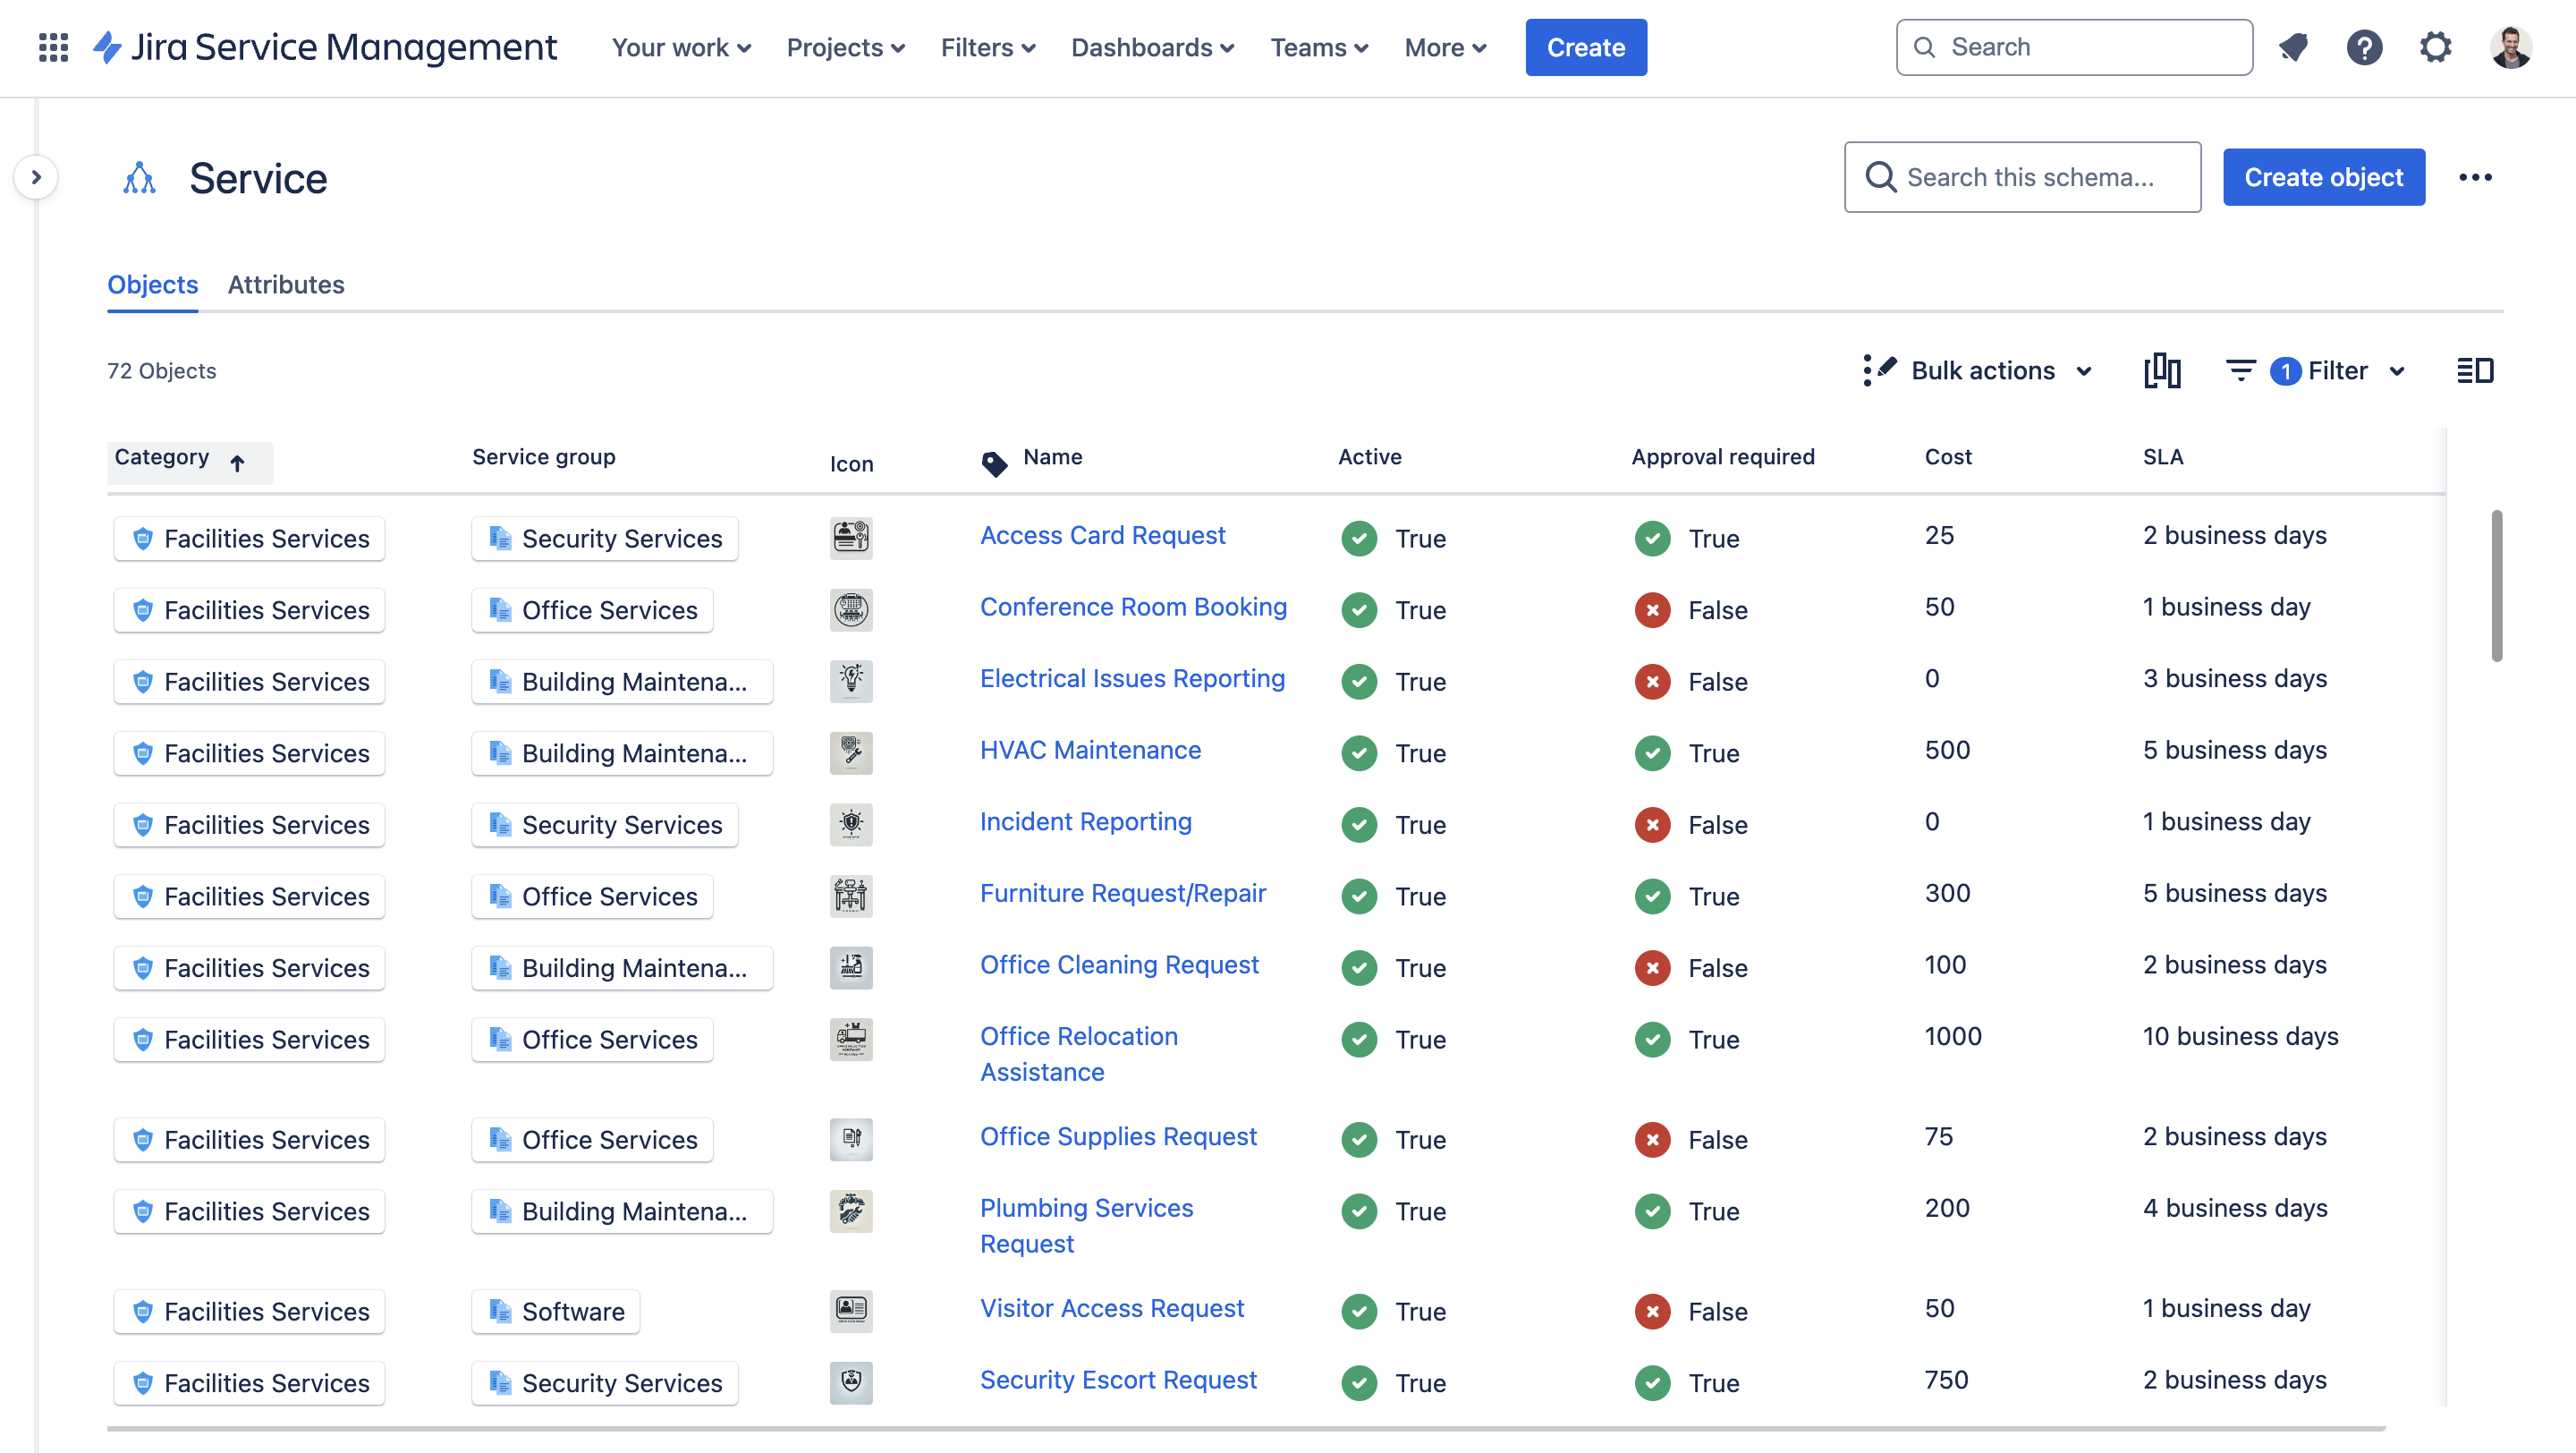
All service information is stored in Jira Assets, organized into categories, groups, and individual services.
-
Service catalog managers or service owners can easily update and maintain service details, ensuring accuracy and consistency. This reduces the dependency on Jira admins and speeds up the update process.
Enhanced user experience
-
Users can easily navigate through hundreds of services, quickly finding the service they need thanks to the Elements connected items that offer dynamic values and cascading selection.
-
Detailed service information, including descriptions, SLAs, and costs, is readily accessible, empowering users to make informed decisions.
Scalable and customizable
-
The solution is highly scalable, capable of handling thousands of service objects.
-
Organizations can customize the structure and attributes of their service catalog to meet specific needs, ensuring flexibility and adaptability.
How to implement the solution
Implementing this solution involves several key steps to configure Jira Assets, Elements Connect and Jira Service Management.
Setting up Jira Assets
To set up Jira Assets for managing your service catalog, follow these general steps:
-
Create a schema
-
Name your schema, e.g., "Services."
-
-
Define object types
-
Create object types for each level of your service catalog, e.g.:
-
Service category
-
Service group
-
Service
-
-
In our example, we’ve organized the service catalog into three levels, but this structure is completely flexible. You can adapt it to fit your organization’s needs, with as many levels as required. However, it is advisable not to exceed five levels, as this seems to be a reasonable limit to maintain simplicity and manageability.
-
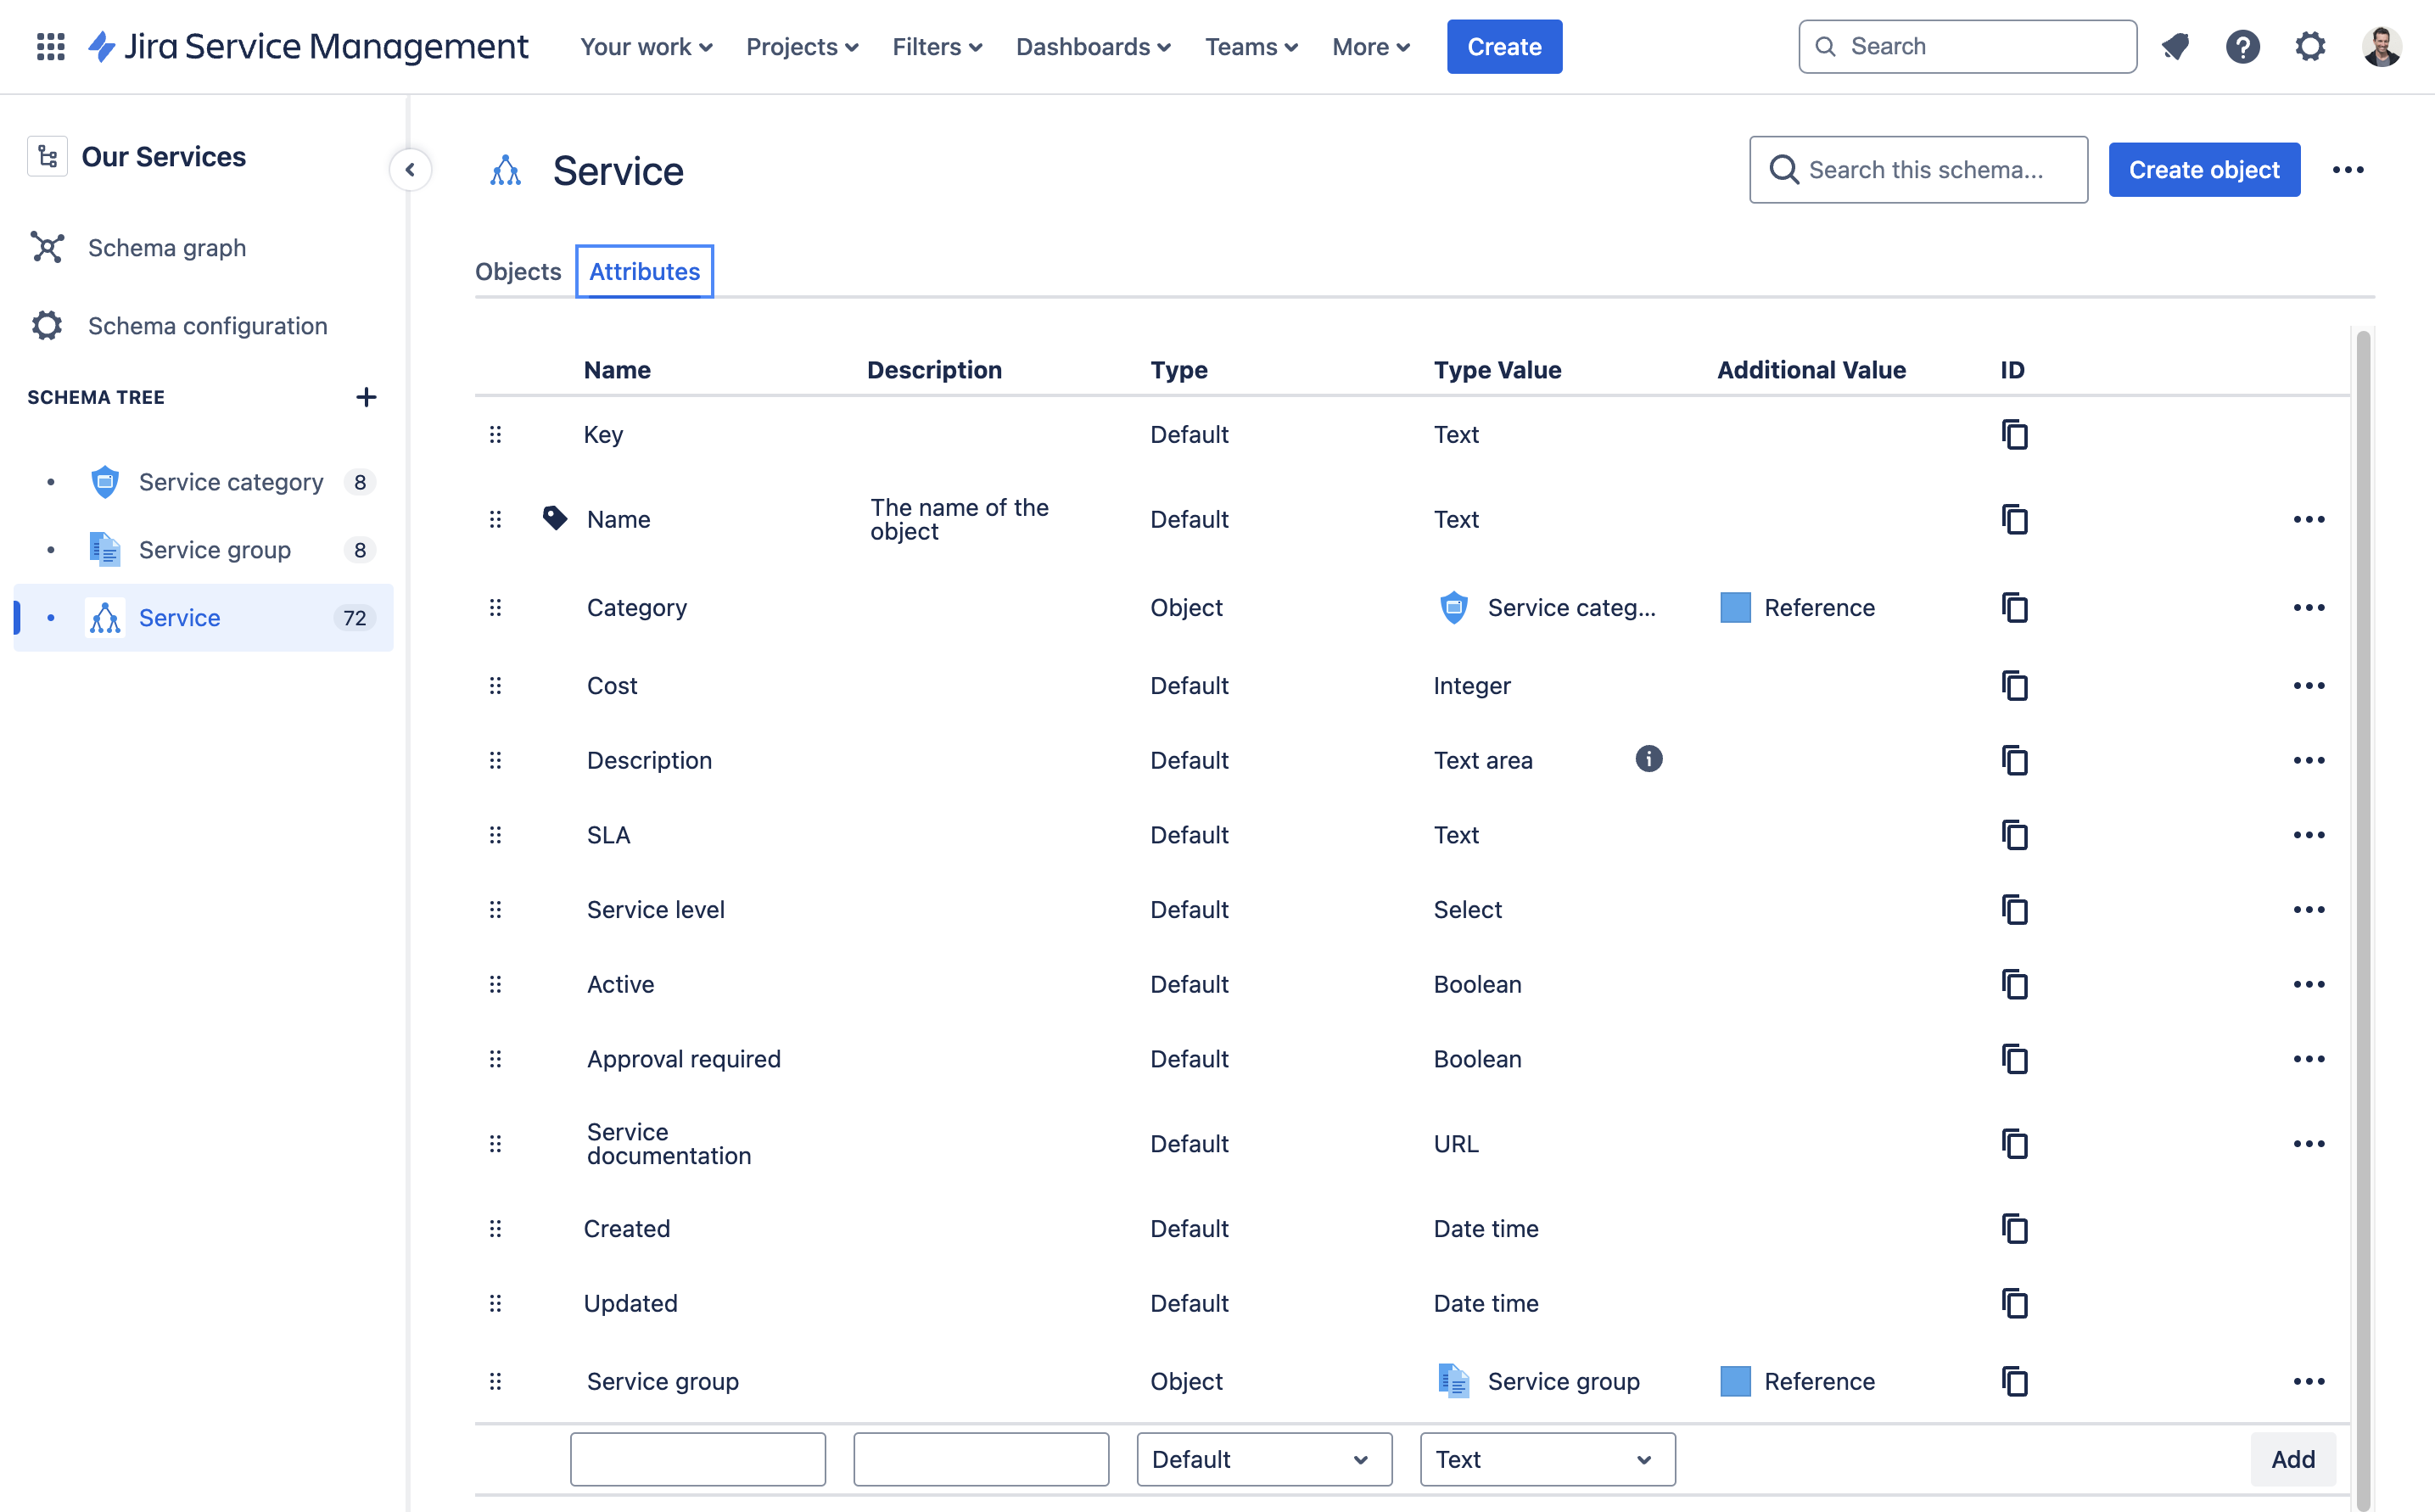
Add attributes
-
Add necessary attributes to each object type. Typical attributes for a service might include:
-
Name
-
Description
-
Cost
-
SLA
-
Owner (can be a user)
-
Active (boolean to indicate if the service is available)
-
-
Ensure you reference the Service category in the Service group schema and the Service group in the Service schema using an attribute of type "object."
-
Alternatively, consider creating a 'Retired Services' category to archive inactive services while keeping them accessible for historical reference.
-
Create or import data:
-
Create data:
-
Manually create objects in Jira Assets, similar to creating issues in Jira.
-
-
Import data:
-
Use the import feature of Jira Assets to import data from CSV or other supported formats. Detailed instructions can be found in the Jira Assets import documentation.
-
-
If you have a large existing service catalog, importing data via CSV or JSON is more efficient than manual entry, but it requires careful formatting to avoid errors
For more detailed instructions, refer to the official Jira Assets documentation.
Configure Elements Connect
Create and configure the "Assets" datasource
To connect Jira Assets with Elements Connect, you first need to create a datasource definition named "Assets." For detailed instructions on how to configure Jira Assets as a datasource, refer to How to configure Jira assets as a datasource .
Create and configure the Connected Items
Next, you'll create four connected items: Service category, Service group, Service, and Service details. These items will enable users to navigate and select services dynamically within the Jira Service Management portal.
In this setup, we create one connected item per level plus one additional connected item to display the service details. This structure can be adapted to fit your organization’s specific needs and how services are organized within Jira Assets.
Service category
Follow these steps to create and configure the first connected item, "Service category":
Step 1: Create the Connected Item
-
Navigate to the Connected fields section in Elements Connect.
-
Click on Create a connected field.
-
Select Connected item.
-
Choose Single select.
-
Name the connected item, for example, "Service category".
-
Select the datasource created in the previous step ("Assets").
-
Uncheck the Create the associated mirror field box unless you want to perform searches or reporting based on the Service category.
-
Click on Create.
Step 2: Configure the query
-
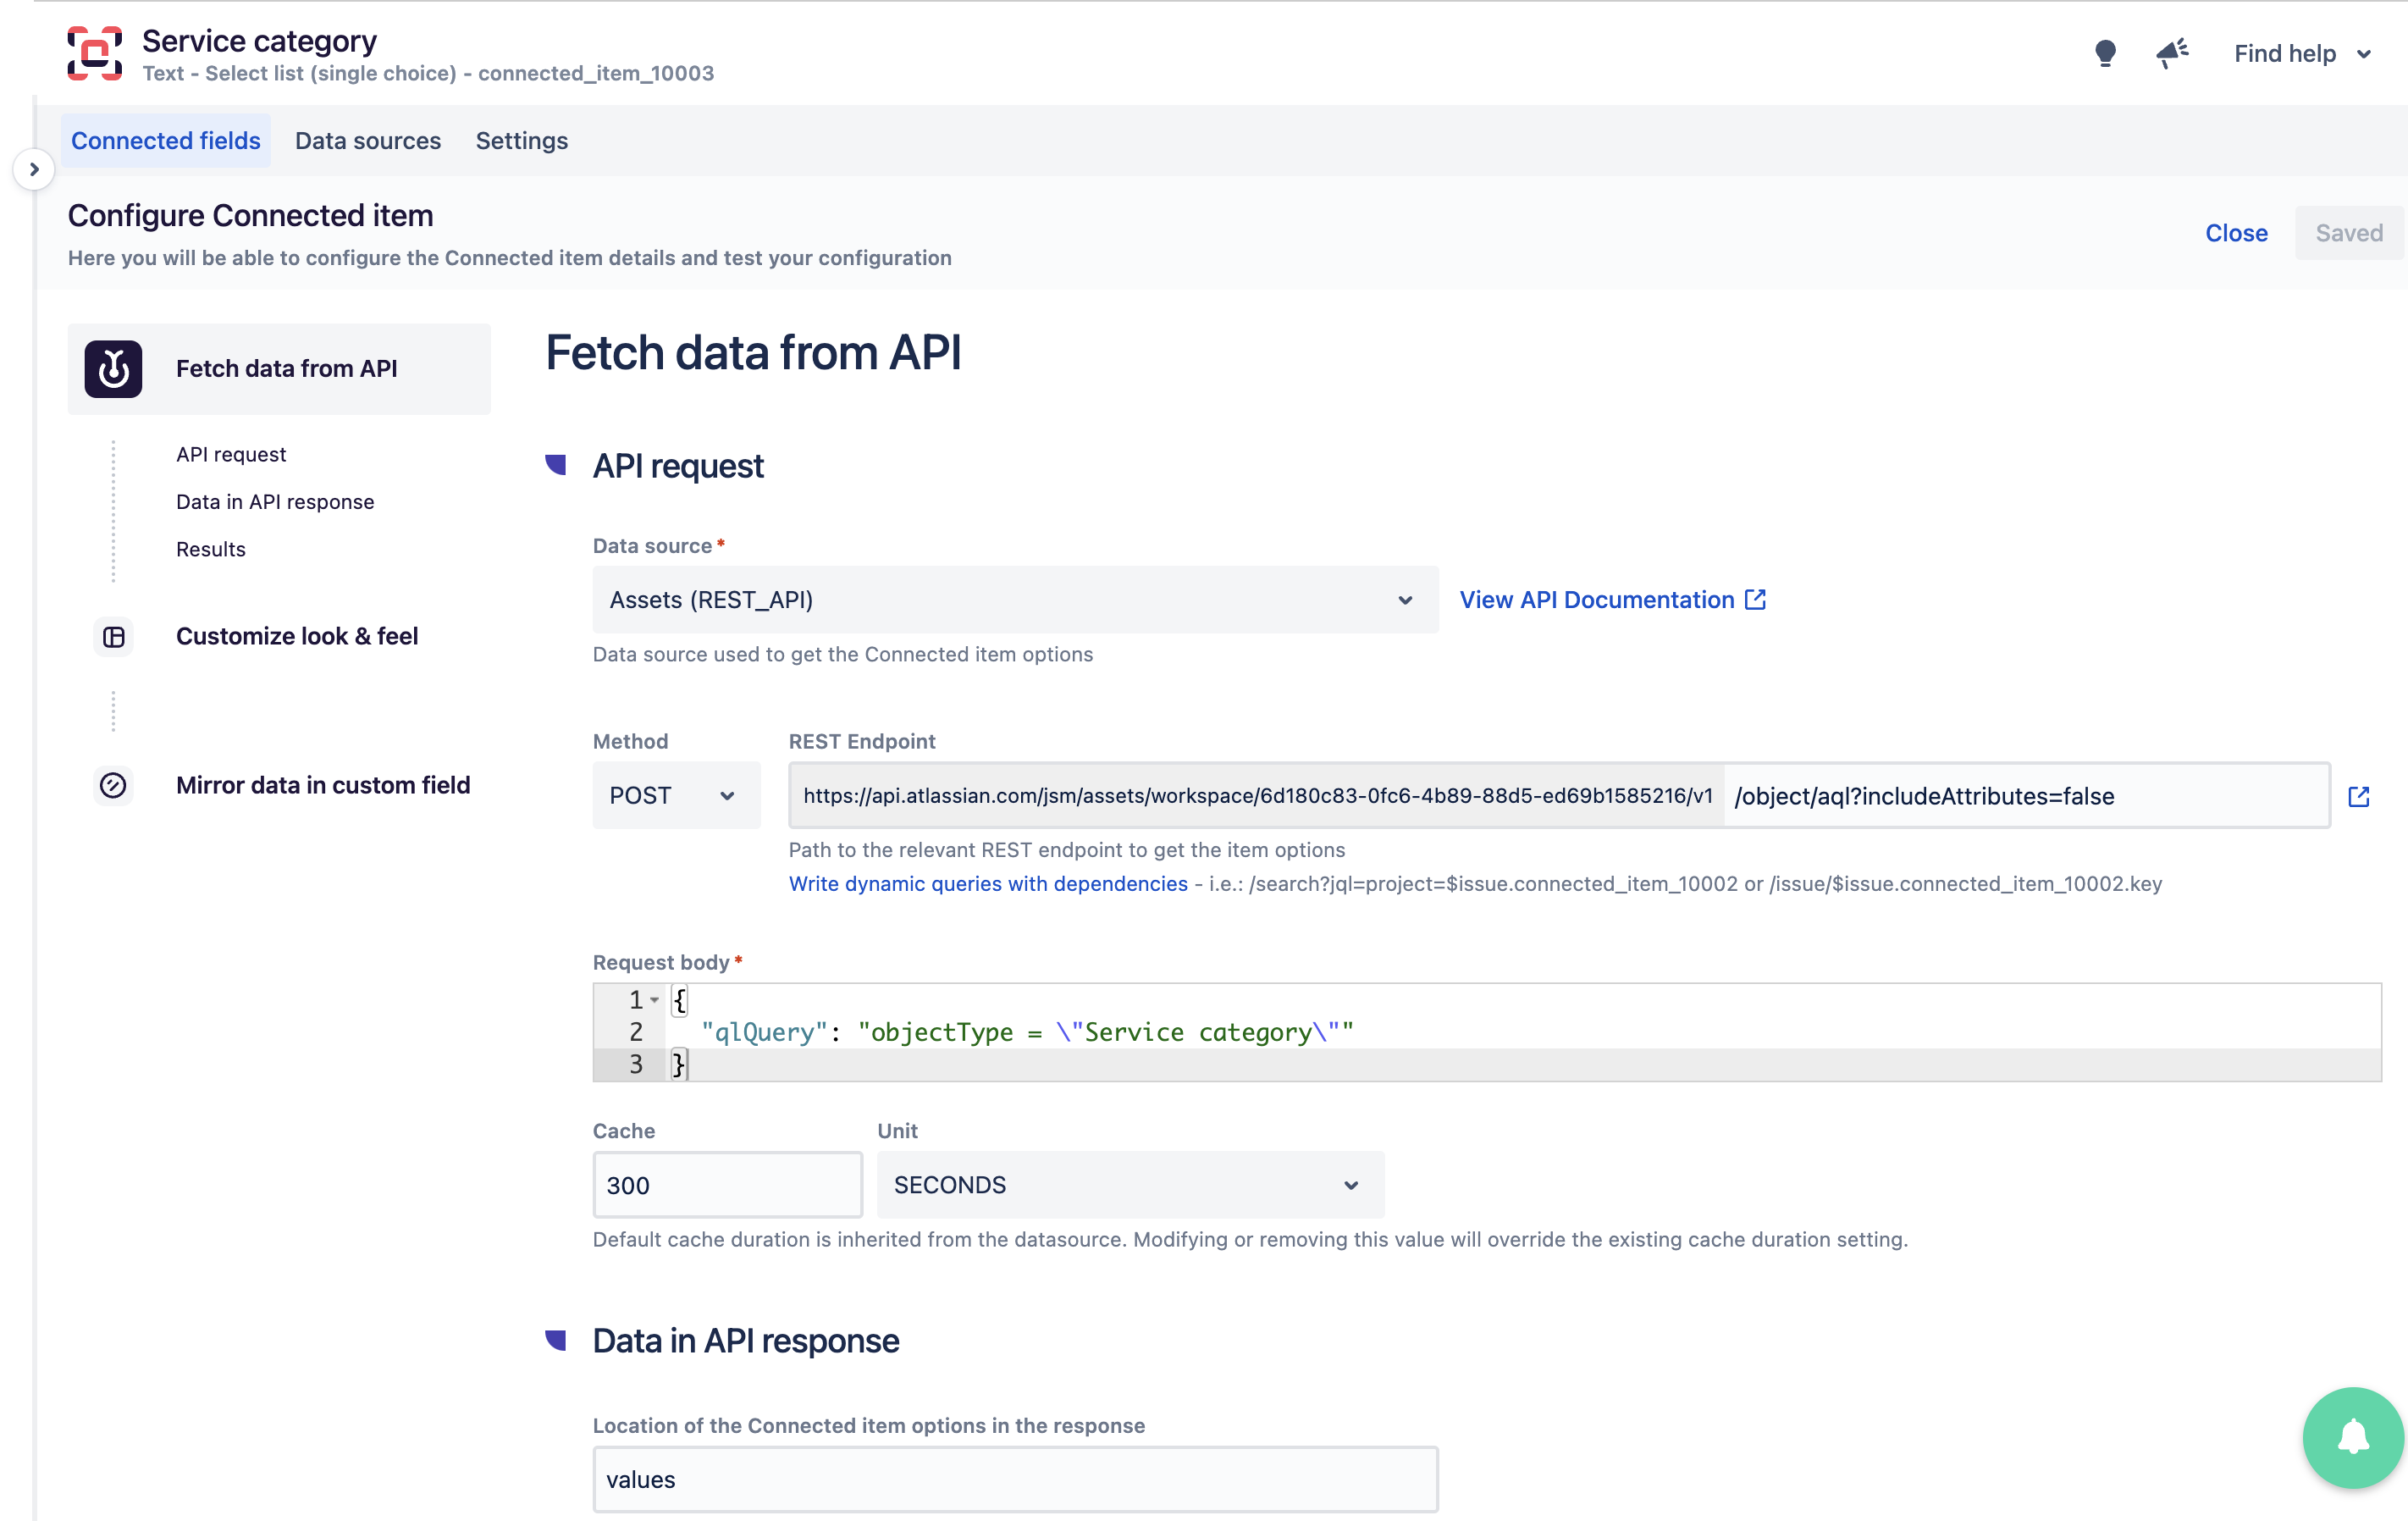
Navigate to the "Fetch data from API" section from the Connected item configuration screen.
-
Set the following configurations:
-
Method: Set to
POST. -
REST endpoint: Enter
/object/aql?includeAttributes=false. -
Request body: Enter
{ "qlQuery": "objectType = \"Service category\""}(whereService categoryis the object type name configured in Jira Assets). -
Cache: Leave it set to the default value.
-
Location of the Connected item options in the response: Set to
values.
-
For more information on the endpoint used, refer to the endpoint documentation.
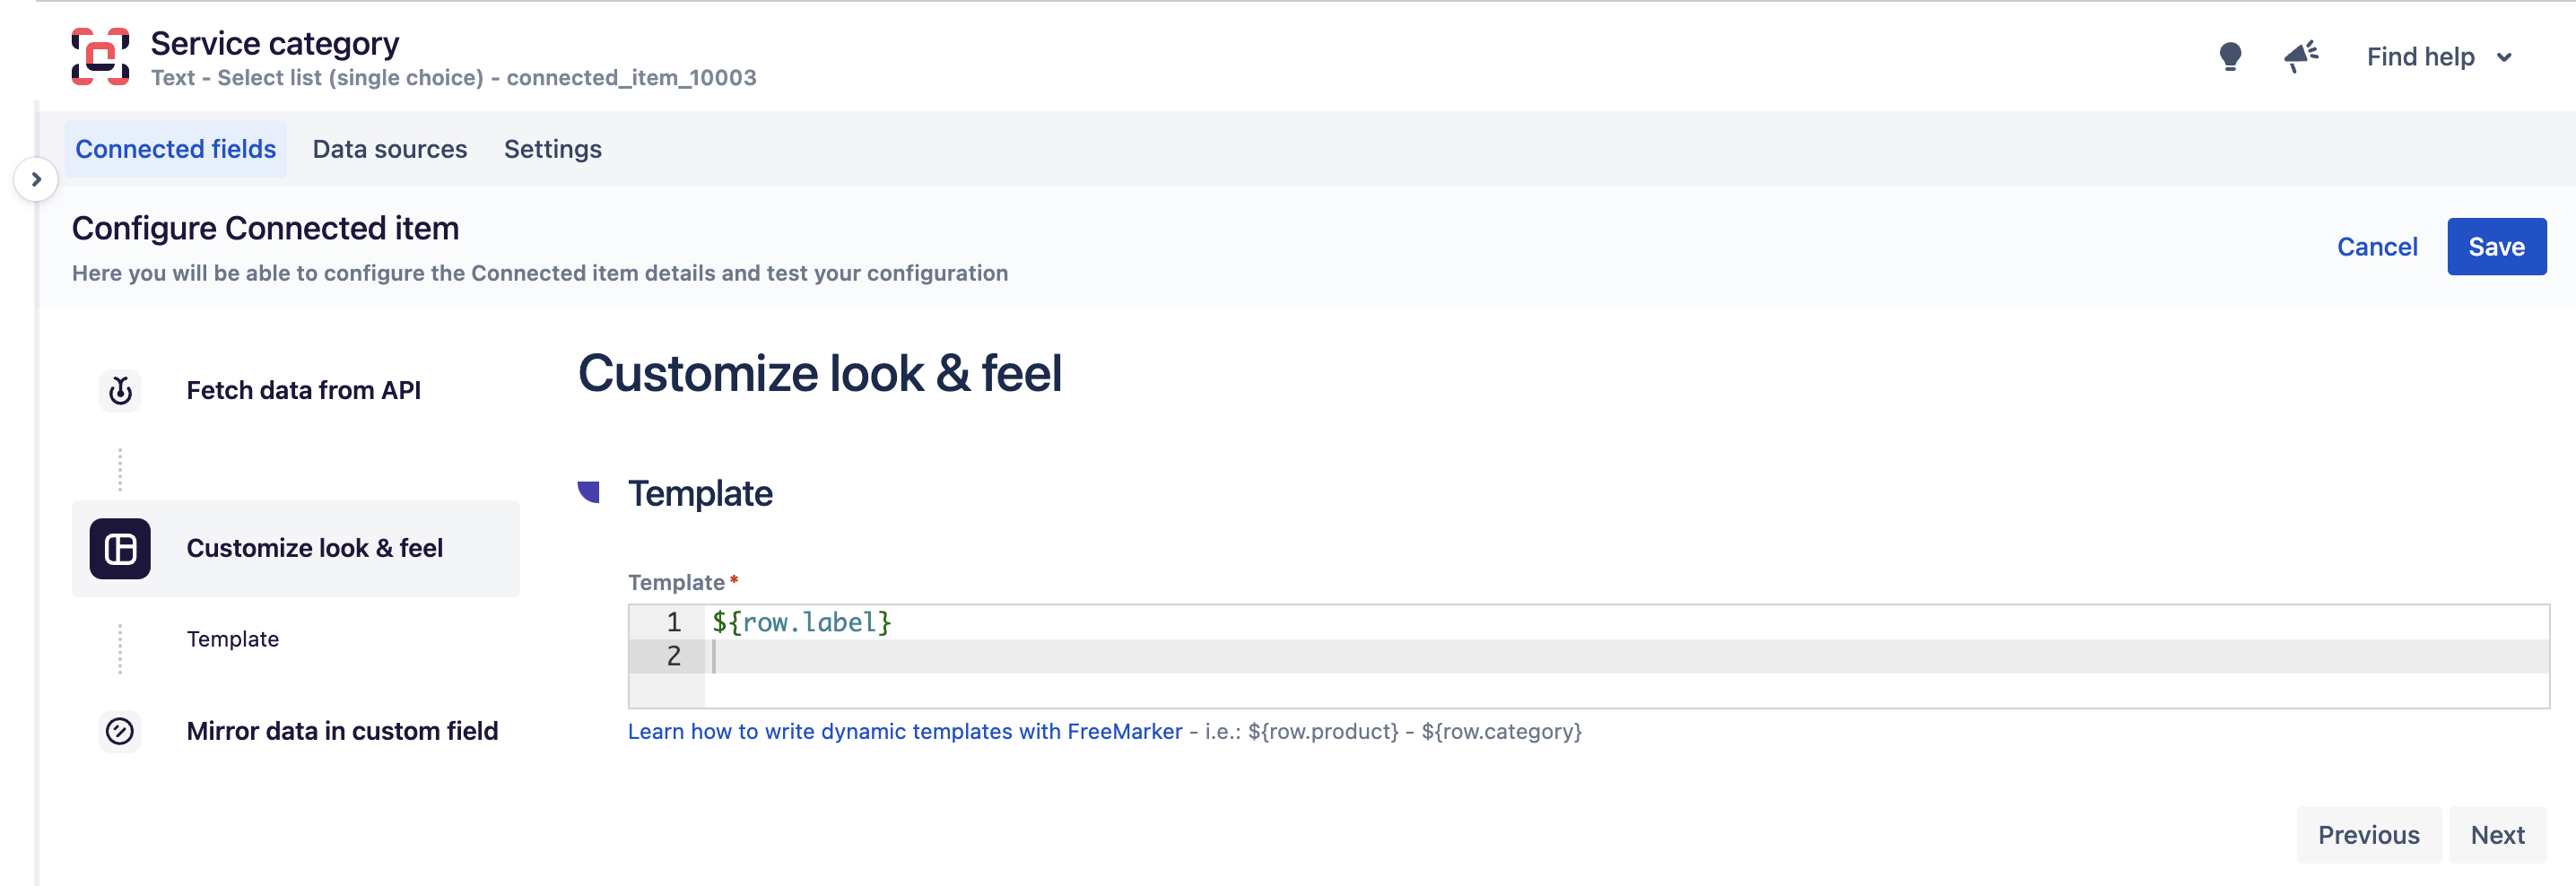
Step 3: Configure the display
-
In the Customize look & feel section:
-
Template: Enter
${row.label}to display the service name. You can include more attributes if needed (refer to the JSON in the configuration tester to see the list of available attributes).
-
-
Save the configuration.
Service group
The "Service group" connected item will display groups based on the selected service category. Before configuring this item, make sure to note down the ID of the "Service category" connected item (e.g., connected_item_10003). This ID will be used to filter the service groups based on the selected service category.
Step 1: Create the Connected Item
-
Follow the same steps as for creating the "Service category" connected item, but name this item "Service group".
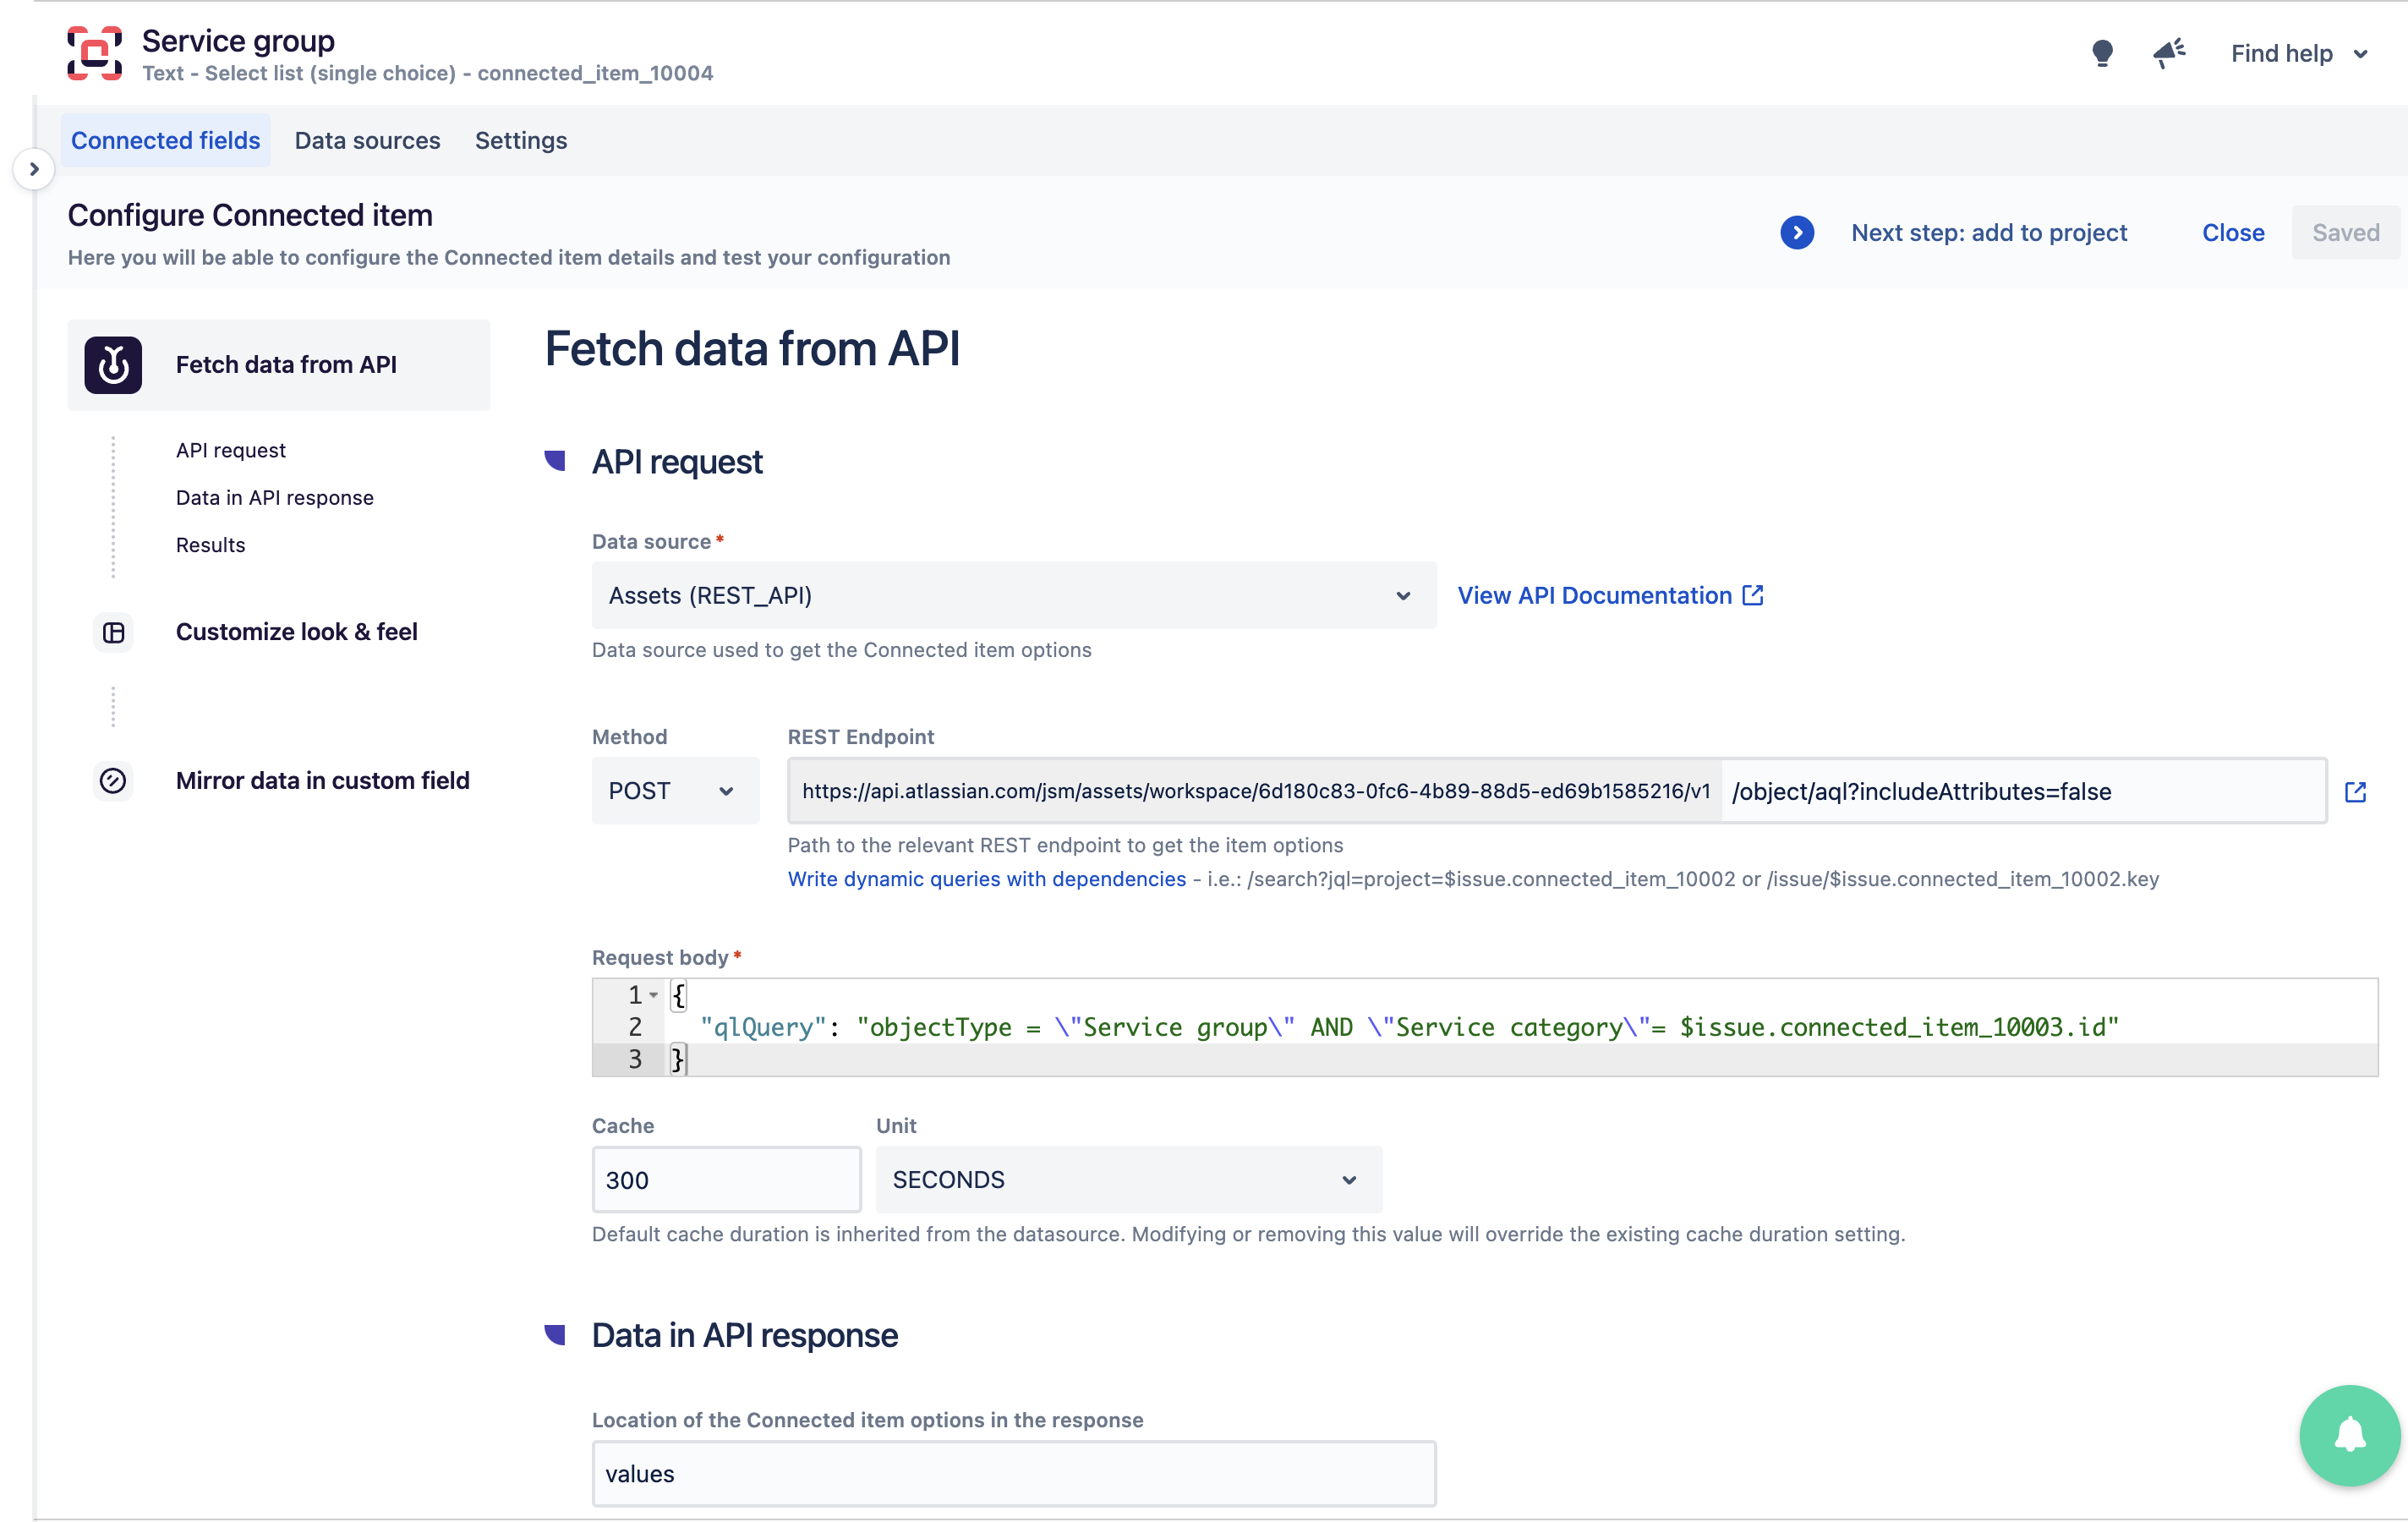
Step 2: Configure the query
-
Navigate to the "Fetch data from API" section from the Connected item configuration screen.
-
Set the following configurations:
-
Method: Set to
POST. -
REST endpoint: Enter
/object/aql?includeAttributes=false. -
Request body: Enter:
{
  "qlQuery": "objectType = \"Service group\" AND \"Service category\"= $issue.connected_item_10003.id"
}
Where
Service groupis the object type name configured in Jira Assets, andconnected_item_10003is the ID of the "Service category" connected item. -
Cache: Leave it set to the default value.
-
Location of the Connected item options in the response: Set to
values.
-
-
Test the configuration by clicking on Run in the Results section to verify that the query works and returns data.
For more information on the endpoint used, refer to the endpoint documentation.
Step 3: Configure the display
-
In the Customize look & feel section:
-
Template: Enter
${row.label}to display the service group name. You can include more attributes if needed (refer to the JSON in the configuration tester to see the list of available attributes).
-
-
Save the configuration.
Service
The "Service" connected item will display active services based on the selected service group.
Step 1: Create the Connected Item
-
Follow the same steps as for creating the previous connected items, but name this item "Service".
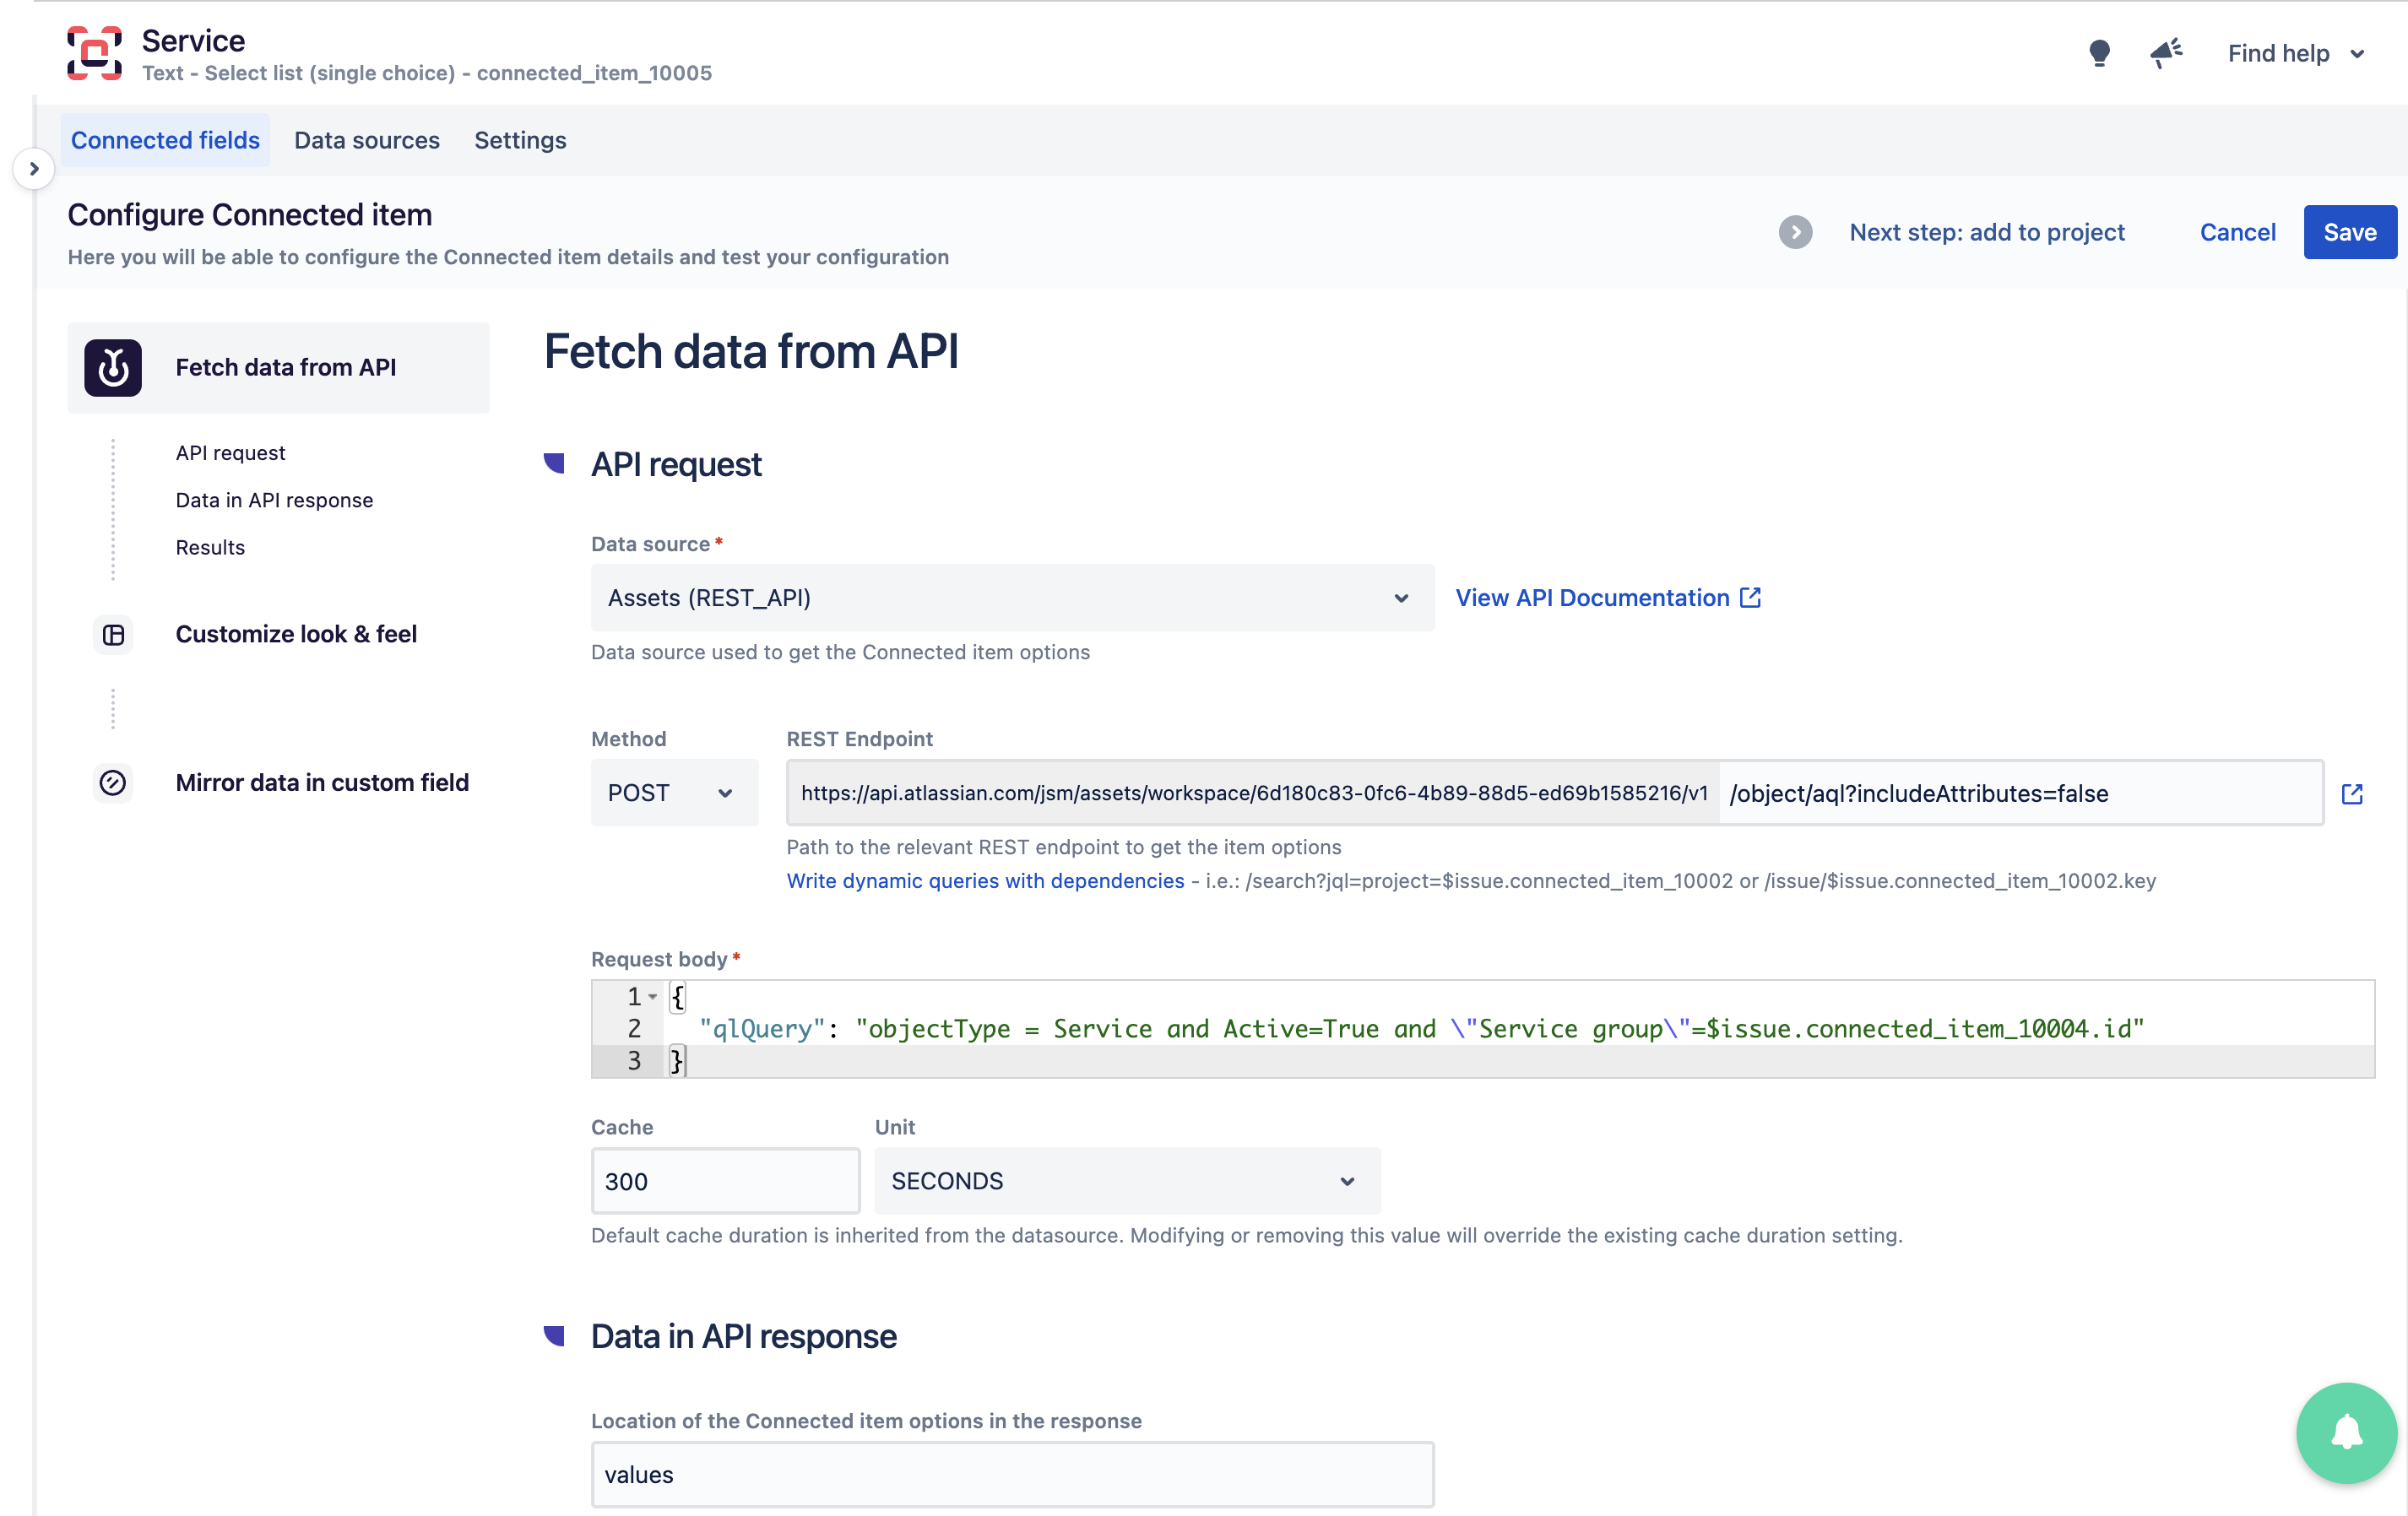
Step 2: Configure the Query
-
Navigate to the "Fetch data from API" section from the Connected item configuration screen.
-
Set the following configurations:
-
Method: Set to POST.
-
REST endpoint: Enter
/object/aql?includeAttributes=false. -
Request body: Enter:
{
  "qlQuery": "objectType = Service and Active=True and \"Service group\"=$issue.connected_item_10004.id"
}
Where
Serviceis the object type name configured in Jira Assets, andconnected_item_10004is the ID of the "Service group" connected item. -
Cache: Leave it set to the default value.
-
Location of the Connected item options in the response: Set to values.
-
In the query, the Active=True condition ensures that only active services are displayed, allowing service managers to activate or deactivate services from Assets.
-
Test the configuration by clicking on Run in the Results section to verify that the query works and returns data.
Step 3: Configure the Display
-
In the Customize look & feel section:
-
Template: Enter
${row.label}to display the service name. You can include more attributes if needed (refer to the JSON in the configuration tester to see the list of available attributes).
-
-
Save the configuration.
For more information on the endpoint used, refer to the endpoint documentation.
Service details
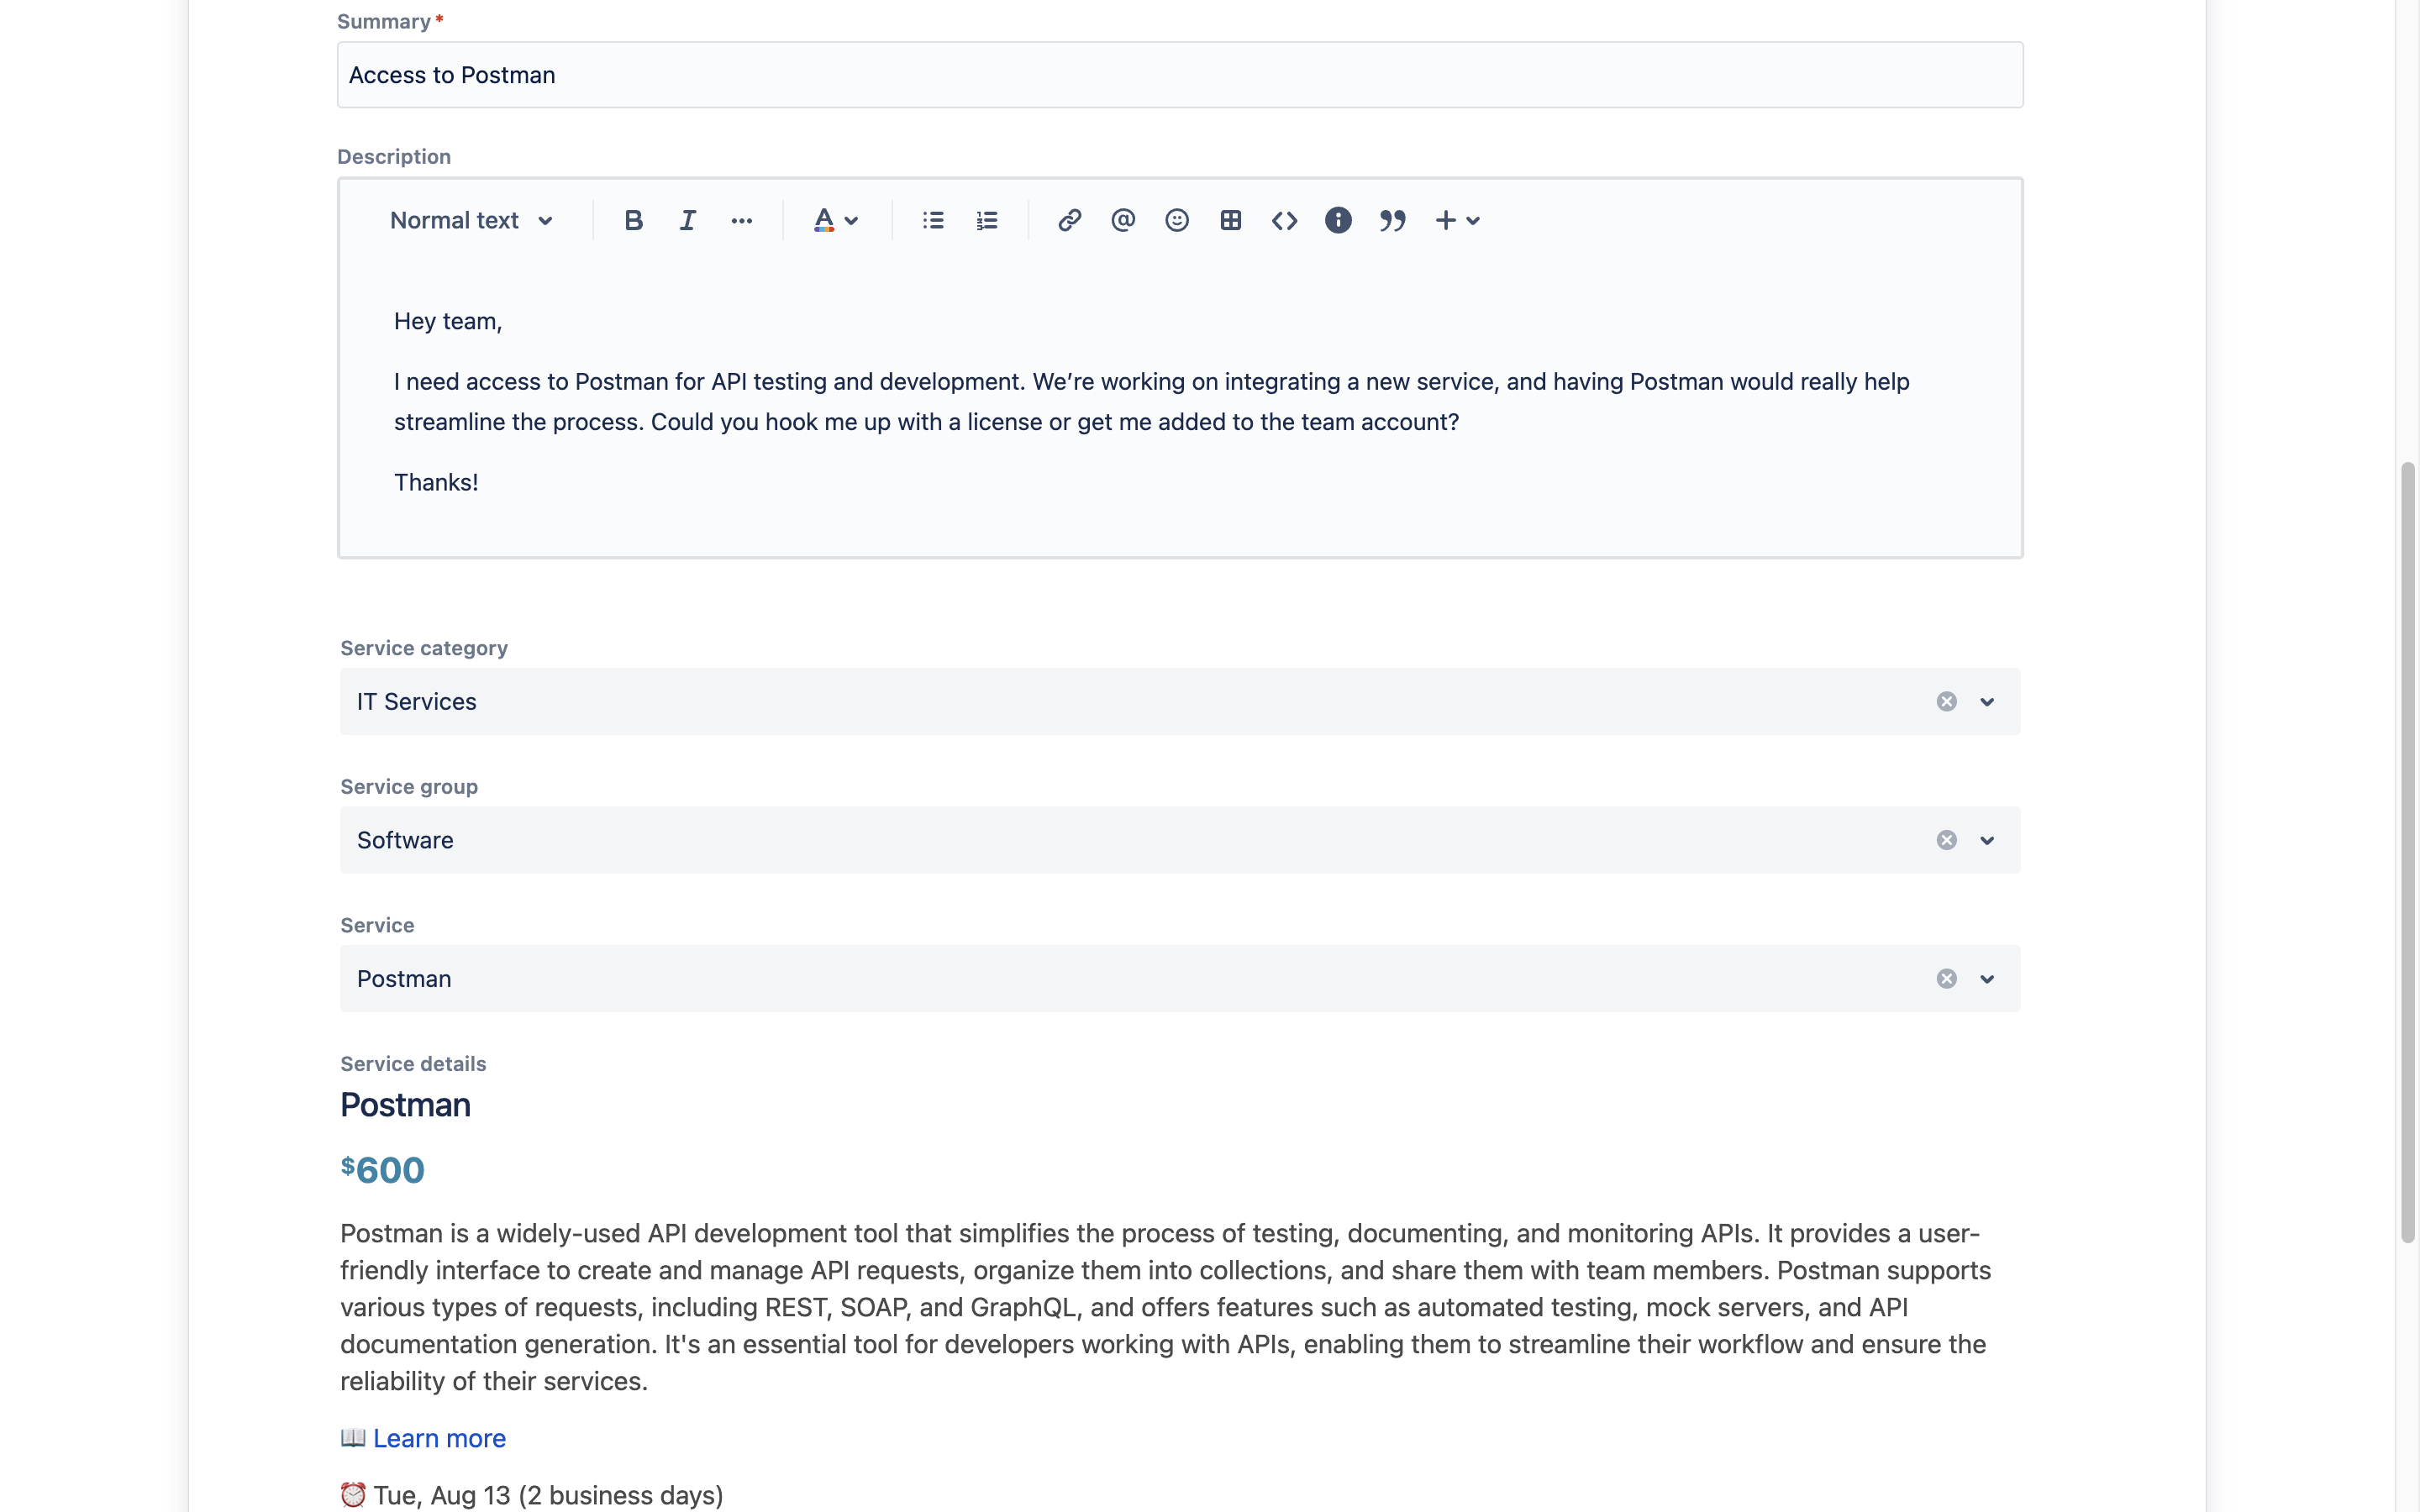
The "Service details" connected item is a read-only field that will display detailed information about the selected service to the user. This enhances the user experience by providing them with all necessary details, such as cost, SLA, and service documentation, directly within the Jira Service Management portal.
Step 1: Create the Connected Item
-
Follow the same steps as for creating the previous connected items, but:
-
Instead of selecting "Select list," choose "Readonly".
-
Name this item "Service details".
-
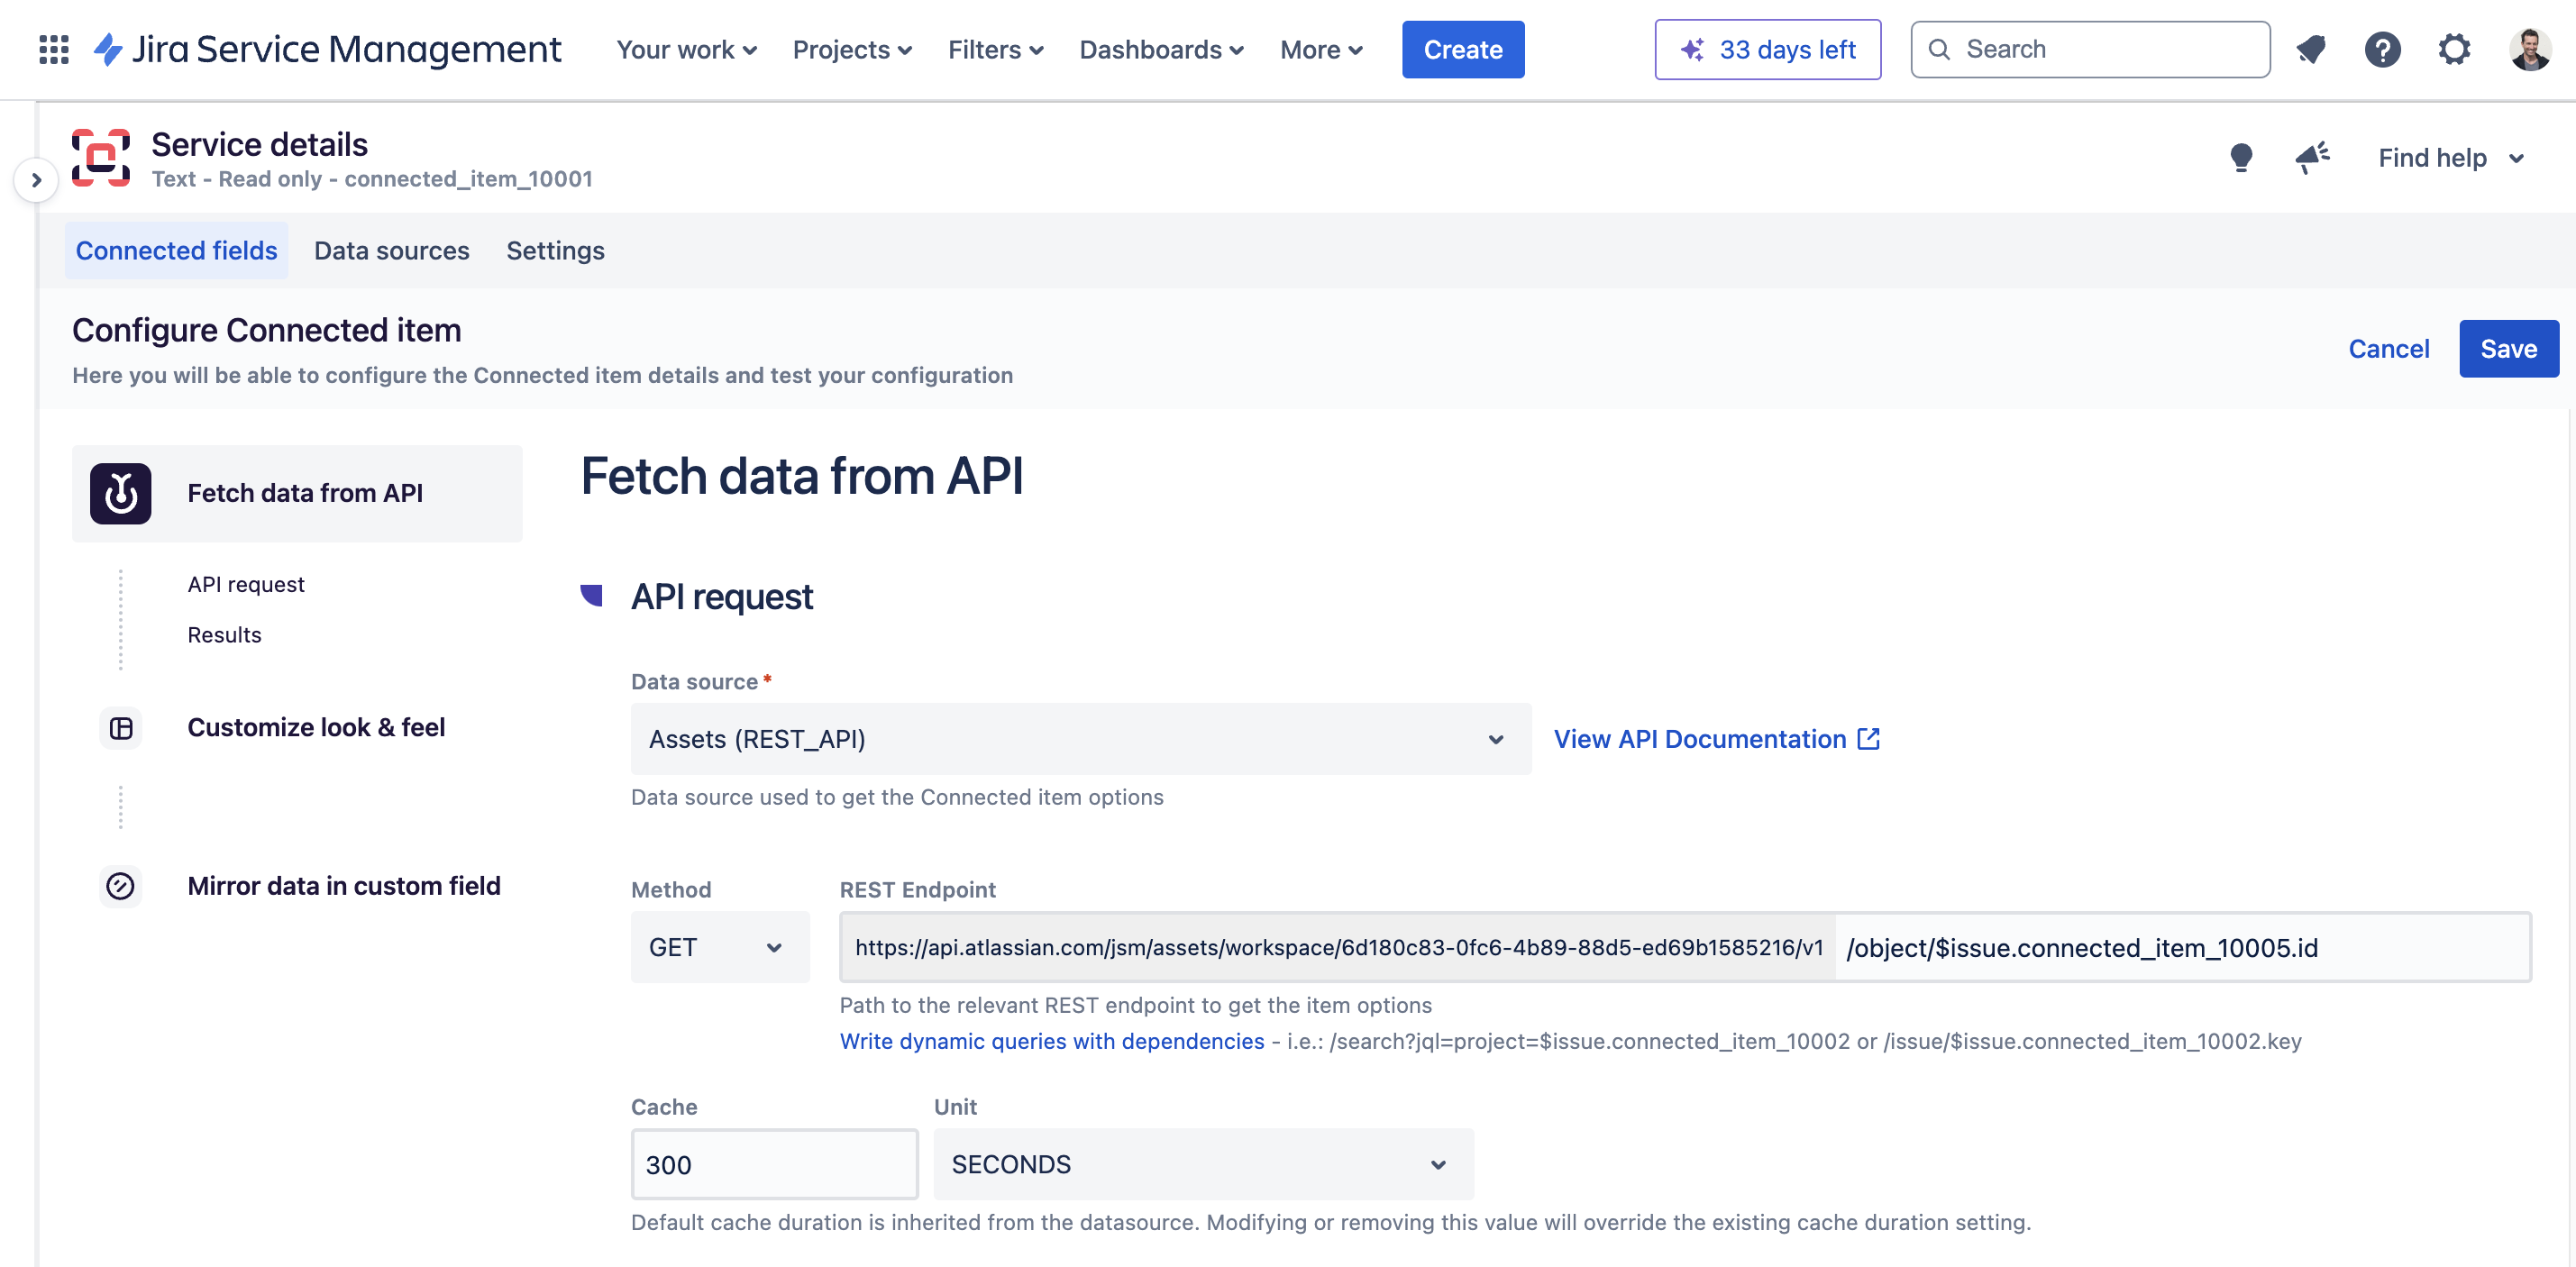
Step 2: Configure the Query
-
Navigate to the "Fetch data from API" section from the Connected item configuration screen.
-
Set the following configurations:
-
Method: Set to GET.
-
REST endpoint: Enter
/object/$issue.connected_item_10005.id(whereconnected_item_10005is the ID of the "Service" connected item). -
Cache: Leave it set to the default value.
-
Use the JSON response preview to identify additional attributes that could enhance your service details display.
For more information on the endpoint used, refer to the endpoint documentation.
Step 3: Configure the Display
-
In the Customize look & feel section, you can use a rich display template to present detailed information to the user. Below is a sample template that includes a dynamic calculation of the target date, cost, description, and other service details:
<#function getAttributeValueByName attributes name> <#list attributes as attribute> <#if attribute.objectTypeAttribute.name == name> <#return attribute.objectAttributeValues[0].value> </#if> </#list> <#return ""> </#function> <#assign sla = getAttributeValueByName(data.attributes, "SLA")> <#assign businessDays = sla?replace(" business days", "")?replace(" business day", "")?number> <#assign millisecondsInADay = 24 * 60 * 60 * 1000> <#assign etaMilliseconds = .now?long> <#setting locale="en_US"> <#-- Loop to add business days while skipping weekends --> <#list 1..businessDays as i> <#-- Increment etaDate by one day --> <#assign etaMilliseconds = etaMilliseconds + millisecondsInADay> <#-- Check if the new date falls on a weekend --> <#assign dayOfWeek = etaMilliseconds?number_to_date?string["EEEE"]> <#if dayOfWeek == "Saturday"> <#-- If it's Saturday, move to Monday (add 2 days) --> <#assign etaMilliseconds = etaMilliseconds + millisecondsInADay*2> <#elseif dayOfWeek == "Sunday"> <#-- If it's Sunday, move to Monday (add 1 day) --> <#assign etaMilliseconds = etaMilliseconds + millisecondsInADay> </#if> </#list> <#assign etaDate = etaMilliseconds?number_to_date?string("EEE, MMM dd")> <h3 style="margin: 0 0 8px; color: #172B4D;">${data.label}</h3> <p style="color: #2885a7;"> <strong> <#assign cost = getAttributeValueByName(data.attributes, "Cost")> <#if cost != "0"> <span style="font-size: 14px;vertical-align: super;">$</span><span style="font-size: 21px;">${cost}</span> </#if> </strong> </p> <p style="color: #4A4A4A; font-size: 1.1em; "></p> <p style="color: #4A4A4A; font-size: 1.1em; ">${getAttributeValueByName(data.attributes, "Description")}</p> <p style="color: #4A4A4A; font-size: 1.1em;"><a href="${getAttributeValueByName(data.attributes, "Service documentation")}" target="_blank">📖 Learn more</a></p> <p style="color: #4A4A4A; font-size: 1.1em;">⏰ ${etaDate} (${sla})</span> </p> <p style="font-size: 1.1em; color: #172B4D;">🪜 ${getAttributeValueByName(data.attributes, "Service level")} service level</p>Note: You may need to adapt this script to match the attributes you have configured in the schema of the Service in Jira Assets.
If your organization has specific branding requirements, consider adjusting the HTML template to align with your corporate style guide.
-
Save the configuration.
Associate Connected Items with a Jira Service Management request type
The final step is to associate the connected items you've configured with a Jira Service Management request type. This will allow users to select and view service details directly within the JSM portal.
To associate the connected items with a request type, follow the steps outlined here: How to associate a Connected item with a request type
If you need further assistance or encounter any issues during the implementation, please contact our support team.
Going further
To further enhance your service catalog management, consider implementing an approval process:
-
Is approval required: Determine whether an approval is necessary for a specific service by pulling the "Approval Required" attribute from Jira Assets into a custom field within your Jira issue.
-
Manager as approver: Configure Elements Connect to retrieve the manager of the issue reporter, who will serve as the approver. Retrieving the manager's information might require integration with another IT tool.
When the custom field indicates that an approval is required, the issue can be automatically routed through an approval workflow where the designated manager acts as the approver. This approach reduces manual intervention and ensures the process aligns with your organization's standards.
Read more about adding an approval step to a workflow in the Jira Service Management documentation.
Conclusion
By following these steps, you have successfully configured a robust and efficient service catalog management system within Jira Service Management. This solution leverages Jira Assets and Elements Connect to provide a seamless experience for both administrators and users, enabling dynamic service selection and detailed service information display.