Configure Elements Connect custom field

In this section, you'll learn how to:
4/ Tour the field configuration interface (2 min)
5/ Populate your Connect field with external data (1 min)
6/ Personalize the way data will be displayed in Jira issues (2 min)
4/ Tour the field configuration interface (2 min)
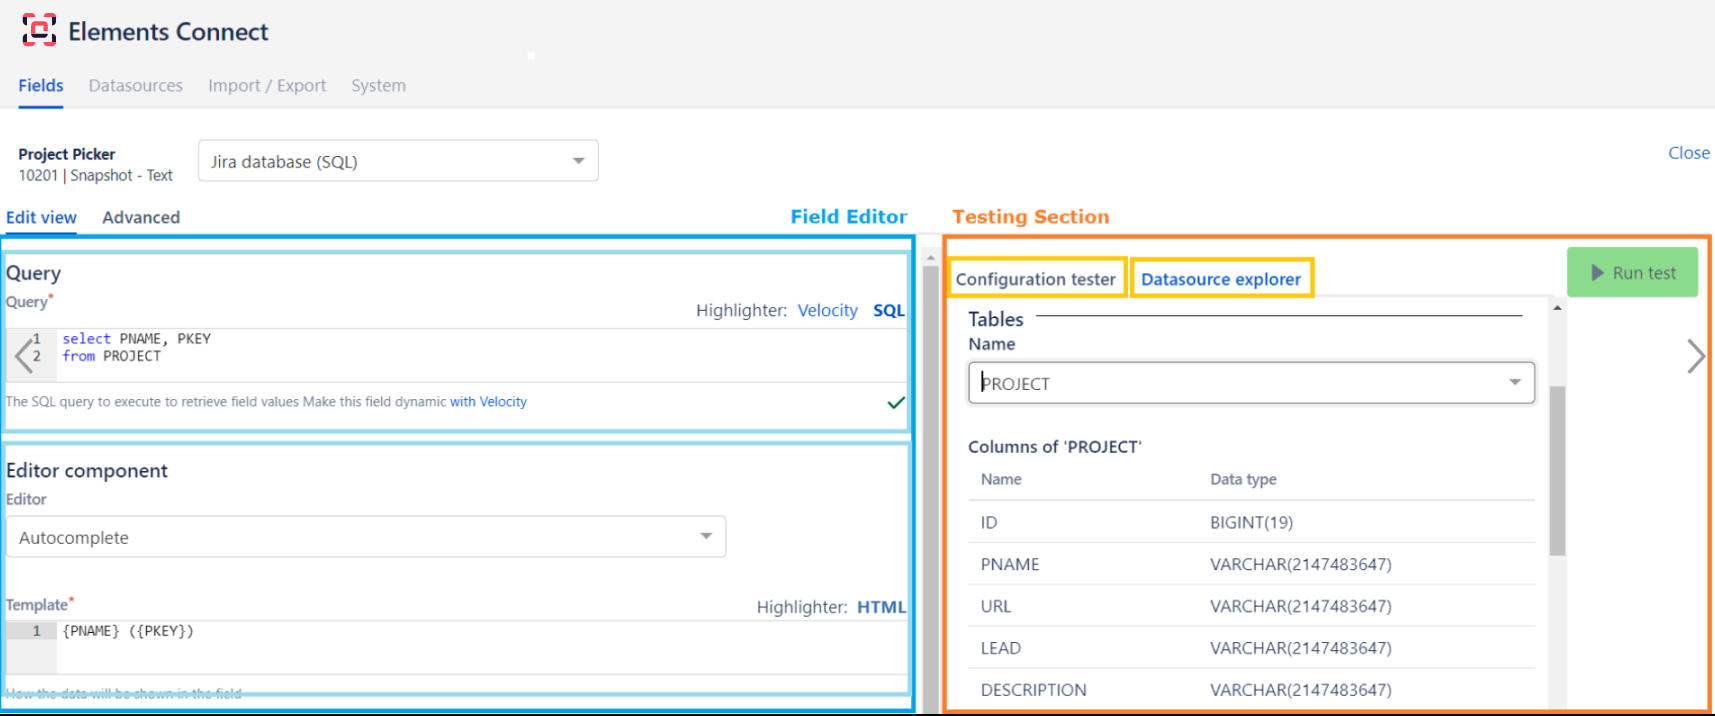
First, let's take a look at the main sections of the field configuration interface:
https://www.youtube.com/watch?v=e8BFSFAoJ18&list=PLcOqr7VcnOkrY7Yzmu-cX0uUPx_LCjKd8&index=4The interface is divided in two main sections:
on the left side, the Field Editor, where you'll do all the configuration.
The Query section is for you to specify the SQL query to execute to retrieve data from the data source,
The Editor component is to define how this data will be displayed in your field.
and on the right side, the Testing Section to directly try your configuration and explore your data source without leaving the interface.
The Configuration Tester enables you to test your configuration without leaving the interface,
The Datasource explorer gives you direct access to the data source structure, as well as a preview of the data itself.

Elements Connect field configuration - Configuration tester
5/ Populate your Connect field with external data (1 min)
https://www.youtube.com/watch?v=eMCkLT4aWu8&list=PLcOqr7VcnOkrY7Yzmu-cX0uUPx_LCjKd8&index=5Our goal here is to create a Jira project picker. This is the SQL query we'll use to retrieve the project names & keys from the Jira SQL database:
In the Query section:
select PNAME, PKEY
from PROJECT
Finally, run a test in the Configuration Tester to verify this query.
![]() SQL cheatsheet in case you need it.
SQL cheatsheet in case you need it.
6/ Personalize the way data will be displayed in Jira issues (2 min)
https://www.youtube.com/watch?v=O0RsKMRRkBA&list=PLcOqr7VcnOkrY7Yzmu-cX0uUPx_LCjKd8&index=6Once we specified our SQL query to retrieve external data (as shown in the previous video), we have to configure the way this data will be displayed in Jira issues.
We use the Editor component section here. to create an autocomplete field listing all project names and their key in parenthesis.
First we choose the Autocomplete option. Then in the Template section we define how the data will be displayed in the field, using HTML language.
You can check the result in the Preview tab in the Configuration Tester.
More resources
Learn more about the field configuration and advanced configuration options in the documentation
Your project picker is now configured! Congrats! ![]()
Download this field configuration: Project_Picker_export.json
You can import it to your own Jira instance & get this Elements Connect field already configured.
Go to the next step DISPLAY =>

