
Elements Connect is compatible with the Jira Cloud Migration Assistant (JCMA), allowing you to migrate your Elements Connect custom fields and their values from Jira Data Center to Jira Cloud.
This feature is currently available as an EAP version for selected customers.
It allows us to collect feedback before general availability.
This guide explains how to prepare and run your migration using JCMA.
Access to the EAP version
If you are not already in contact with Elements, please reach out to our Support team to request access to the JCMA migration feature.
Elements Connect for Jira Data Center
During the EAP phase, you must install a specific OBR version of Elements Connect for Jira Data Center.
Your Elements contact will provide:
-
The appropriate OBR file
-
Compatible with your Jira version (Jira 9 or Jira 10)
Elements Connect for Jira Cloud
-
Be sure both Elements Connect Cloud app and Elements Connect Cloud - Helper app are installed on your target Jira Cloud site and that both apps are up-to-date.
-
The migration capability is already deployed in production but hidden unless your site is enrolled in the EAP program.
To enable it:
1) Share your Cloud site URL with your Elements contact.
2) We will activate the feature for your site.
Step-by-step migration guide

 Our migration tool perimeter
As shown in the above workflow and below table, our Migration tool will NOT migrate Elements Connect custom fields configuration.
This action will need to be done via the “Migration” tab on Elements Connect Cloud.
|
|
Migration tool perimeter |
|---|---|
|
Elements Connect Custom field creation |
|
|
Elements Connect Custom field configuration |
|
|
Elements Connect Custom field values migration |
|
If a project contains values for an Elements Connect custom field but this field is not on a screen of this project ==> Custom field will NOT be migrated
Archived projects values and archived issues values will not be migrated.
This support could be implemented in the future if there is strong demand from customers.
So please don’t hesitate to reach out to our Support team if you have this need.
⚠️ Important prerequisites
Be sure both Elements Connect Cloud app and Elements Connect Cloud - Helper app are installed on your target Jira Cloud site and that both apps are up-to-date.
Be sure you have marked Elements Connect to “Needed in Cloud” on Jira Data Center App assessment.

In order Elements Connect custom fields to be correctly migrated, Elements Connect app must be part of the JCMA migration (even with low number of projects selected in Step 1) when projects are migrated to Cloud.
If it is not the case, Elements Connect fields will not be created on target Cloud site and no value will be migrated.
Two conditions must both be met for a field to appear in Cloud:
-
the app is included in the migration scope
-
the field has at least one value in a migrated project
Step 1 – Define the migration scope (Data Center)
In Elements Connect (Data Center):
-
Go to the "Migration to Cloud" tab.
-
Select the projects from which you want to migrate Elements Connect field values.
-
Save your selection.
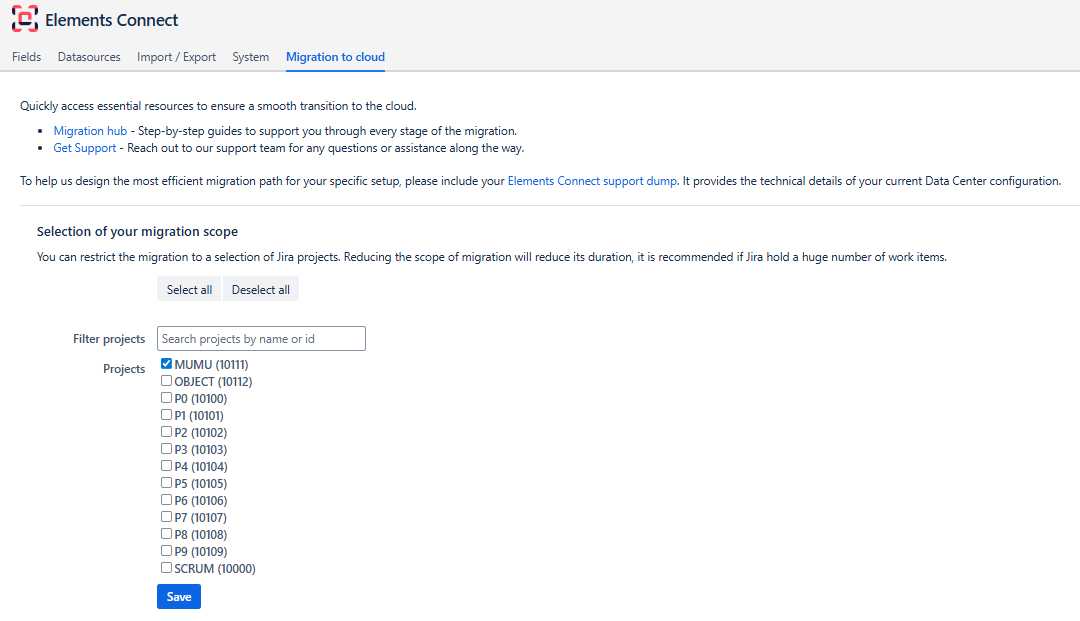
Selected projects must either be already created on Cloud site, or selected to be migrated in dedicated JCMA step. Otherwise Elements Connect values will not be migrated.
If your Jira instance contains a large number of issues, we recommend limiting the migration to a subset of projects to:
-
Reduce migration time
-
Reduce load
-
Simplify troubleshooting
All Connected fields added to projects will be migrated.
You will not be able to select the specific fields to migrate.
Step 2 – Run the migration in JCMA
In Jira Data Center:
-
Go to Migrate to Cloud.
-
Create a new migration.
-
In the Projects step:
-
If the previously selected projects already exist in Cloud, you can skip them.
-
If they do not exist yet, you must select them for migration in this step, otherwise Connect values migration will fail.
-
-
In the Apps step, select Elements Connect.
-
Complete pre-migration checks.
-
Run the migration.
Monitoring the migration
You can track progress in:
-
The Migrations dashboard in Jira Data Center
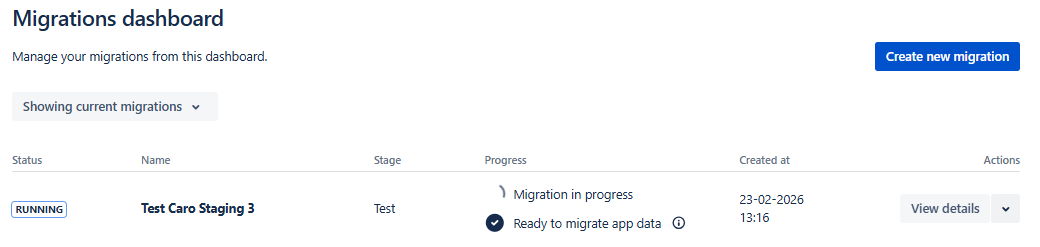
You can follow the status of Elements Connect migration in “View details”:
-
The Migration tab in Elements Connect for Jira Cloud
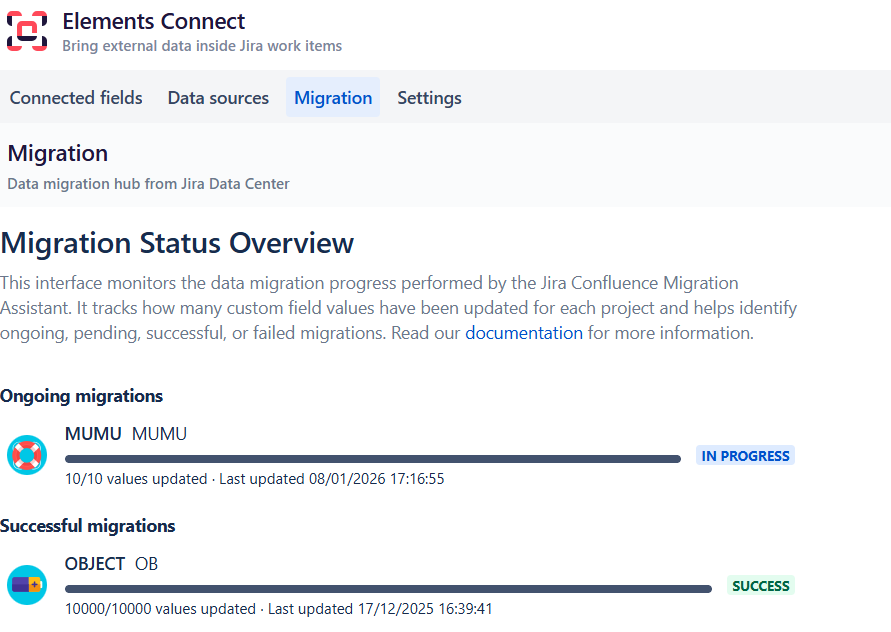
Migration is complete only when it has finished on both sides:
-
Data Center
-
Cloud
How Elements Connect values migration works
The migration process runs asynchronously and in multiple stages.
-
Creation of Elements Connect custom fields in Jira Cloud
-
Migration of Elements Connect field values
Created Connected custom fields will only be partially preconfigured.
These fields will need to be configured in Step 3.
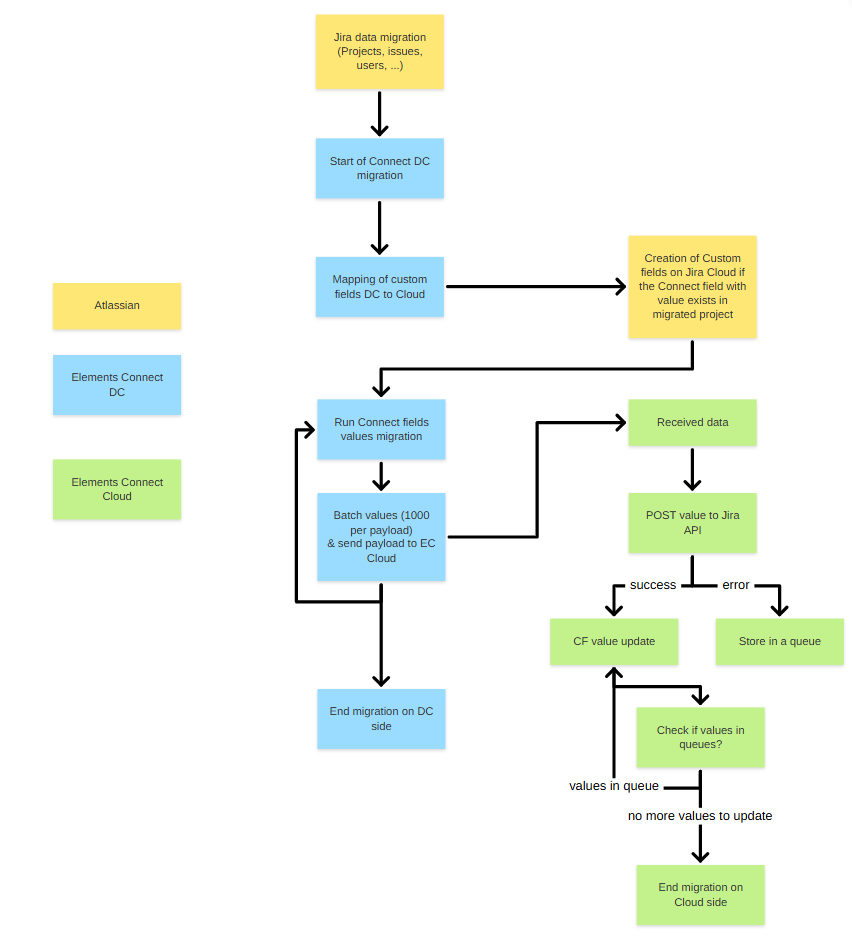
On the Data Center side
For each selected project:
-
Field values are sent to Cloud
-
Data is transmitted in batches of 1,000 issues
-
Once all batches are sent, the DC side of the migration is complete
On the Cloud side
For each value:
-
The app updates the Cloud field using the Jira Cloud API
Because Jira Cloud enforces API rate limits:
-
Some update calls may be temporarily rejected
-
Rejected updates are automatically placed in a queue
-
The system retries them until successful
This ensures all values are eventually migrated.
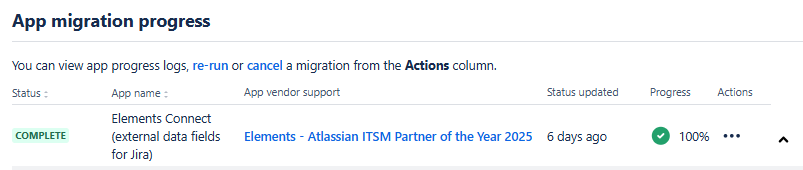
Migration statuses (per project)
Each project displays one of the following statuses:
-
IN PROGRESS – Migration is ongoing
-
SUCCESS – All values migrated
-
ERROR – Migration failed (check error message)
At this stage, Cloud fields are populated with their migrated values but are not yet fully configured.
Step 3 – Configure migrated custom fields (Cloud)
After values are migrated, you must configure each field in Cloud.
Data sources configuration
Go to: Elements Connect → Data sources tab
Configure the data source connections you will need for your fields.
==> see Data sources configuration.
Connected custom fields configuration
Go to: Elements Connect → Migration tab → Migrated custom fields
For each field:
-
Click the ⋯ menu
-
Select Add configuration
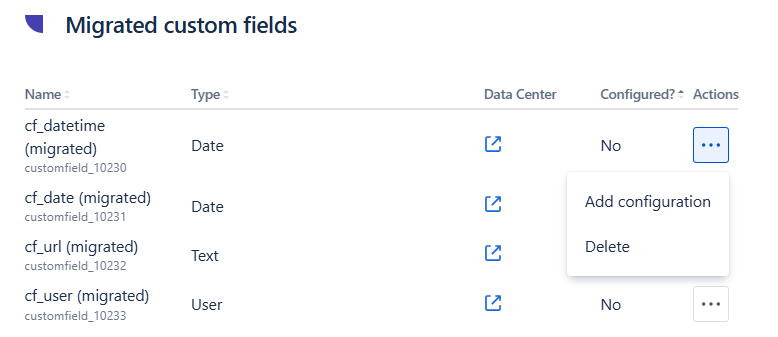
You can use the Data Center link to open the original field configuration in Jira Data Center and replicate its setup.
Each field is preconfigured based on its Data Center configuration:
-
Name
-
Main type (Text, User, Date)
-
Single or Multi value
-
Storage type mapping:
|
Connect Data Center Field type |
Connect Data Center storage |
Connect Cloud field type after migration |
Connect Cloud storage after migration |
|---|---|---|---|
|
Live Text - Single |
|
Text - Object - Single |
|
|
Live Text - Multi |
|
Text - Object - Multi |
|
|
Snapshot Text - Single |
|
Text - Snapshot - Single |
|
|
Live User - Single |
|
User - Single |
|
|
Live User - Multi |
|
User - Multi |
|
|
Date |
|
Date |
|
|
Datetime |
|
Date |
|
==> see 3 - Customize look & feel of custom fields to understand difference between these storage types.
When adding configuration, define:
-
The Data source
-
Whether the field is:
-
Select list
-
Read-only
-
-
How it fetches data from the external source. See 1 - Fetch data from data source
-
How data is displayed. See Template guide
Once all migrated fields are configured:
Your Connected custom fields:
-
Can be edited in work items
-
Fetch data from your external data source
-
Are fully operational in Jira Cloud