
The need: Get customer information and associated deals from HubSpot
In this context, we use a JSM portal to manage RFP (request for proposal) requests from sales representatives on behalf of leads tracked in HubSpot.
When creating a RFP request on the Jira Service Management portal, users must select which customer they are raising the request for. This means that Jira administrators must maintain customer records and associated deals up to date in order to keep it synchronized with what’s configured in HubSpot. Furthermore, agents in charge of processing these requests - typically pre-sales teams - want to know details about the customer or any existing associated deals without having to log in to HubSpot.
We would like to:
-
populate a select list with customer stored in the CRM tool, HubSpot, and keep it synchronized
-
provide pre-sales teams with customer information stored in HubSpot (contact details, associated deals, etc.)
Solution: Populate connected custom fields with customer names and related information
We use Elements Connect to directly fetch customer names from HubSpot by configuring a direct connection between Jira and HubSpot. We also provide Pre-sales teams with customer information stored in HubSpot, such as the customer name, e-mail, job title, and deals associated to this customer:
.gif?cb=04715f02c57fc5daac03be52d36f6ffc)
How to configure a customer selector and fetch customer information and associated deals from HubSpot
Prerequisites
-
Have HubSpot as your Customer Relationship Management tool
-
Have Elements Connect installed on your instance
Configuration steps
The configuration is done in 4 steps:
-
Create and configure the HubSpot datasource in Elements Connect
-
Create and configure the Connected custom field in Elements Connect to retrieve customers, contacts and deals from the HubSpot datasource
-
Associate the Connected custom field to a request type in your JSM project
1. Hubspot configuration
Please follow the documentation below explaining how to configure Hubspot and connect to our app: Configure Hubspot as a datasource
2 - Configuring the connected items “Customer”, “Contacts” and “Deals”
In this tutorial, we are going to create 3 Connected custom fields:
-
Customer: A select list that retrieves customers configured in HubSpot based on what the user is typing
-
Contacts: A read-only table that displays the contact first name, last name and e-mail
-
Deals: a read-only table that display all deals associated to the customer selected
A. Customer
Click to expand...
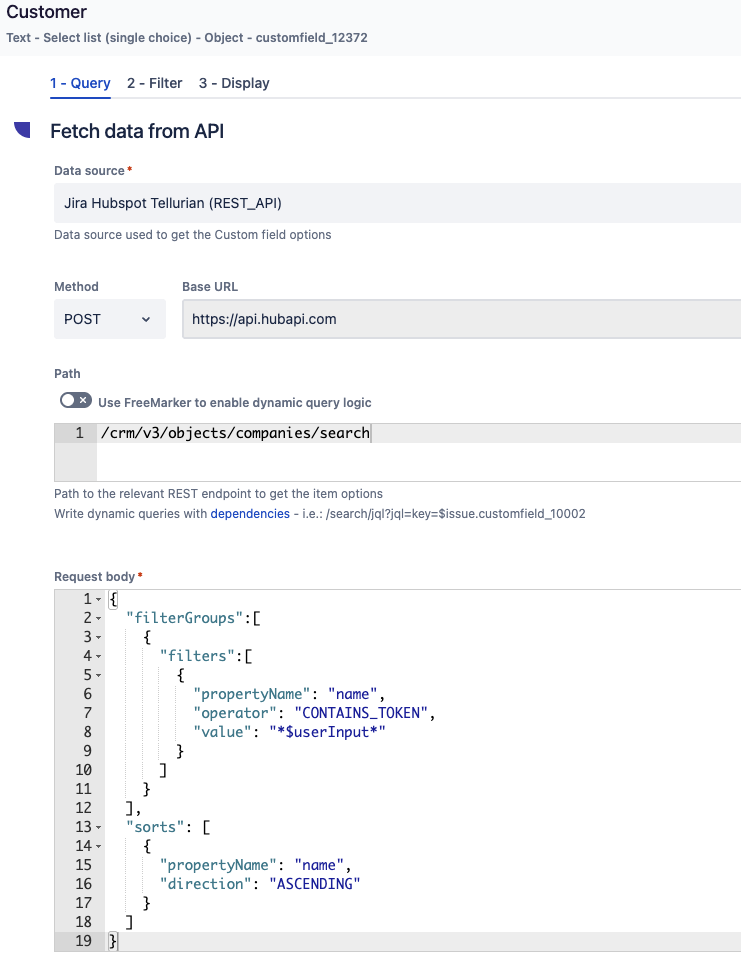
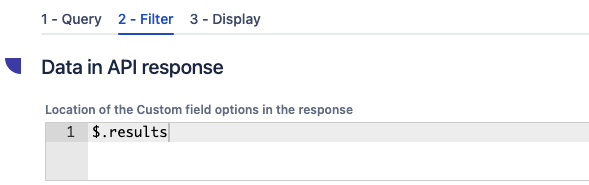
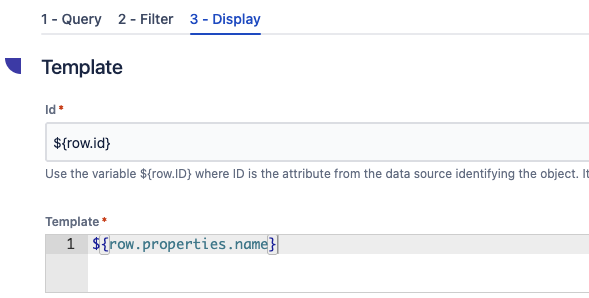
Create one Connected custom field called “Customer” of type Select list. Set HubSpot (or the name you gave to the datasource configured previously) as the datasource and configure it as follows:
-
Method: Post
-
REST Endpoint:
/crm/v3/objects/companies/search -
Request body:
{ "filterGroups":[ { "filters":[ { "propertyName": "name", "operator": "CONTAINS_TOKEN", "value": "*$userInput*" } ] } ], "sorts": [ { "propertyName": "name", "direction": "ASCENDING" } ] } -
Filter:
$.results -
Template ID:
${row.id} -
Template display:
${row.properties.name}
B. Contacts
Click to expand...
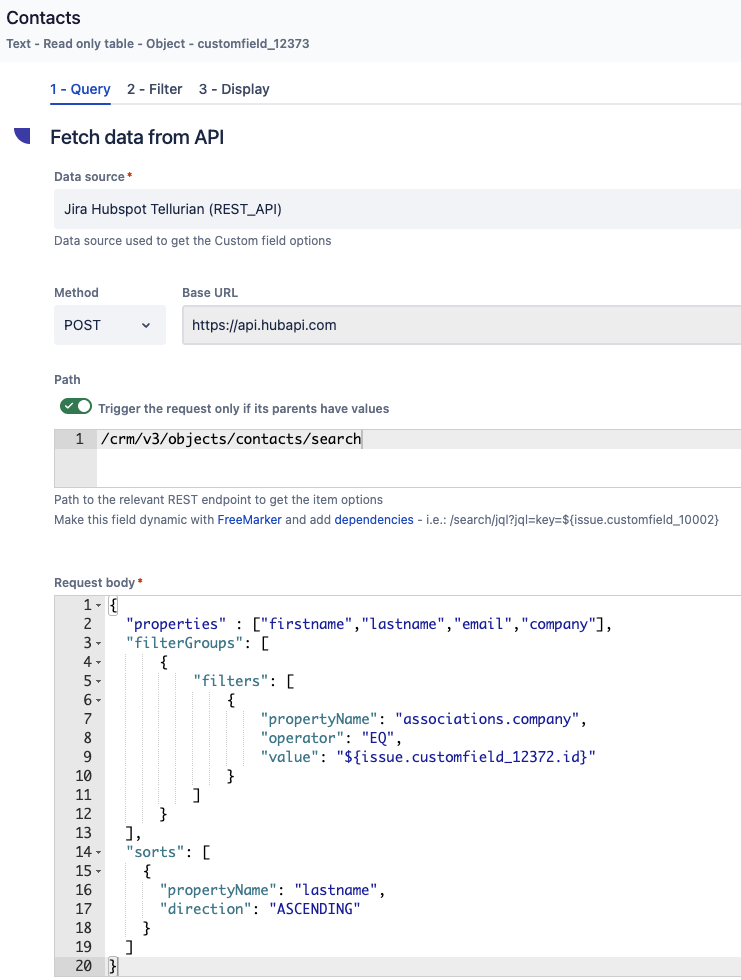
Create a second Connected custom field called “Contacts” of type Read Only Table. Set HubSpot (or the name you gave to the datasource configured previously) as the datasource, and configure it as follows:
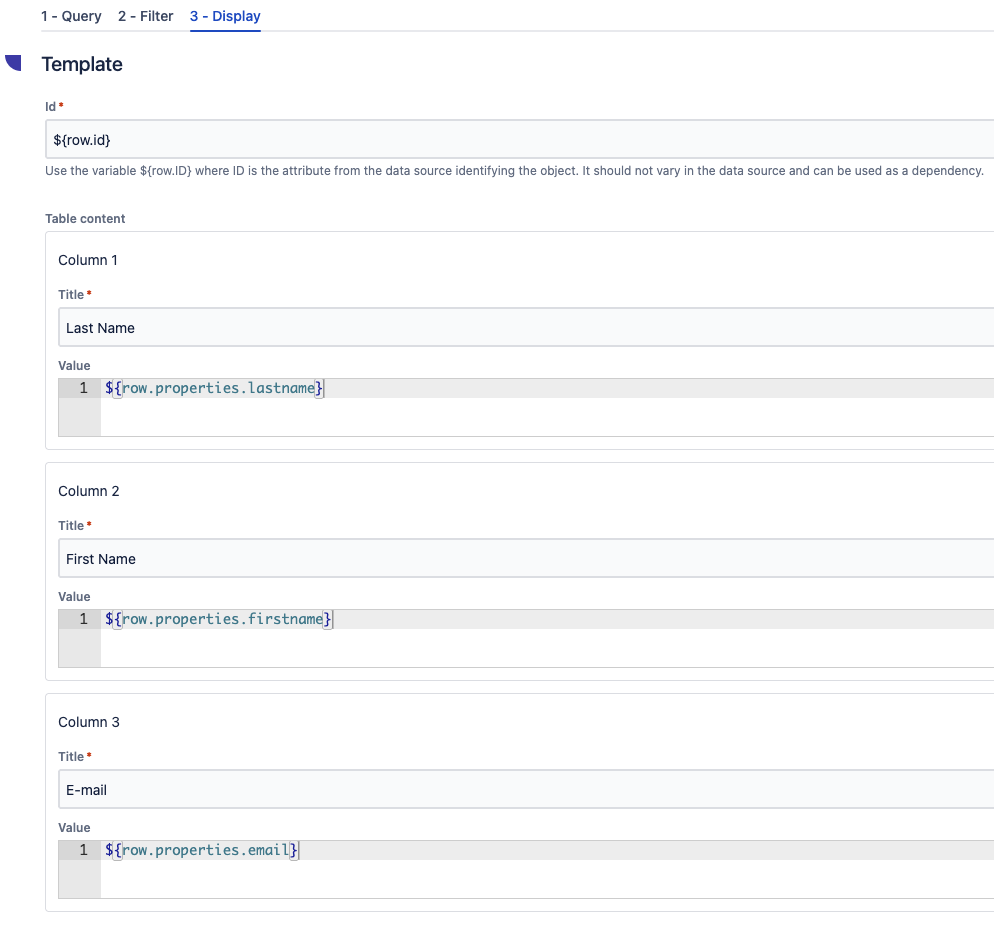
-
Method: Post
-
REST Endpoint:
/crm/v3/objects/contacts/search -
Request body:
{
  "properties" : ["firstname","lastname","email","company"],
  "filterGroups": [
      {
          "filters": [
              {
                  "propertyName": "associations.company",
                  "operator": "EQ",
                  "value": "${issue.customfield_XXXXX.id}"
              }
          ]
      }
  ],
  "sorts": [
    {
      "propertyName": "lastname",
      "direction": "ASCENDING"
    }
  ]
}
Replace $issue.customfield_XXXXX.id with the ID of the parent connected custom field (Customer)
-
Filter:
$.results -
Template ID:
${row.id} -
Template display:
Column 1
TitleLast NameValue
${row.properties.lastname}Column 2
TitleFirst NameValue
${row.properties.firstname}Column 3
TitleE-mailValue
${row.properties.email}
C. Deals
Click to expand...
Create a third Connected custom fields called “Deals” of type Read Only Table. Set HubSpot (or the name you gave to the datasource configured previously) as the datasource, and configure it as follows:
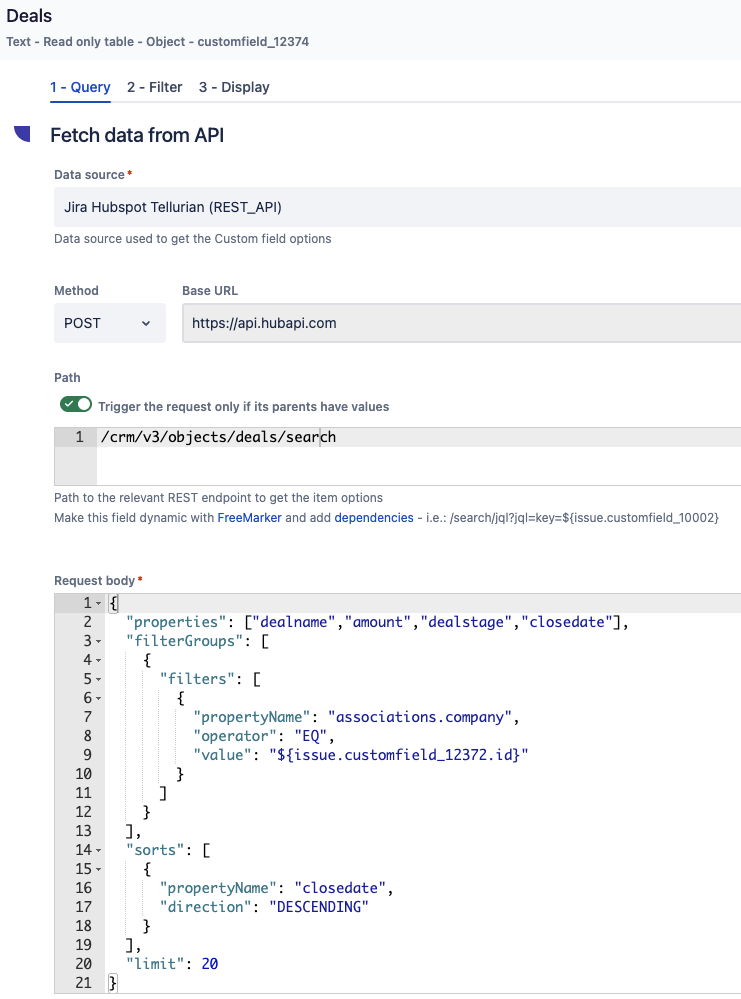
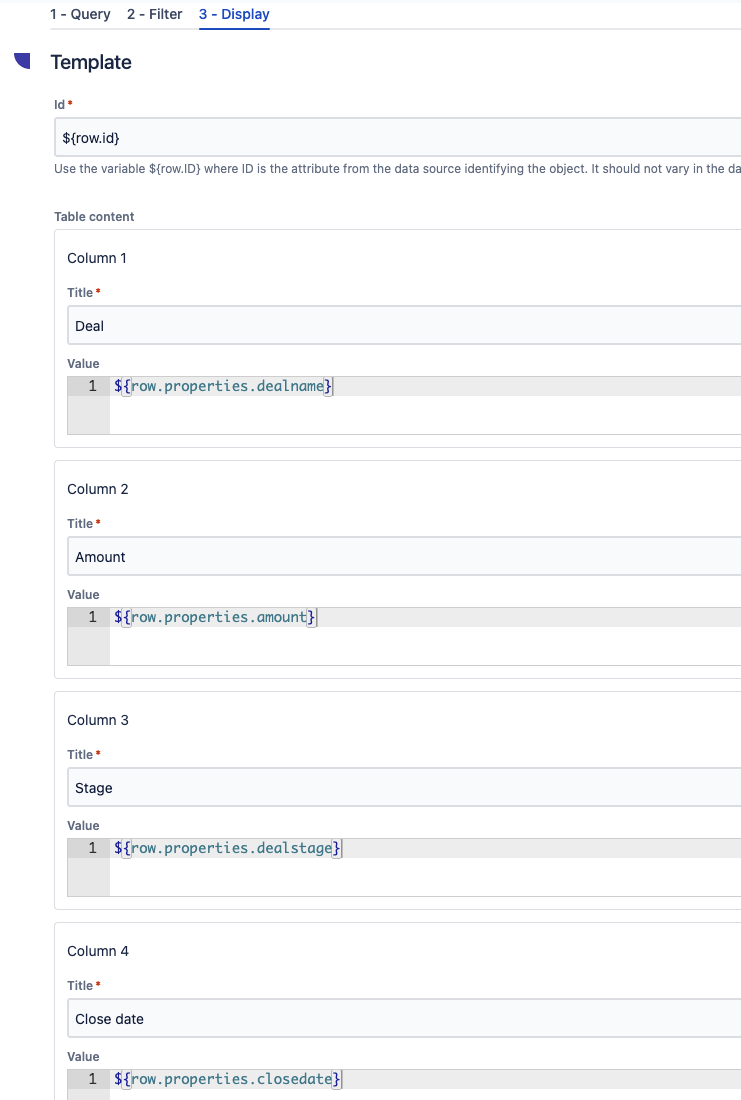
-
Method: Post
-
REST Endpoint:
/crm/v3/objects/deals/search -
Request body:
{ "properties": ["dealname","amount","dealstage","closedate"], "filterGroups": [ { "filters": [ { "propertyName": "associations.company", "operator": "EQ", "value": "${issue.customfield_XXXXX.id}" } ] } ], "sorts": [ { "propertyName": "closedate", "direction": "DESCENDING" } ], "limit": 20 } -
Template ID:
${row.id} -
Template display:
Column 1
TitleDealValue
${row.properties.dealname}Column 2
TitleAmountValue
${row.properties.amount}Column 3
TitleStageValue
${row.properties.dealstage}Column 4
TitleClose dateValue
${row.properties.closedate}
3 - Associate the Connected custom fields to a request type in your JSM project
Now that your connected custom fields are configured, you need to associate them to a request-type in your JSM project:
-
Directly after saving a custom fields configuration, click on “Add field to portal”

-
Or go to Elements Connect admin section and find “Add field to portal” in the “Actions” button.

-
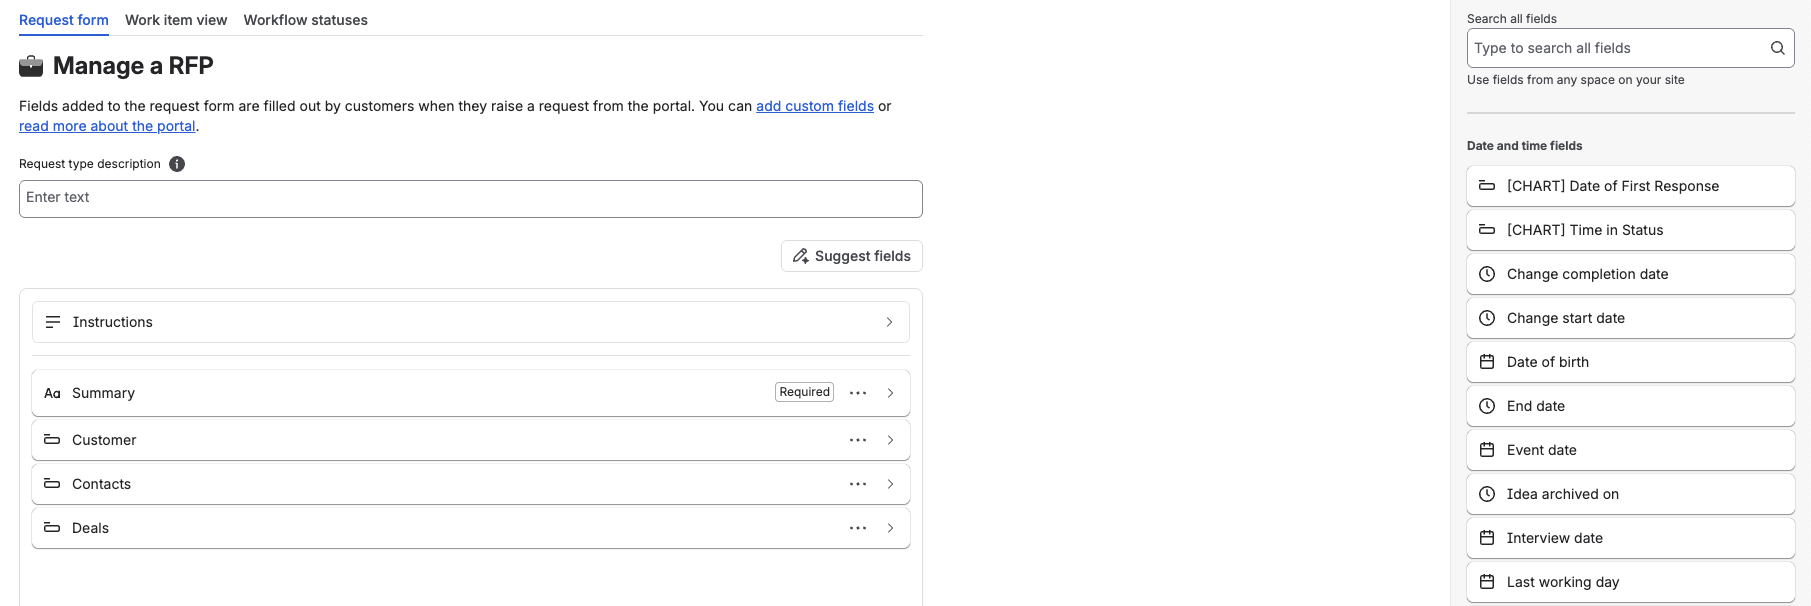
Select the targeted project and Request type.
-
Add the Connected custom fields with a drag & drop action in the Request form section, as below:
That's it, your use case has been set. Don’t hesitate to reach our support if you have any question.