
This guide provides step-by-step instructions to configure Snowflake as a datasource in Elements Connect for Jira Cloud, using Microsoft Entra ID (Azure AD) authentication with the OAuth 2.0 Client Credentials flow.
By setting up this integration, you'll enable secure, password-less access to your Snowflake data within your Jira issues, so you can populate connected fields directly from your data warehouse.
Three systems work together in this setup:
-
Microsoft Entra ID issues a signed access token
-
Snowflake trusts that token and runs your query
-
Elements Connect obtains the token and calls Snowflake on every request.
Prerequisites
-
A Jira Cloud instance with Elements Connect installed.
-
A Snowflake account, with a user holding the
ACCOUNTADMINrole (or a role able to create security integrations and users). -
A Microsoft Entra ID tenant, with permission to create an app registration and access to an administrator who can grant tenant-wide admin consent.
Configuration steps
Part 1 - Microsoft Entra ID
1.1 - Create the app registration
-
Go to the Azure portal → Microsoft Entra ID → App registrations → New registration
-
Give it a name (for example,
Snowflake-ElementsConnect), choose Single tenant only, and leave the Redirect URI empty -
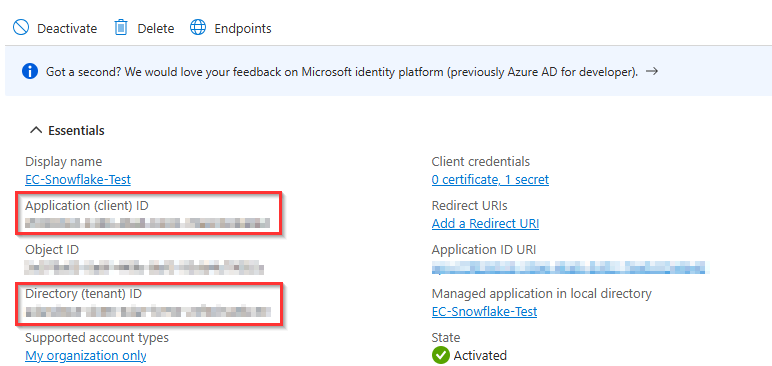
Click Register, then from the Overview page save the Application (client) ID and the Directory (tenant) ID:
1.2 Expose an API (the token audience)
-
Go to Expose an API and click Add next to Application ID URI.
-
Accept the default value
api://YOUR_CLIENT_IDand save it -> this is your Application ID URI. -
Click Add a scope, name it
default, set consent to Admins only, and add it: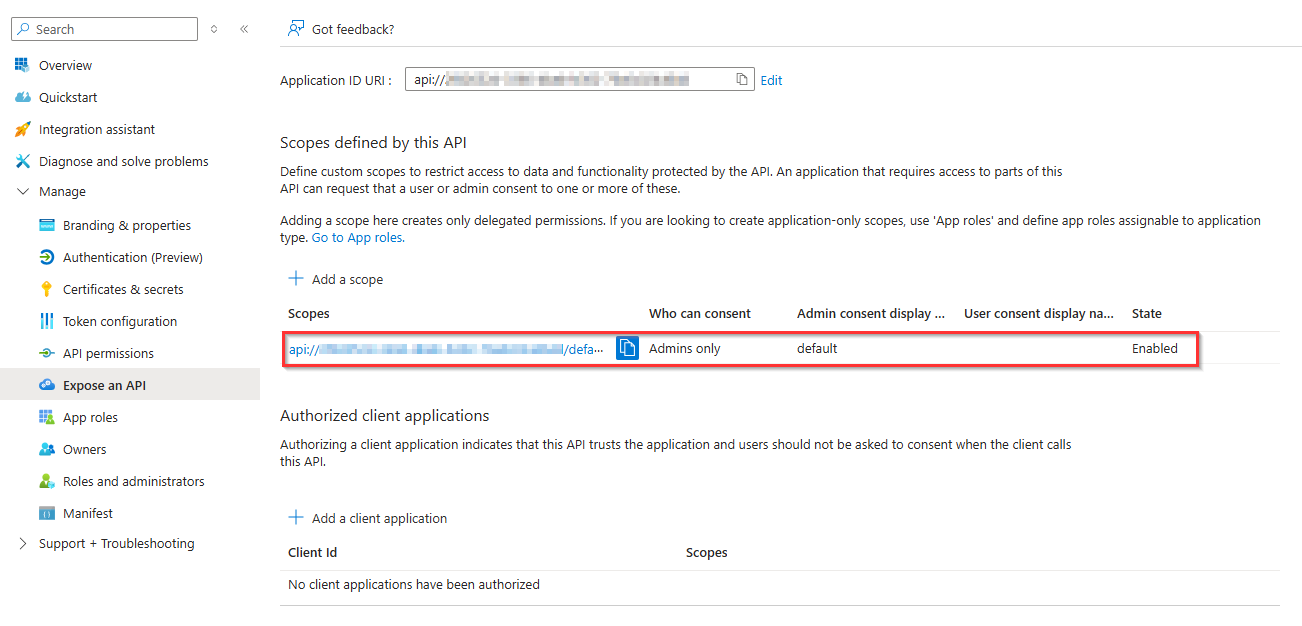
1.3 Create the app role (the roles claim)
-
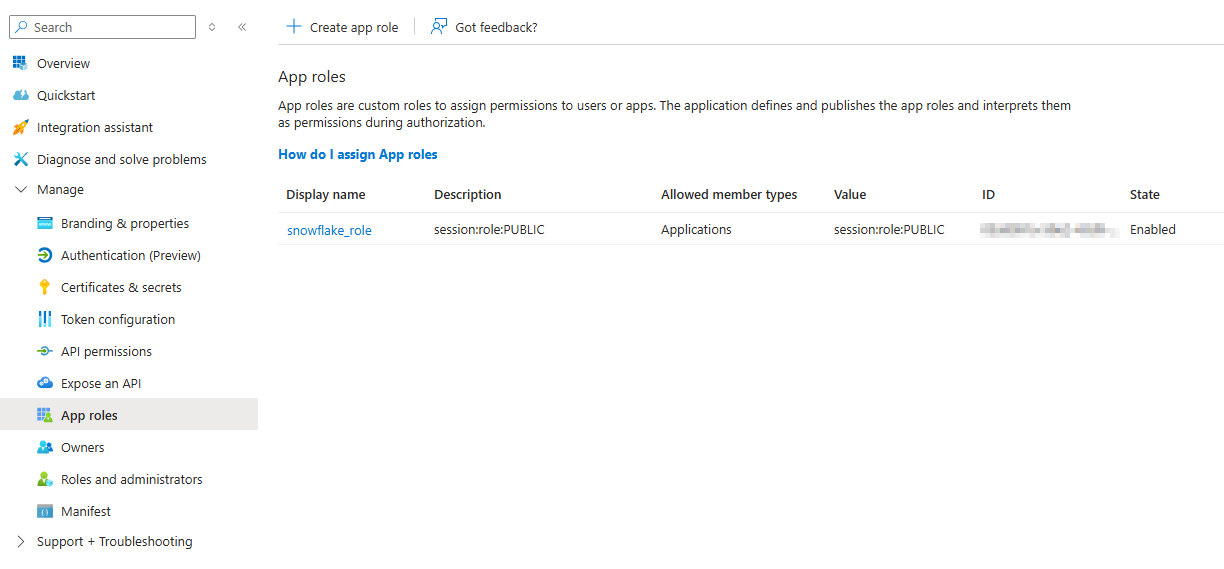
Go to App roles → Create app role
-
Configure it as follows:
-
Display name:
snowflake_role -
Allowed member types:
Applications(this is an app-to-app flow) -
Value:
session:role:<ROLE>(e.g.session:role:PUBLIC) -> this exact value appears in the token'srolesclaim and tells Snowflake which role to use.
-
-
Enable the role and click Apply:
1.4 Grant the app role to the application
-
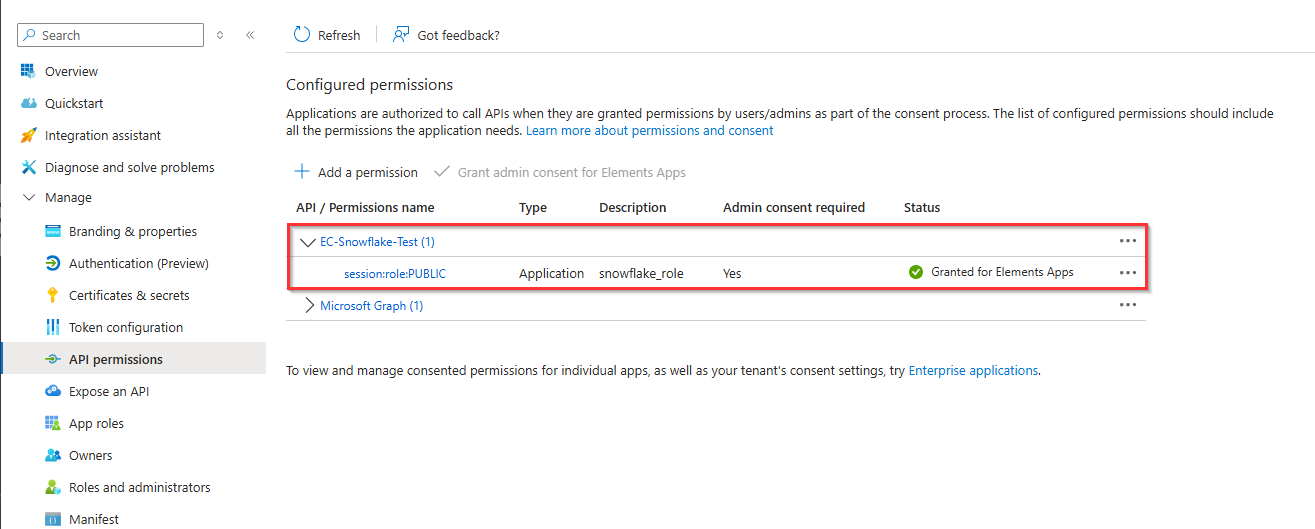
Go to API permissions → Add a permission → My APIs, and select your own application.
-
Choose Application permissions (not Delegated), check
snowflake_role, and click Add permissions. -
Click Grant admin consent for your organization. The permission status should turn to a green Granted state:
If Grant admin consent is greyed out, ask an administrator (Global Admin, Privileged Role Admin, or Cloud Application Admin) to click on it.
1.5 Create the client secret
-
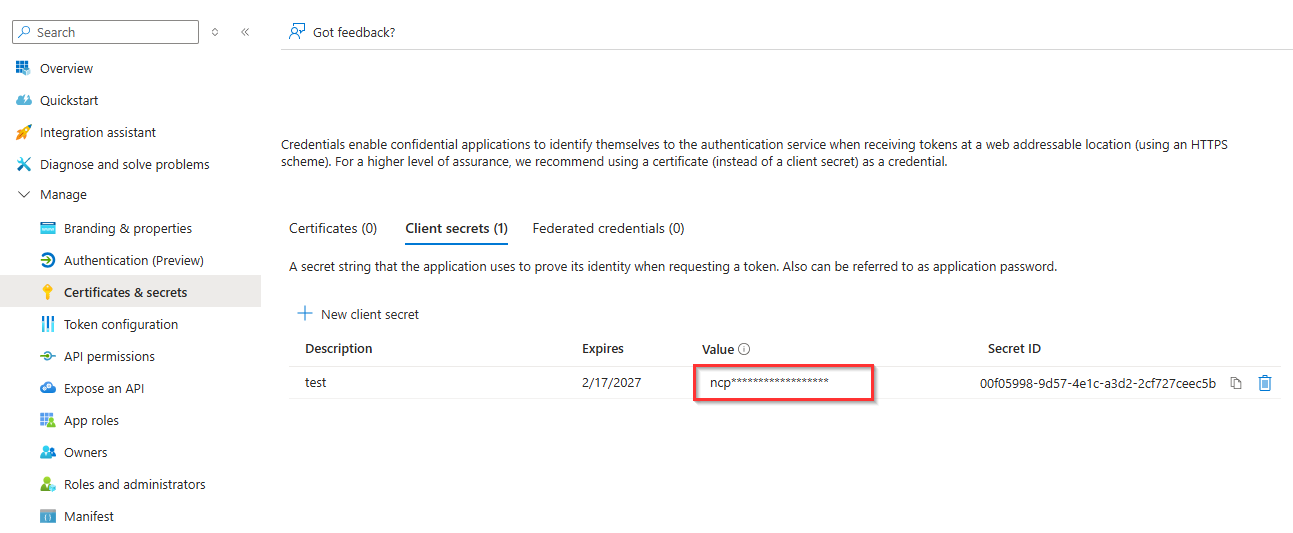
Go to Certificates & secrets → New client secret, add a description and expiry, then click Add.
-
Copy the secret's Value immediately and save it -> this is your Client secret:
1.6 Get a token and decode it
Before configuring Snowflake, confirm the token works and note the values Snowflake will need.
Run the following curl query in any terminal or command-line interface:
curl -s -X POST "https://login.microsoftonline.com/<TENANT_ID>/oauth2/v2.0/token" \
  -d "grant_type=client_credentials" \
  -d "client_id=<CLIENT_ID>" \
  -d "client_secret=<CLIENT_SECRET>" \
  -d "scope=<APP_ID_URI>/.default"
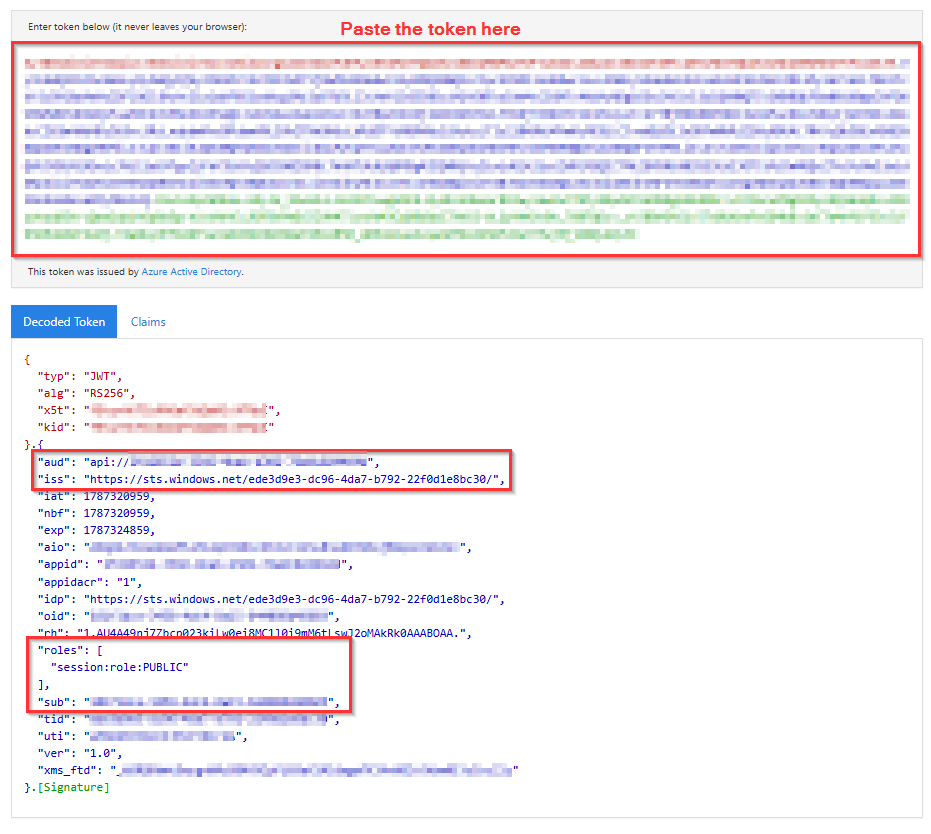
Copy the access_token from the response, paste it into jwt.ms, and note the following values:
|
Claim |
What it is |
What to check |
|---|---|---|
|
|
Who issued the token. The address of the Microsoft service that signed it. Snowflake uses this to know it can trust the token. |
Copy it exactly. Looks like |
|
|
Who the token is meant for. It names the application the token was created to access. Snowflake checks this matches the app you registered. |
Must equal your Application ID URI ( |
|
|
The Snowflake role the token grants. The set of permissions the query will run with |
Must contain |
|
|
Who the token represents. A unique ID for your application, like an identity card number. Snowflake uses it to match a user account. |
Note this value. You will set it as the Snowflake user's |
As follows:
Part 2 - Snowflake
2.1 Get your account URL
-
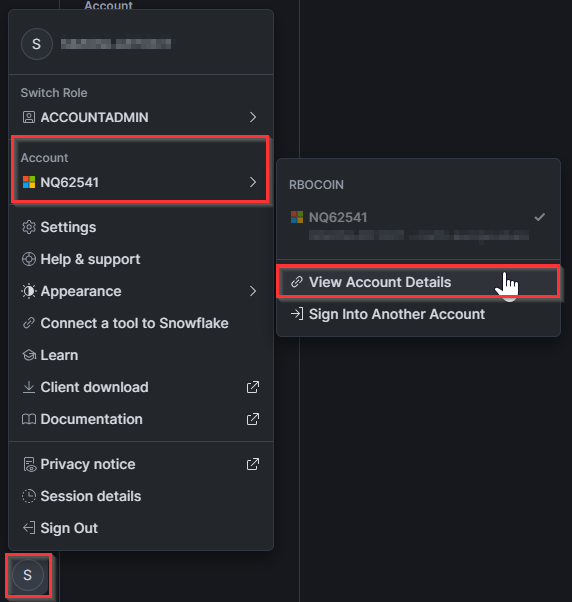
Click your account name (bottom-left in Snowsight) → View Account Details:
-
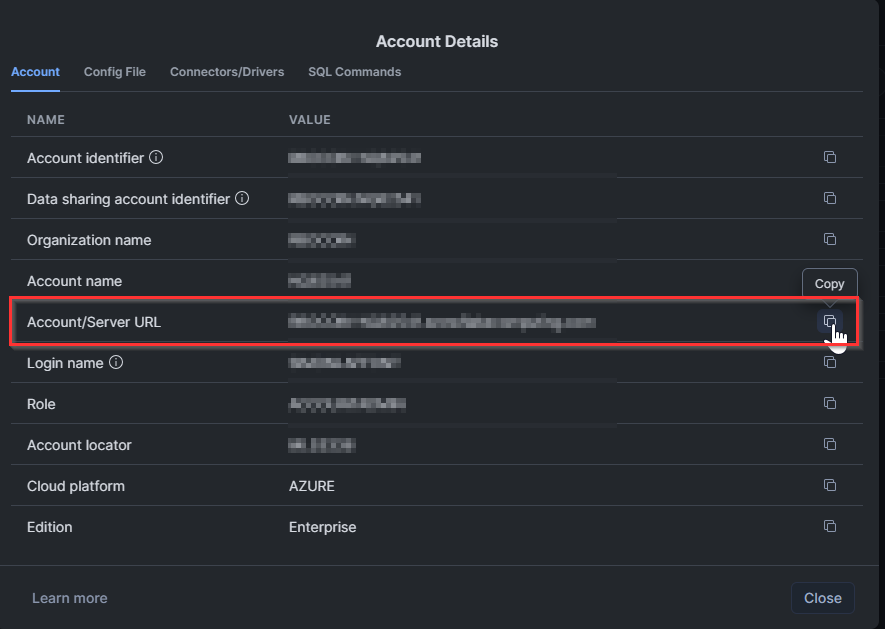
Copy your Account/Server URL:
2.2 Create the External OAuth integration
Replace <ISSUER_FROM_TOKEN> with the iss value obtained in step 1.6:
CREATE OR REPLACE SECURITY INTEGRATION DEMO_EXTERNAL_OAUTH
  TYPE = EXTERNAL_OAUTH
  ENABLED = TRUE
  EXTERNAL_OAUTH_TYPE = AZURE
  EXTERNAL_OAUTH_ISSUER = '<ISSUER_FROM_TOKEN>'
  EXTERNAL_OAUTH_JWS_KEYS_URL = 'https://login.microsoftonline.com/<TENANT_ID>/discovery/v2.0/keys'
  EXTERNAL_OAUTH_AUDIENCE_LIST = ('<APP_ID_URI>')
  EXTERNAL_OAUTH_TOKEN_USER_MAPPING_CLAIM = 'sub'
  EXTERNAL_OAUTH_SNOWFLAKE_USER_MAPPING_ATTRIBUTE = 'login_name'
  EXTERNAL_OAUTH_ANY_ROLE_MODE = 'ENABLE';
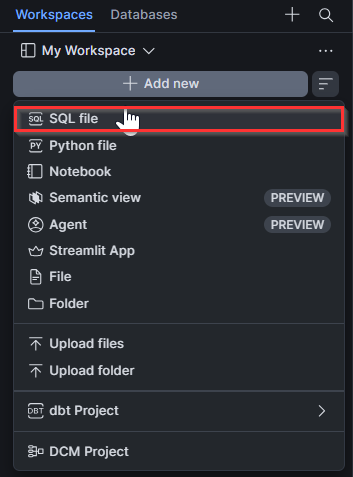
You can run this SQL query in a Snowsight worksheet, as shown below:
2.3 Create the mapped user
Replace <SUB_FROM_TOKEN> with the sub value obtained in step 1.6:
CREATE OR REPLACE USER DEMO_SVC
  LOGIN_NAME = '<SUB_FROM_TOKEN>'
  DEFAULT_ROLE = <ROLE>;
To confirm the user was created correctly, run SHOW USERS LIKE 'DEMO_SVC';
The login_name column must exactly match the sub value from step 1.6. This is what lets Snowflake link an incoming token to this user. If they don't match, the connection will fail with a 401 error.
2.4 Grant privileges
Make sure <ROLE> can reach your existing objects (adjust names to your data). Run each of the following statements separately:
GRANT USAGE ON WAREHOUSE <YOUR_WAREHOUSE> TO ROLE PUBLIC;
GRANT USAGE ON DATABASE SALES_DB TO ROLE PUBLIC;
GRANT USAGE ON SCHEMA SALES_DB.ANALYTICS TO ROLE PUBLIC;
GRANT SELECT ON TABLE SALES_DB.ANALYTICS.customer_orders TO ROLE PUBLIC;
For a role other than PUBLIC, also run GRANT ROLE <ROLE> TO USER DEMO_SVC;
2.5 Validate the setup (optional)
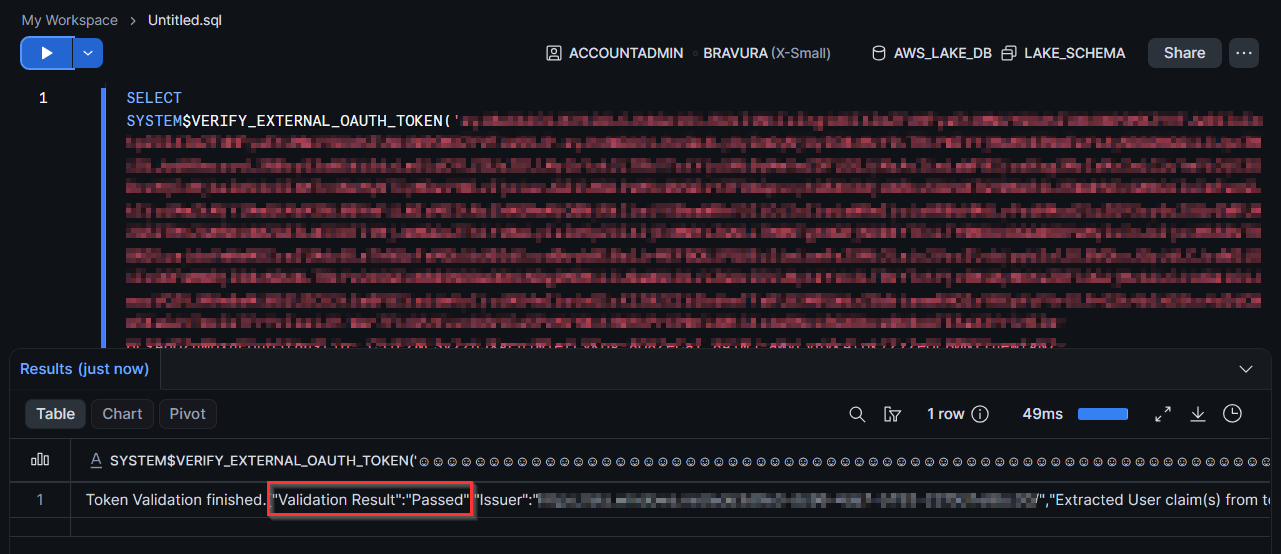
To make sure the entire Snowflake configuration is correct, you can validate an actual token by running the following query:
SELECT SYSTEM$VERIFY_EXTERNAL_OAUTH_TOKEN('<PASTE_ACCESS_TOKEN>');
A Validation Result: Passed, showing your sub as the extracted user, confirms the Snowflake side is correctly configured:
Part 3 - Verify the connection with a direct API call
Before configuring Elements Connect, confirm the token and Snowflake work together. This isolates any Snowflake-side issue from Elements Connect.
Tokens expire (~1 hour), so generate a new one (at step 1.6) if a test fails after some time.
Run the following curl queries in any terminal or command-line interface:
curl -X POST "<SNOWFLAKE_URL>/api/v2/statements" \
  -H "Authorization: Bearer <ACCESS_TOKEN>" \
  -H "X-Snowflake-Authorization-Token-Type: OAUTH" \
  -H "Content-Type: application/json" \
  -d '{"statement":"SELECT * FROM SALES_DB.ANALYTICS.customer_orders LIMIT 10","warehouse":"<YOUR_WAREHOUSE>","role":"PUBLIC"}'
A response containing "message": "Statement executed successfully." and a data array means the entire Entra → Snowflake chain works.
Part 4 - Elements Connect
4.1 Create the REST API datasource
-
Access Elements Connect administration:
-
Click on "Apps" in the top bar menu, then select "Elements Connect".
-
Click on "Data sources" to manage your connections.
-
-
Create a new data source:
-
Click on "Create data source".
-
Select "REST API" as the data source type and click "Next".
-
Provide a unique name (for example,
Snowflake API) and click "Create".
-
4.2 Configure the REST API datasource
Server Details:
-
API Base URL:
<SNOWFLAKE_URL>/api/v2/ -
API Test URL:
<SNOWFLAKE_URL>/api/v2/warehouses
Custom Headers:
|
Name |
Value |
|---|---|
|
|
|
|
|
|
|
|
|
Do not add a custom Authorization header. Elements Connect adds Authorization: Bearer <token> automatically from the OAuth flow. Adding your own can result in a duplicate header, which the server may reject.
Authentication:
-
Mode: OAuth 2 — Grant type: Client credentials
-
Token URL:
https://login.microsoftonline.com/<TENANT_ID>/oauth2/v2.0/token -
Client ID:
<CLIENT_ID> -
Client secret:
<CLIENT_SECRET> -
Credentials: Send in request body
-
Scopes:
<APP_ID_URI>/.default
Click the "Test connection" button to ensure that everything is working properly.
Once the connection test is successful, save your datasource configuration. You're all set!
Going further
The Snowflake datasource allows you to populate connected fields directly from your data warehouse. Below are some use cases and example endpoints to help you make the most of the integration.
Endpoints examples
Once your datasource is configured, you can create connected fields and retrieve various types of information from Snowflake. Here are some example API calls:
|
Name |
Description |
URL |
|---|---|---|
|
Run a query (POST) |
Execute a SQL statement and fetch its rows |
|
|
List warehouses (GET) |
List the warehouses available to the role |
|
|
List databases (GET) |
List the databases available to the role |
|
You can find the full list of available endpoints in the Snowflake documentation here: https://docs.snowflake.com/en/developer-guide/snowflake-rest-api/reference
Field configuration example
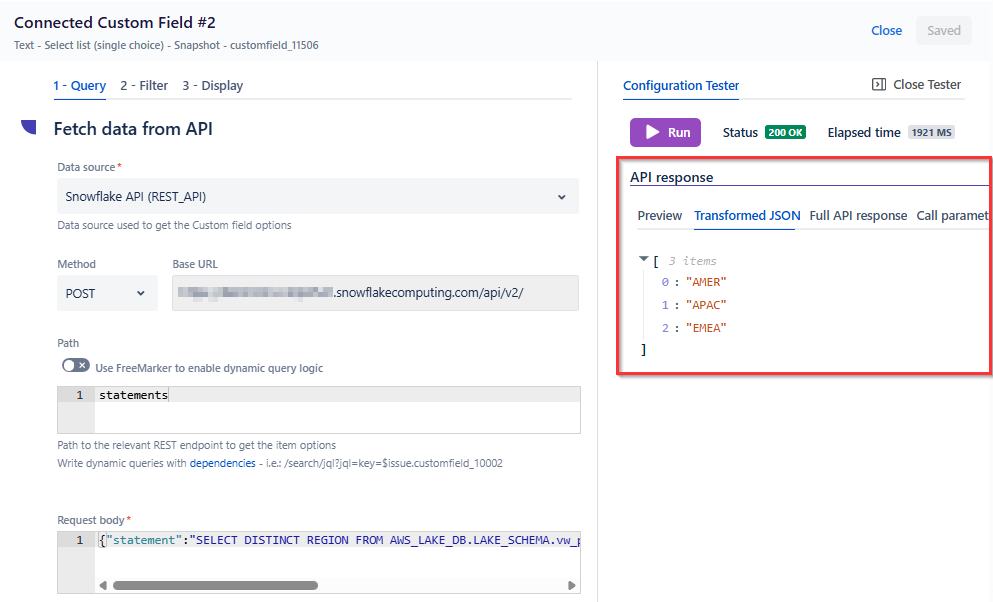
Once the datasource is configured, you can create connected fields backed by SQL queries. For example, you can create a single-choice select list populated from your data warehouse.
Create a Select list (single choice) connected field and configure it as follows:
-
Query tab:
-
Data source: your Snowflake datasource
-
Method:
POST -
Path:
statements -
Request body:
{"statement":"SELECT DISTINCT REGION FROM SALES_DB.ANALYTICS.customer_orders ORDER BY REGION","warehouse":"<YOUR_WAREHOUSE>","role":"PUBLIC"}
-
-
Filter tab:
-
Location of the Custom field options in the response/
$.data
-
-
Display tab:
-
Template:
${row}
-
Then, run a test using the Configuration Tester and check that the values are returned correctly.
Troubleshooting
Datasource connectivity issues
|
Symptom |
Where |
Fix |
|---|---|---|
|
|
Entra |
Re-enter the client secret, and make sure Credentials is set to Send in request body (Entra rejects the secret when sent as Basic Auth) |
|
|
Snowflake |
The token was issued by Entra but rejected by Snowflake. Check the following:
|
|
|
Snowflake |
The role is not being passed. Add the |
|
|
Snowflake |
Either the object does not exist, or the role lacks privileges on it. Confirm it exists ( |
How to retrieve multiple values in a nested array format
Snowflake’s API uses an uncommon data structure: instead of returning standard objects enclosed in {}, it returns the data as nested arrays (using []), enclosed within another array.
-
Ideally, the data should be structured as follows:
"data": [ { "ID", "VALUE" } ] -
However, Snowflake returns the data in the following format:
"data": [
    [
        "ID",
        "VALUE"
    ]
]
This nested array structure is currently not supported by Elements Connect.
As a workaround, you can transform the data into a structure that Elements Connect can process by using the OBJECT_CONSTRUCT() function.
For example, with the following query:
SELECT r_regionkey AS id, r_name AS name FROM snowflake_sample_data.tpch_sf1.region
You can use the following query instead:
SELECT OBJECT_CONSTRUCT('id',r_regionkey , 'name',r_name) AS JSON_OBJ FROM snowflake_sample_data.tpch_sf1.region
The data will then be returned in the following format:
{
    "data": [
        [
            "{\"id\": 0,\"name\": \"AFRICA\"}"
        ],
        [
            "{\"id\": 1,\"name\": \"AMERICA\"}"
        ],
        [
            "{\"id\": 2, \"name\": \"ASIA\"}"
        ]
    ]
}
You can then retrieve these values from the template as follows:
${row?eval.id} - ${row?eval.name}