
Salesforce supports several OAuth 2.0 authentication flows. In this guide, we will cover the following two methods:
-
Authorization Code flow, which requires a Salesforce user to sign in and authorize access to their Salesforce data.
-
Client Credentials flow, which enables server-to-server authentication without requiring interactive user authorization.
For each authentication method, we will explain the required Salesforce configuration, and steps to be followed on Elements Connect side to configure the datasource.
Authorization code authentication
Create an external client app on Salesforce
Step 1: Log in to your Salesforce account.
Step 2: Navigate to the Salesforce Setup by clicking on the gear icon in the upper-right corner and selecting "Setup" from the dropdown menu.
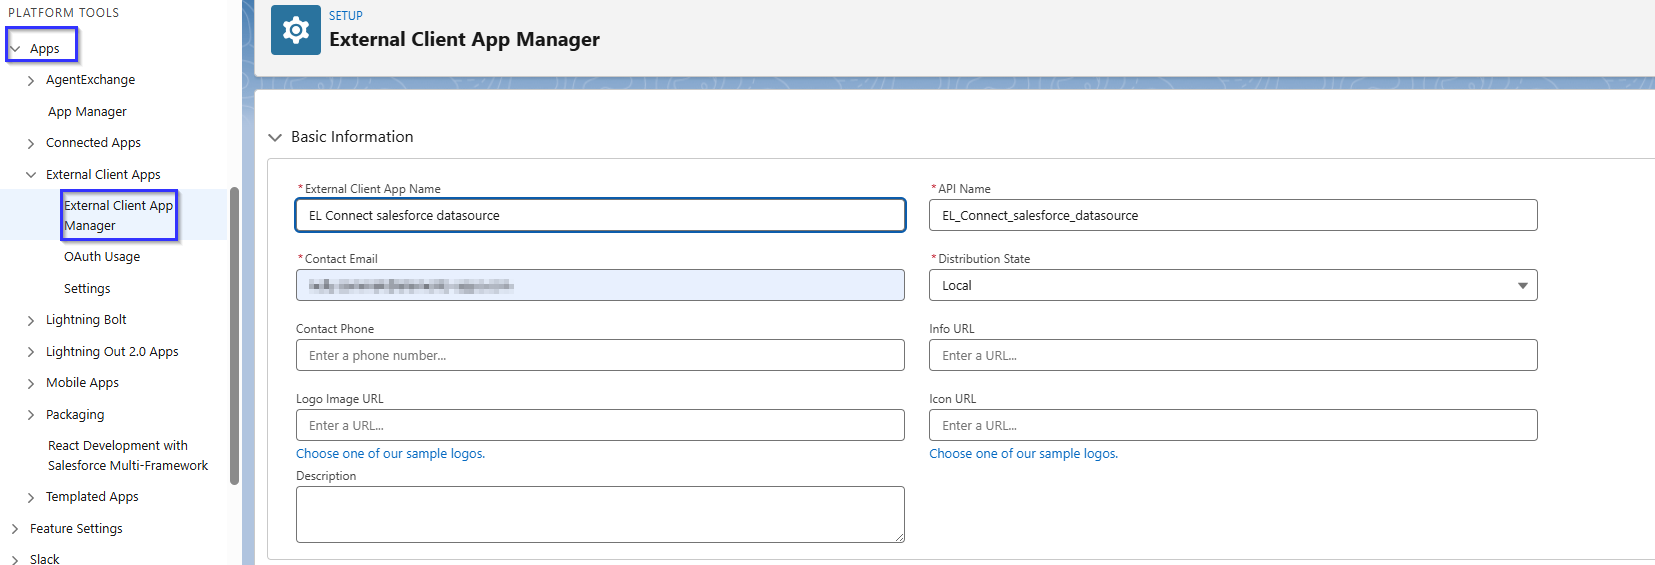
Step 3: Navigate to “Apps” → “External Client Apps” → “External Client App Manager” then click on “New External Client App” button on the upper-right corner.
Step 4: Fill in the required information:
Step 4.1: Under the “Basic Information” section
-
External Client App Name: Provide a name for your app.
-
API Name: The API name will be auto-populated based on the connected app name.
-
Contact Email: Enter your email address.
-
Distribution State: Keep it as it’s (Local)
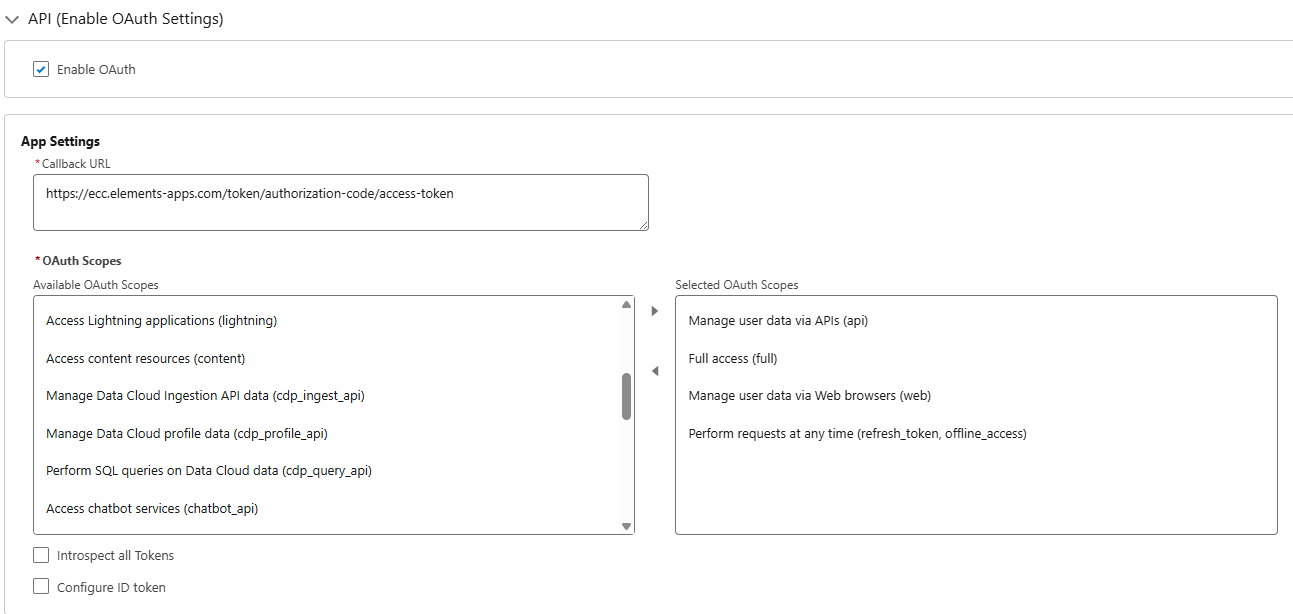
Step 4.2: Under the "API (Enable OAuth Settings)" section, check “Enable OAuth” then configure the following settings in the different sections:
App Settings:
-
Callback URL: Enter https://ecc.elements-apps.com/token/authorization-code/access-token
-
Selected OAuth Scopes: Choose the required OAuth scopes based on the permissions your app needs (In this example, we select the “full” scope).
Always make sure to have at least these permissions selected:-
Full access (full)
-
Manage user data via APIs (api)
-
Manage user data via Web browsers (web)
-
Perform requests at any time (refresh_token, offline_access)
-
Flow Enablement
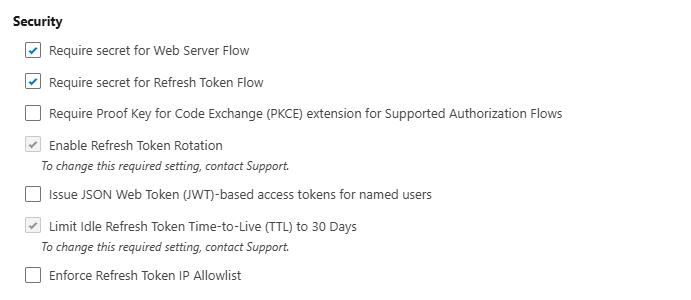
Disable the “Require Proof Key for Code Exchange (PKCE)”
Security
Activate the “Enable Authorization Code and Credentials Flow” option
Step 5: Click on the "Create" button
Step 6: Go back to “External Client Apps” and the app will be listed under “External Client App Manager“
Step 7: Click on the app name and go to “Settings” tab, under the “OAuth settings”, click on “Consumer Key and Secret”
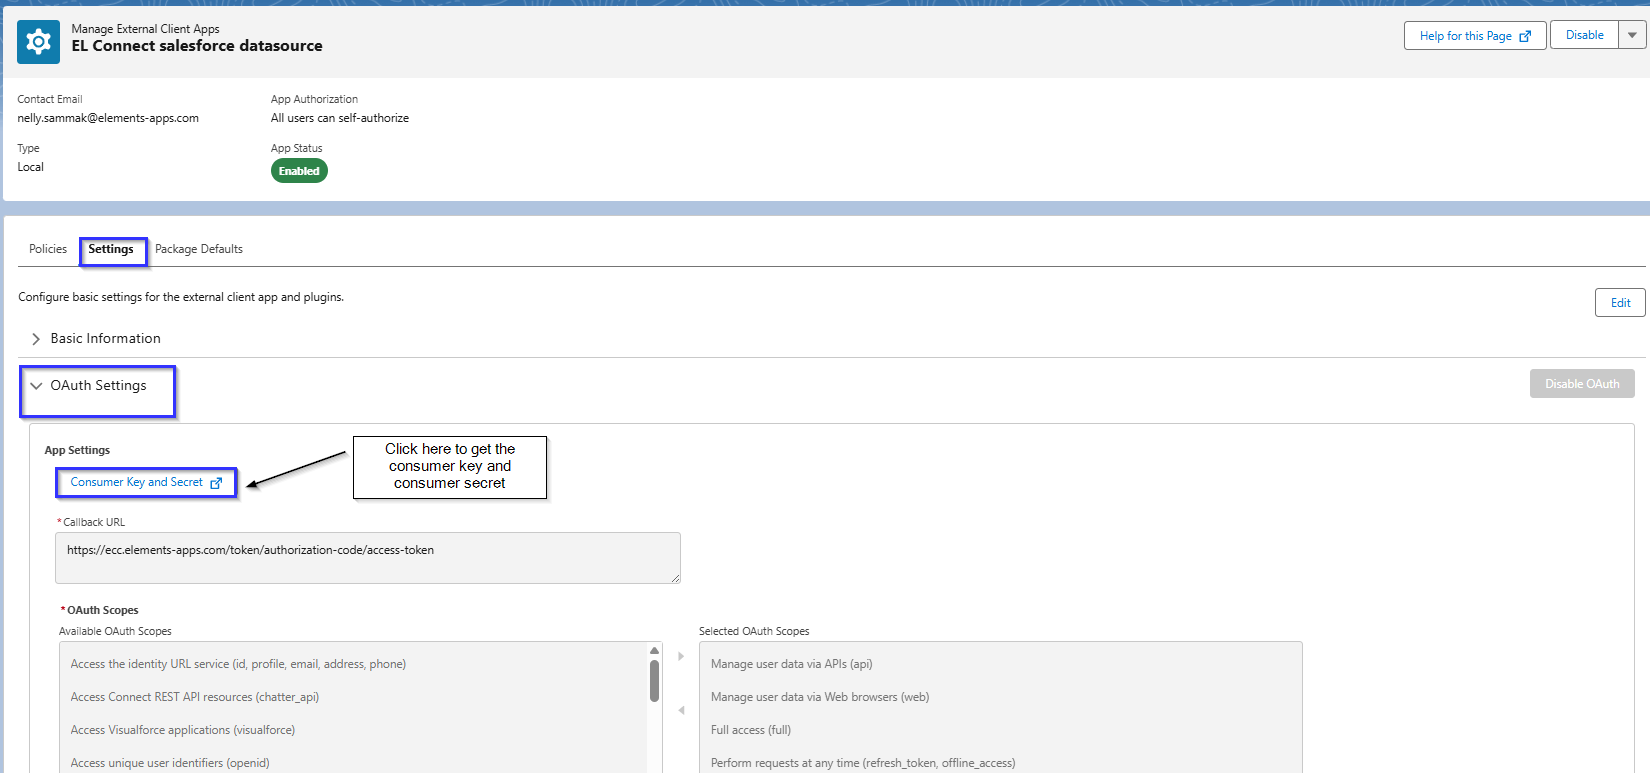
Step 8: Note down the "Consumer Key" and "Consumer Secret" values as they’ll be used for authentication with Salesforce when creating the datasource.
Create REST API datasource on Elements Connect
Make sure you have Elements Connect installed on your Jira instance and that you have administrator permissions to access to Elements Connect administration page
From your Jira instance, under “Apps”, click on Elements Connect and go to 'Data sources” tab.
Click on “Create data source”, choose the type as “REST API” then click on “Next” button.
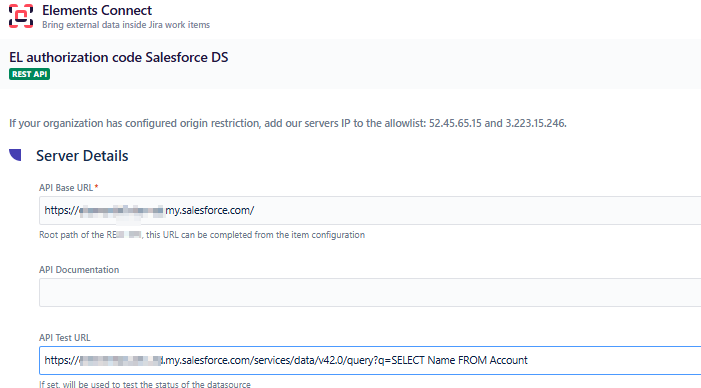
Set a Name and Description of your choice and click “Create” and configure the relevant fields:
-
Base URL:
https://yourcustomurl.my.salesforce.com/ -
API Documentation: https://developer.salesforce.com/docs/atlas.en-us.api_rest.meta/api_rest/intro_rest.htm
-
API Test URL:
SQLhttps://yourcustomurl.my.salesforce.com/services/data/v65.0/query?q=SELECT Name FROM Account
-
Custom Headers: Nothing to configure
-
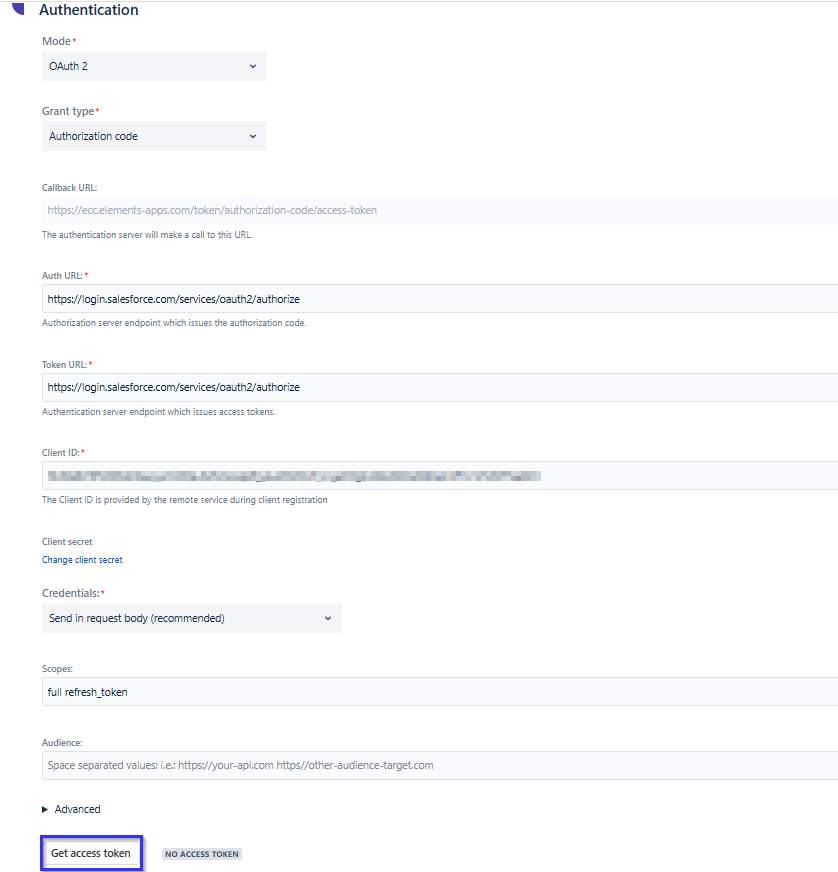
Authentication
-
Mode: OAuth 2
-
Grant type: Authorization code
-
Access Token URL: https://login.salesforce.com/services/oauth2/token
-
Client ID: Copy the Consumer Key from your Salesforce app
-
Client Secret: Copy the Consumer Secret from your Salesforce app
-
Credentials: Send in request body (recommended)
-
Scope: Add “full” (or any other access you've decided to grant) and “refresh_token” (not included in any other scope, mandatory to avoid manual refresh of tokens)
full refresh_token
-
Be aware that the scope configured in your datasource must match the Selected OAuth Scopes you have defined in your Salesforce app.
Specifically, if the “Full access (full)” scope is not included in the Salesforce app, the “full” scope should not be added in Elements Connect either.
If you are using a Salesforce sandbox environment, the Authentication URL and Access Token URL change. Please use the following:
-
Click “Get access token”
-
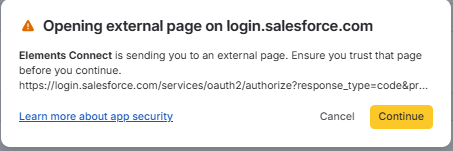
You will then be prompted to enter your Salesforce credentials and allow the app to communicate with Elements Connect
-
Click “Allow”, then you should see on the screen a message
JavaScriptAuthentication successful. You can now close this window. -
Once the access token status is valid, the status will be “VALID ACCESS TOKEN”
-
Save your data source.
Client credentials authentication
Create an integration user
We recommend validating this step with your Salesforce administrator
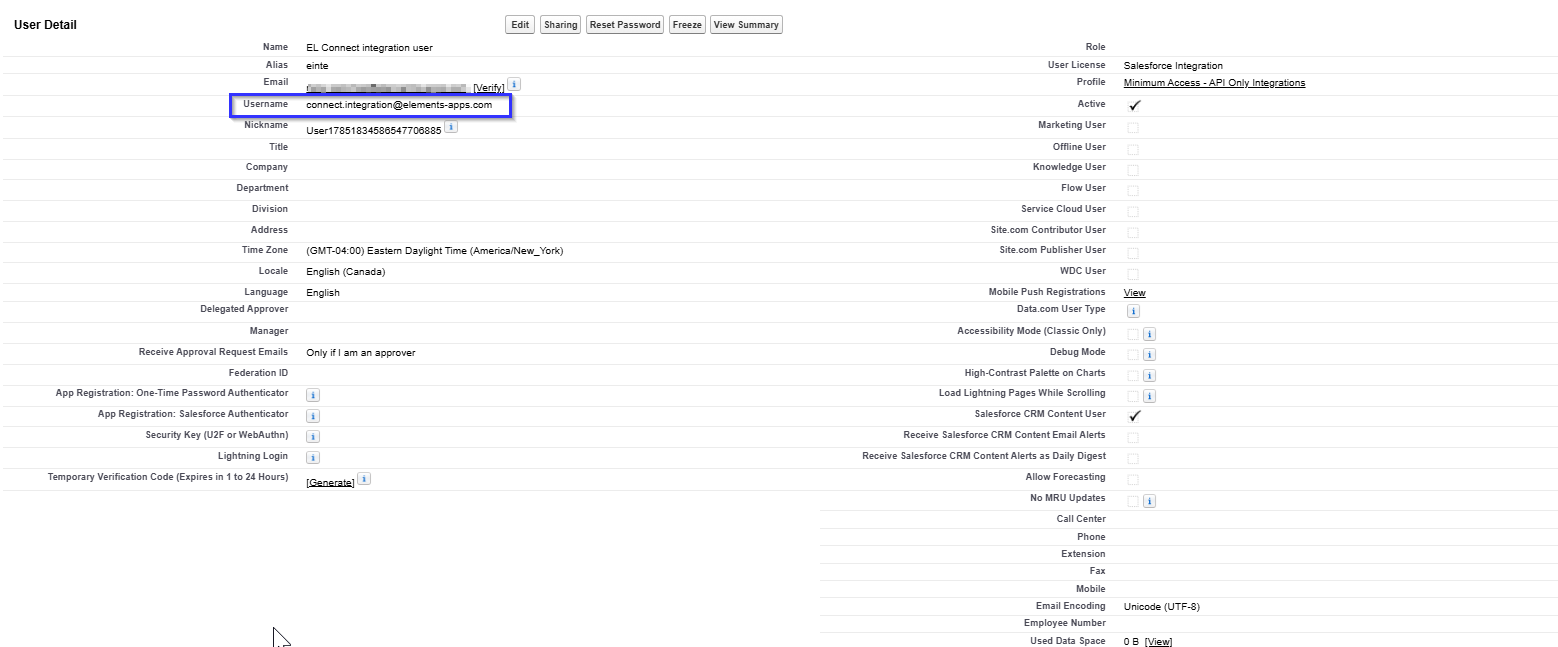
For the Client Credentials authentication flow, it is recommended to create a dedicated Salesforce integration user rather than using a personal account. This user acts as the Run As User for the External Client App (this will be explained in below steps), and all API requests made by Elements Connect are executed with this user's permissions. Assign only the permissions required to access the data needed by your datasource (principle of least privilege) to improve security and simplify administration.
-
Navigate to the Salesforce Setup by clicking on the gear icon in the upper-right corner and selecting "Setup" from the dropdown menu.
-
Navigate to “Users” → “Users” then click on “New User”
-
First Name and Last Name: set a name of your choice
-
Alias will be automatically generated after filling first and last name.
-
Email: use a real accessible email address
-
Username: it needs to be unique and in email format but necessarily referring to an actual email address
-
Role: Noe specified
-
User license: Salesforce Integration
-
profile: “Minimum Access - API Only Integrations”
-
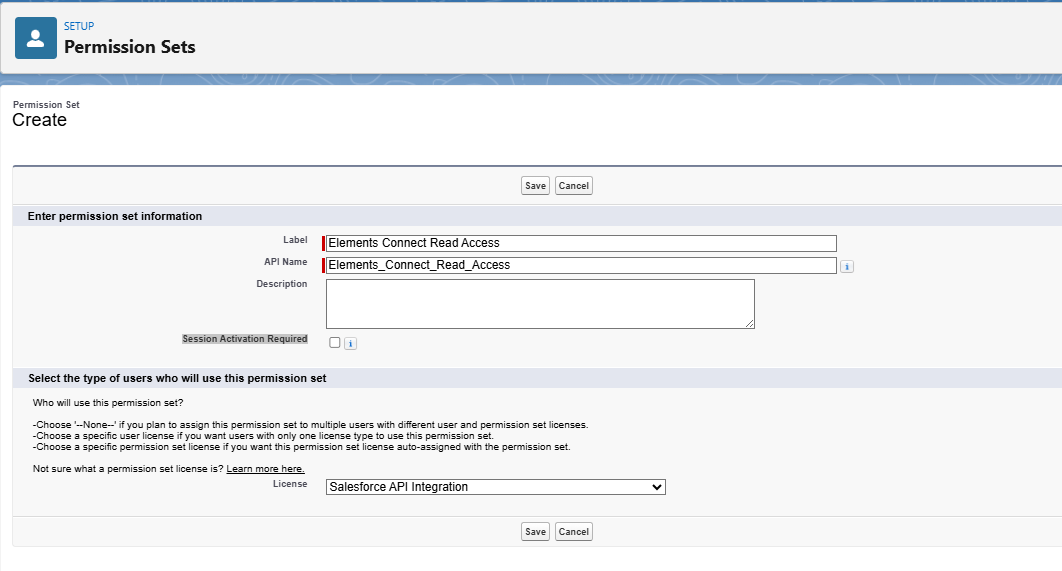
Create a permission set
-
Navigate to the Salesforce Setup by clicking on the gear icon in the upper-right corner and selecting "Setup" from the dropdown menu.
-
Navigate to “Users” → “Permissions set” then click on “New”
-
Label: assign any label of your choice like
“Elements Connect Read Access" -
API Name: will be generated automatically
-
License: Select the same license as your integration user.
-
If the user has a Salesforce Integration license, choose Salesforce API Integration.
-
-
-
Click Save.
Grant object permissions
Open the Permission created previously and click Object Settings.
-
Select the Salesforce object that Elements Connect will query (for example, Account).
-
Click “Edit”.
-
Enable “Read”.
-
Click “Save”.
-
Repeat for every required object (examples: Account, Contact, Opportunity, Lead, …)
Grant field permissions
Within each object accessed previously:
-
Open the object.
-
Click Edit.
-
Under Field Permissions, grant Read Access only to the fields Elements Connect needs.
-
Click Save.
Assign the Permission Set
Open the Permission Set.
-
Click “Manage Assignments” then click “Add Assignments”.
-
Select the integration user created previously (check the checkbox on the left).
-
Click “Assign”.
Create an external client app on Salesforce
Step 1: Log in to your Salesforce account.
Step 2: Navigate to the Salesforce Setup by clicking on the gear icon in the upper-right corner and selecting "Setup" from the dropdown menu.
Step 3: Navigate to “Apps” → “External Client Apps” → “External Client App Manager” then click on “New External Client App” button on the upper-right corner.
Step 4: Fill in the required information:
Step 4.1: Under the “Basic Information” section
-
External Client App Name: Provide a name for your app.
-
API Name: The API name will be auto-populated based on the connected app name.
-
Contact Email: Enter your email address.
-
Distribution State: Keep it as it’s (Local)
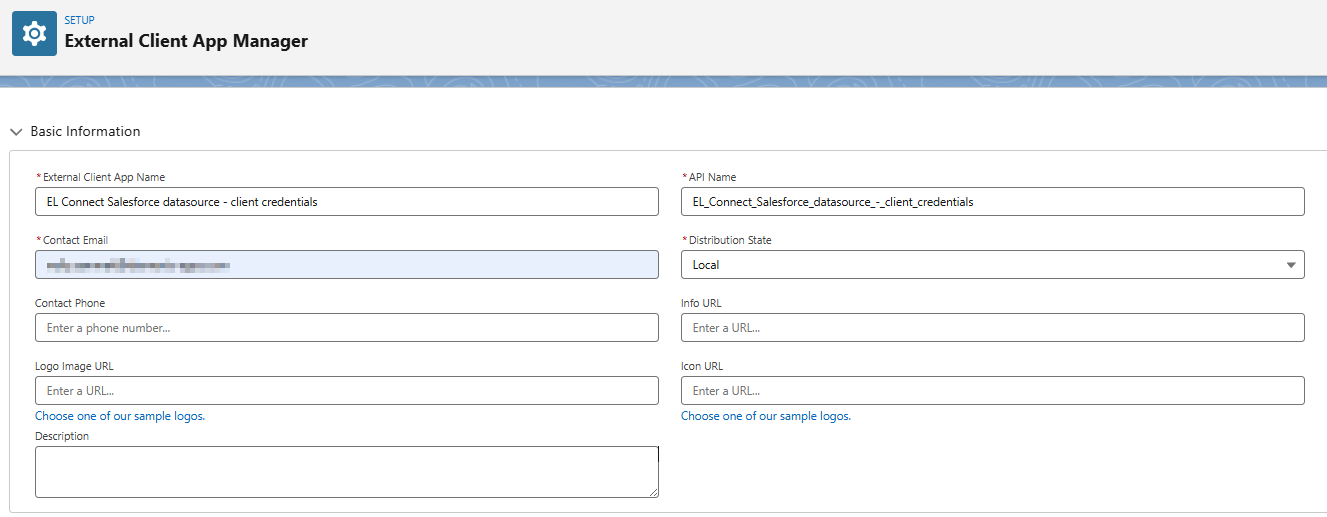
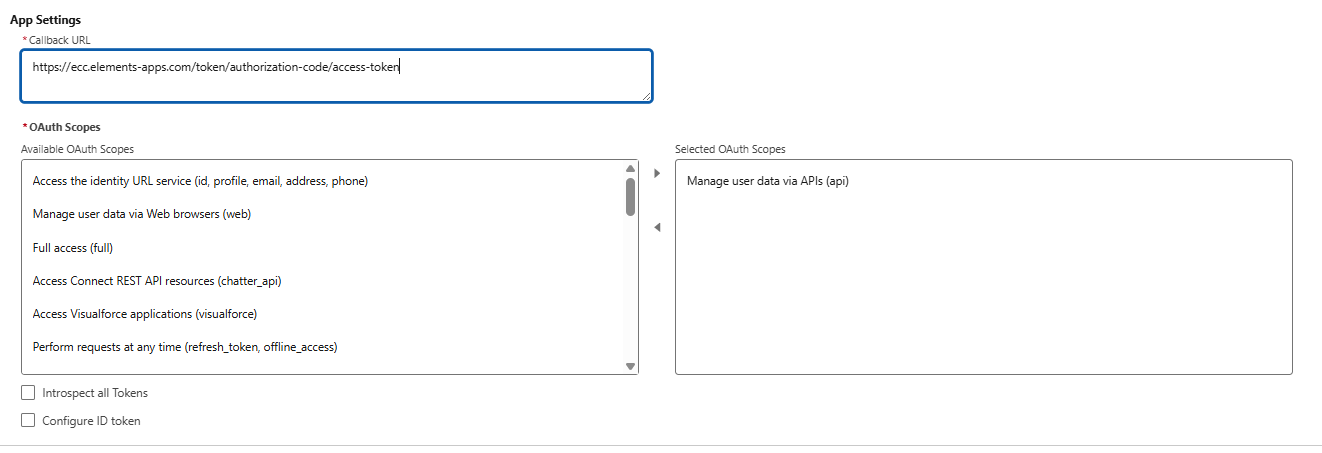
Step 4.2: Under the "API (Enable OAuth Settings)" section, check “Enable OAuth” then configure the
App Settings:
-
Callback URL: Enter https://ecc.elements-apps.com/token/authorization-code/access-token
-
Selected OAuth Scopes: Choose the required OAuth scopes based on the permissions your app needs (in this example, we select the “Manage user data via APIs (api)” scope).
Flow Enablement
Check 'Enable Client Credentials Flow”, you will be prompt to confirm your selection. Click “Ok”
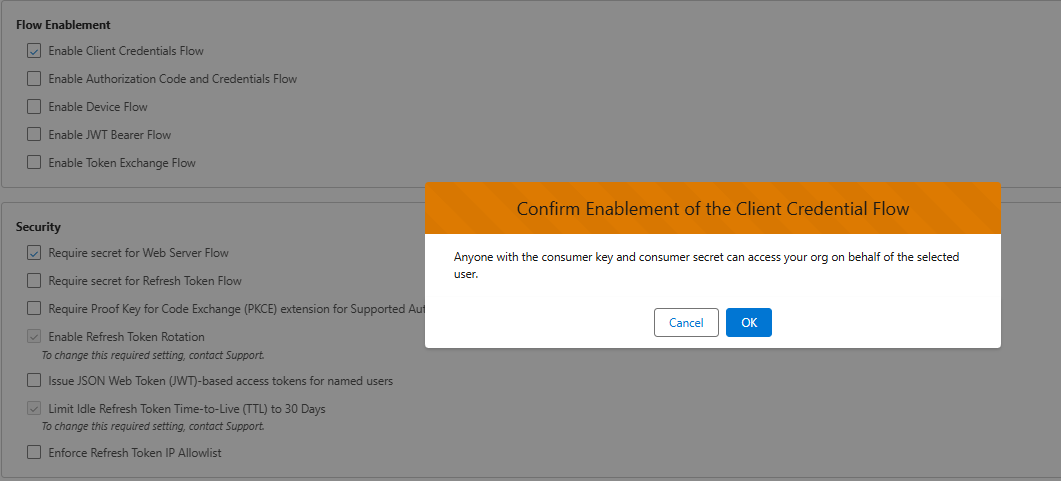
Security
Select 'Require secret for Web Server Flow” and uncheck other options (some options are pot editable, see previous screenshot).
Step 5: Click on the "Create" button
Step 6: Go back to “External Client Apps” and the app will be listed under “External Client App Manager“
Step 7: Click on the app name and go to “Policies” tab, click “Edit”
Step 7.1: Under “App Policies”, keep “Start Page” set to “None”
Step 7.2: Under “OAuth Policies”
-
Plugin Policies: set “Permitted Users' to “All users can self authorized”
-
OAuth Flows and External Client App Enhancements: check “Enable Client Credentials Flow”
-
“Run As (Username)”: use a user with needed permissions
-
-
App Authorization: nothing to configure (keep as it is)
Get the Consumer key and secret
-
Go back to “External Client Apps” and the app will be listed under “External Client App Manager“
-
Click on the app name and go to “Settings” tab, under the “OAuth settings”, click on “Consumer Key and Secret”
-
Note down the "Consumer Key" and "Consumer Secret" values as they’ll be used for authentication with Salesforce when creating the datasource.
Create REST API datasource on Elements Connect
Make sure you have Elements Connect installed on your Jira instance and that you have administrator permissions to access to Elements Connect administration page
From your Jira instance, under “Apps”, click on Elements Connect and go to 'Data sources” tab.
Click on “Create data source”, choose the type as “REST API” then click on “Next” button.
Set a Name and Description of your choice and click “Create” and configure the relevant fields:
-
Base URL:
https://yourcustomurl.my.salesforce.com/services/data/v65.0 -
API Documentation: https://developer.salesforce.com/docs/atlas.en-us.api_rest.meta/api_rest/intro_rest.htm
-
API Test URL:
SQLhttps://yourcustomurl.my.salesforce.com/services/data/v65.0/query?q=SELECT Name FROM Account
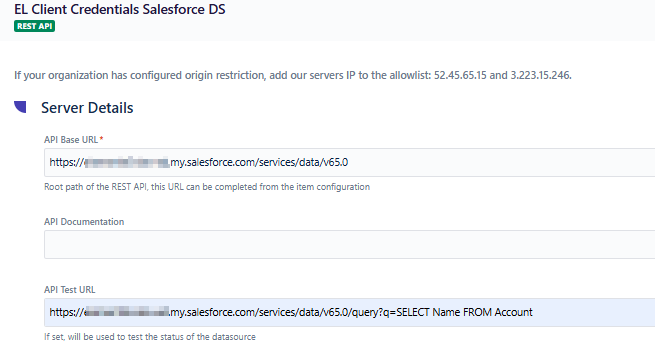
-
Custom Headers: Nothing to configure
-
Authentication
-
Mode: OAuth 2
-
Grant type: Client Credentials
-
Token URL:
https://yourcustomurl.my.salesforce.com/services/oauth2/token -
Client ID: Copy the Consumer Key from your Salesforce app
-
Client Secret: Copy the Consumer Secret from your Salesforce app
-
Credentials: Send in request body (recommended)
-
Scope: empty
-
-
Click “Test connection”
-
If the configuration was correct, you should see the message “Connection to datasource established successfully”